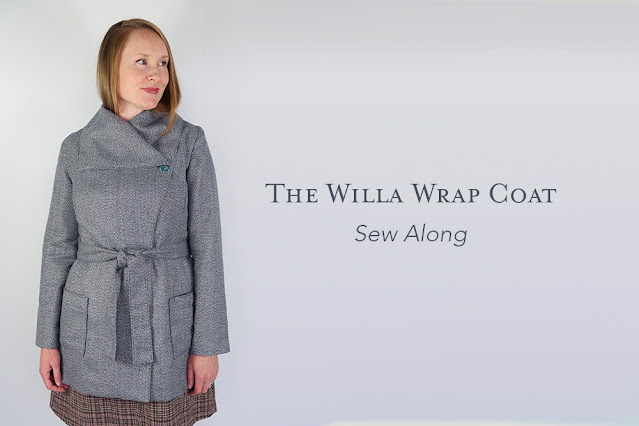
Welcome to the first official post in the Willa Wrap Coat Sew Along!
Although the Sew Along doesn't officially start until January 18th, I wanted to pop this post up a bit earlier so that you could start thinking about the kind of fabrics you might want to use for your final coat. I say 'final' because of course, I recommend making a quick toile of your coat first. Which leads me too...
Fabric Options
Toile Fabric:
While you can use calico (muslin) to make a toile of your coat - as this is traditionally what is used when making toile's for other garments - you do need to be careful about over fitting in a fabric like this.
Generally, your outer coat fabric is going to be much heavier/thicker than calico, and it can be easy to think your coat may be too big/bagging in places it shouldn't etc when in fact, once it's fully interfaced, constructed and lined, then put over the top of any garments you might be wearing underneath, you may find it just right.
So, if you can, finding a cheaper fabric that is slightly heavier for your toile is recommended, but, realistically, you'll have lighter/cheaper fabric laying around that you'll probably want to use instead. So, just keep in mind that it's really important you don't over fit your toile in a fabric like that.
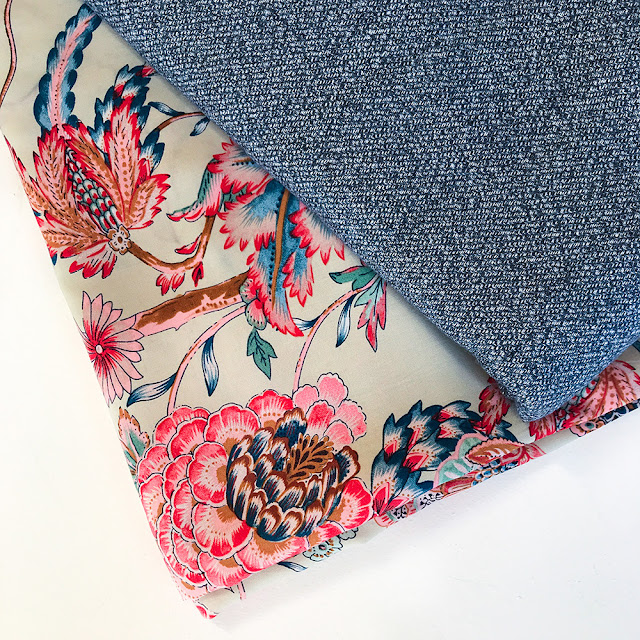
A close up of the woven marle-effect wool blend outer fabric and rayon lining used in my (Jen) Willa Wrap Coat Sample.
Main Outer Coat Fabric:
There are so many beautiful coat options out there! I love a traditional melton wool (which is essentially a felted wool, used in Kyla's Cream Willa Wrap Coat sample) as well as herringbone, tweed and boucle.
You're looking for a fabric that is mid-weight with drape and some body to keep that collar looking crisp, whether it's buttoned up in the funnel neck style or the collar is left wide open.
Opting for a wool blend will give your coat warmth and drape while also keeping it light and easy to construct. The fabric I used for my sample (blue) has texture woven into it using strands of blue and white wool/polyester blend threads. It's silky to the touch and the weave pattern gives an interesting look to the fabric, along with a marle effect with the two colours intertwined.
Quilted fabrics would also be a great option and give your coat some beautiful texture - just watch out that the finished fabric isn't too thick/heavy. There are some beautiful quilted denims around, as well as velvets, linen and metallics.
And for a much lighter weight coat, you could try using a mammoth flannel, it's thicker than normal PJ flannel, giving you a super lightweight coat, while also still being snuggly warm and easy to wash and wear. In this instance, you could also consider adding an additional layer between your outer and lining fabrics. I would suggest using any additional fabric as an interlining paired with your outer coat pattern pieces. You essentially cut your outer coat and interlining fabric together and treat each piece as one, keeping your lining separate.
And finally, you could also opt for a sweatshirt knit - these have a slight stretch to them and tend to be a bit lighter in weight than traditional coat fabrics. They are floppier in their structure, but if you use a good interfacing, you'll get the hold at the front you need for a crisp collar.
Here are a few links to some lovely fabrics from your favourite local haunts:
There are so many more lovely Willa appropriate fabrics available from other JLH Stockists as well, find your local options here.
Lining Fabric:
I opted to use rayon for all of my linings - it's relatively inexpensive (unlike silk), comes in a huge range of colours and prints and is still light-weight and silky. It also doesn't fray as easily as many polyester fabrics and also breathes much better. Viscose is also another great, pocket-friendly, option.
If budget is not a priority, you can opt to splash out on silk, just watch it around any steamy/hot irons, and make sure you finish all of the seams to keep it in tip-top shape for a coat that will last you many years.
Polyester linings are inexpensive and a great option for if you're just wanting to see whether coat-making is your jam, without making it an expensive exercise. You can always re-line your coat later if it becomes a staple in your wardrobe and you're wanting something with a bit more breathability.
Kyla's cream flecked melton wool Willa Wrap Coat with a spotty honey coloured rayon lining.
Interfacing:
I recommend using a light- to mid-weight iron on interfacing. The one I purchased also had a slight stretch to it (it's a knit interfacing) which is great if working with fabrics like wool coatings and sweat-shirting or a fabric that has texture woven into it (like boucle), as it gives body and structure without effecting the drape and movement of the fabric. The shop I purchased from has since sold out of what I bought but it was similar to this.
If you're using something more stable like a quilted cotton or denim, then a plain interfacing is perfect here.
As a side note, in the instructions, the Centre Front Coat (pattern piece A) isn't interfaced around the collar/front because most of the time, the outer coat fabric that people will probably choose for a style like this means that adding additional thickness makes sewing hard (and isn't necessary).
However, if you choose a lighter/floppier outer fabric (like mammoth flannel or sweatshirting) then interfacing the centre front coat at the front/collar is a good idea. It will provide the additional structure that your fabric can't and will give you a lovely collar that will hold it's shape during wear. Use pattern piece F (Front Coat Facing) as a template, it doesn't fit exactly, but does the job!
While it can be tempting to interface your front facing when using a thicker/heavier fabric, some machines will struggle with the additional layer, especially if you're choosing to add buttonholes. So, keep that in mind, and perhaps do a test run on some scraps to see what your machine can handle.
Buttons/Snaps:
Buttons/belt loops/closures of any kind are completely optional for Willa. You can leave the coat open as is and it still looks beautiful. You can just use the belt to keep it closed and it works, but if you want extra hold at the waist and want to have the option of the cosy Funnel Neck style, then buttons or snaps are your friends here.
I recommend 2cm diametre buttons because they're an easy size to find and they tend to make a statement. You can opt for smaller or larger buttons here though. They can be shank buttons (copper jeans buttons would look amazing!) or flat round buttons, it's up to you!
If you don't want to insert buttonholes, you can use snap buttons. Just make sure that once your coat is fully constructed, that you can insert them into all of the layers you need too. That's 2 outer coat layers, one of which is interfaced (and possibly 2 if you're needing that additional structure) - so, I recommend testing this senario out first.
Lastly, if you don't want to add any buttons or snaps and prefer a cleaner front coat, you can opt for larger dress/skirt hooks that are sewn invisibly between the front wrap of the coat OR opt for a decorative shawl pin.
For this Sew Along, I'm using a beautiful forest green wool coating (80% wool with 20% polyester) and a rayon, with a slightly tropical vibe, as the lining. I haven't decided on buttons yet...
Useful Sewing Tools
Sewing Machine Needles:
Make sure you pick up a packet of heavy duty machine needles. If your machine is struggling (skipping stitches etc) and isn't improving after re-threading your machine, try either changing your needle to a new sharp one OR go up a needle size.
Tailor's Ham:
Tailor's hams are such useful pressing tools for all kinds of projects, not just coat sewing. If you don't have one, I have a free pattern for you to make your own here. Use your ham to gently press in curves from darts and sleeve heads in your set in sleeves. If you don't have a sleeve sausage, the ham can take it's place in many instances.
Press Cloths and Steamy Irons:
To stop any shine getting onto your lovely coat fabric when pressing/steaming seams (and to protect the plate on your iron!), make sure you use a press cloth. It doesn't have to be fancy - I use an old cotton sheet - just make sure it's light weight and made of a natural fabric (cotton is perfect).
And of course, an iron that gets nice and hot and provides lots of steam for setting seams will make your coat look professional as well as making it easier to construct.
Fancy Tools that are fun (but not necessary):
Walking Foot:
I cannot find a walking foot that will fit my Janome (though I'm sure they must have one...) so this isn't essential BUT can make thick coat sewing much easier on your machine. Since your machine only has feed dogs at the bottom, sometimes this can make the top layer of fabric not feed through the machine evenly. A walking foot effectively works as a feed dog from the top, making the fabric feed through the machine evenly at both the top and bottom.
Wooden Clapper:
A wooden clapper is a tailor's tool that is essentially a block of smooth, polished wood. Once you've steamed a seam, pop the clapper on top and press down until the fabric has cooled. It will give you a lovely flat and crisp seam allowance (or hem etc).
Again, I don't have one and have happily constructed all of my Willa Coats up until now without one, BUT I have since put in a request to my wood-working husband to make me one. Maybe it'll be ready in time for the start of the Sew Along...
Sleeve Sausage:
Like a Tailor's ham but long and slender, like, erm, a sausage. Pop it into your sleeve and press your long sleeve seam(s) open like a pro.
Hammer (not fancy, but definitely fun!):
If you don't have a wooden clapper, and you have a particularly thick section of coat (I'm looking at you front corners!) you can try steaming your seam with an iron, then gently hammering it into submission. Trust me, it works!
If you have any questions about fabric or tools, just send me an email - I can't wait to see what fabric combinations you've come up with come January!
You can purchase your Willa Wrap Coat sewing pattern directly from my shop here.
xx
J