Image Slider

The Sew Weekly Reunion - Faux Liberty Macaron

Wednesday, August 28, 2013
Faux Liberty Macaron11

Faux Liberty Macaron1

Faux Liberty  Macaron10

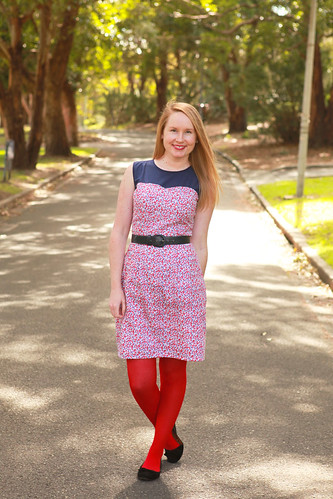
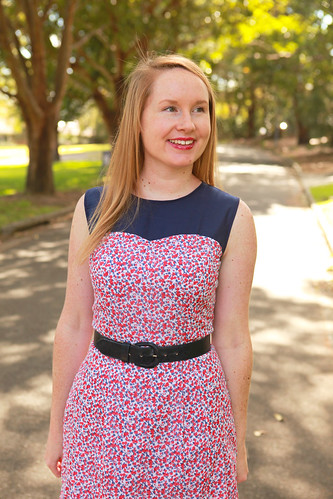
*This is not my One Pattern, Seven Bloggers Macaron. It's the second Macaron I made after I finished my first one because I loved the pattern so much!!

The Facts:
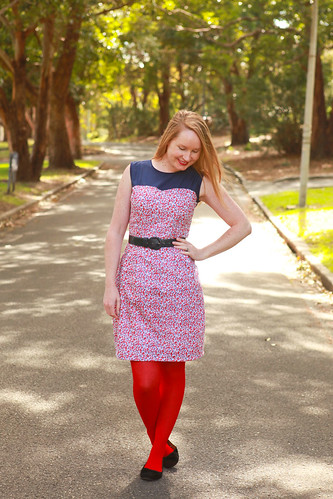
Fabric - Floral Cotton Lawn, Blue Poplin, White cotton Underlining
Notions - Invisible Zipper, Thread
Pantone Challenge Colours - Mykonos Blue and Samba
Pattern - Colette Patterns Macaron


Year - 2009 0r 2010 I think (?)
Time to complete - Over the course of 2 days
First Worn - 27th August 2013
Wear again? Of course!
Total Cost - $30

I loved reading The Sew Weekly. In fact, it is (was) probably one of my favourite sewing blogs. I started reading it when it was just Mena writing and talking about her weekly sewing adventures, and then she opened up the weekly sewing challenge to 4 other lovely sewing ladies and it got even better!

Sadly, The Sew Weekly ladies stopped posting as their lives, schedules and commitments changed, and my weekly burst of sewing inspiration was no longer.  Until...

They came back, baby! And they invited anyone and everyone along for the ride.

Faux Liberty Macaron5

Faux Liberty Macaron3

Faux Liberty Macaron9

I couldn't not sign up to be a part of the challenge, but the truth was, I didn't actually know if I would be able to participate. With our move looming ever closer, I was running out of time to finish the projects I had already committed too, without adding another onto my plate.

So, when they posted the challenge details on the 1st August, I was a little worried about what they would actually entail. You can imagine my relief when it was a pantone challenge, and 2 of the colours almost perfectly matched the fabric I had already picked out for my second version of the Macaron!

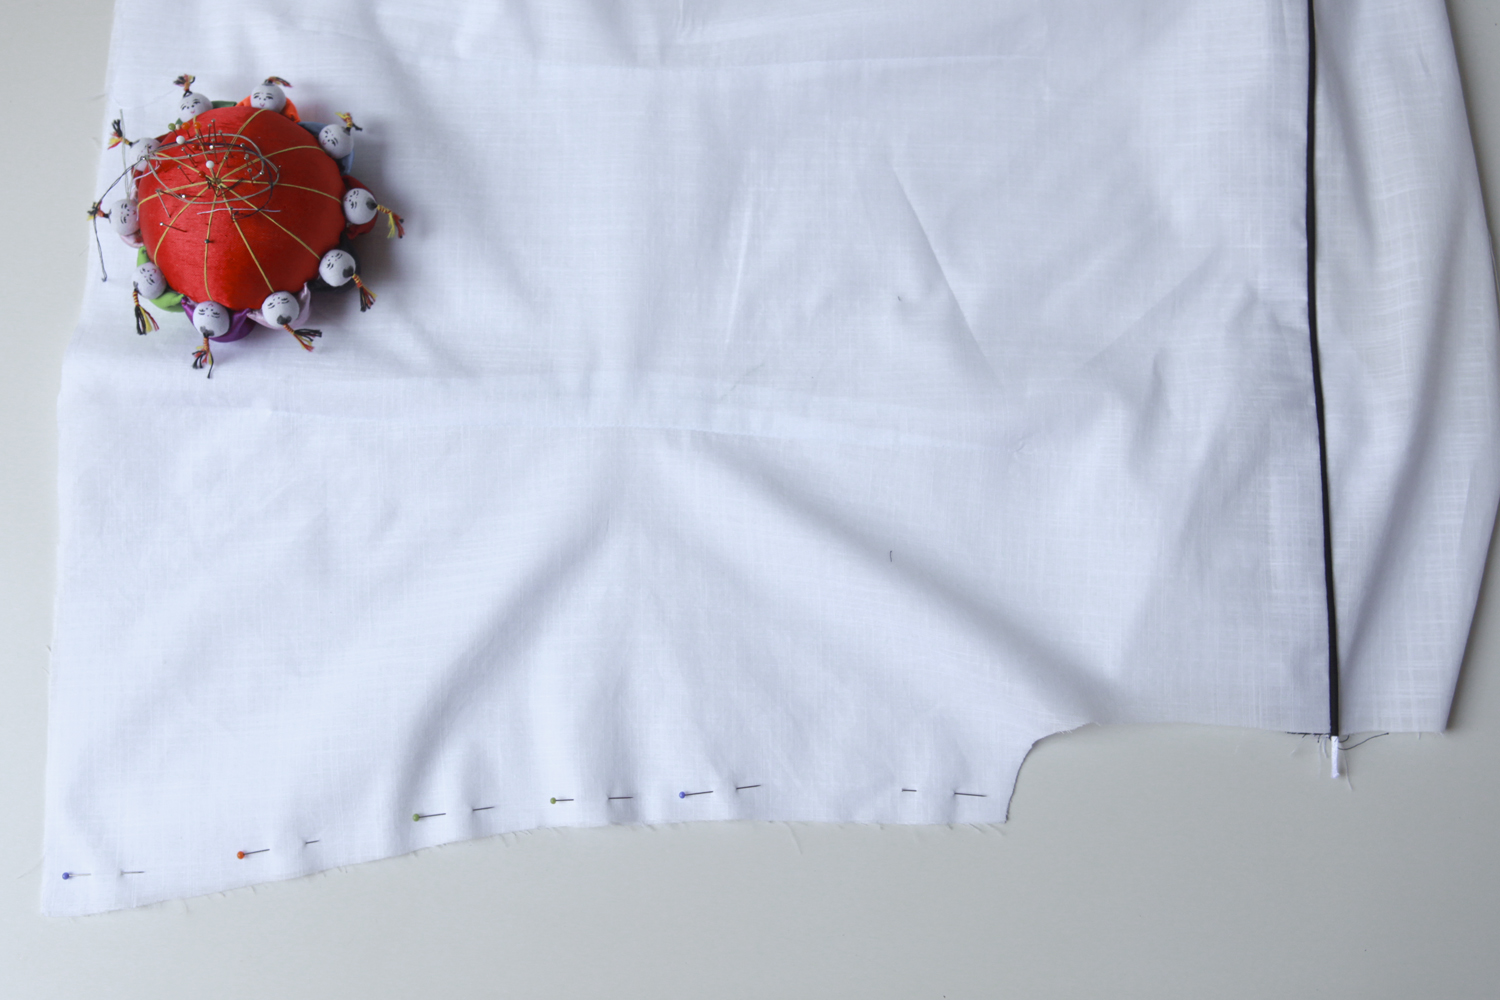
I do plan to write more about working with this pattern in detail in my OP7B reveal on Monday. But briefly, I moved the zip to the centre back and proceeded to insert the worst invisible zipper of my life. Really. It took me about 4 attempts to get it right. I'm usually a lapped zipper kind of girl, but this zip was in my stash and I was determined to use it.

Faux Liberty Macaron8

Faux Liberty Macaron7

Faux Liberty Macaron6

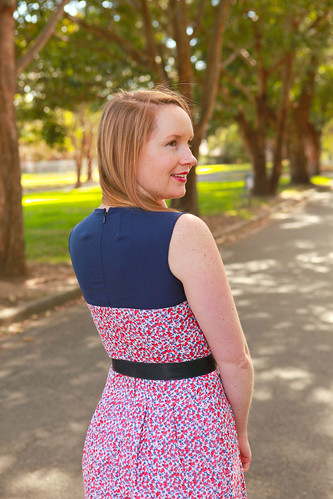
I removed the sleeves and finished the neck and arm holes with bias binding (I have a handy dandy tutorial on how to do this here). I also ended up having to completely underline the floral fabric. I bought this online (my first time buying fabric online) and it claimed to be cotton lawn, but really, it's far too loose a weave to be lawn. It almost looks like muslin (or cheese cloth for those who call it that!). But, while we're talking about this floral, doesn't it look a little like a Liberty print? Well, I think so, so I've dubbed this dress the Faux Liberty Macaron :)

Overall, I love this pattern and am kicking myself for not making it sooner. Make sure you check back in on Monday for more Macaron-gushing and my first version of this dress!

Faux Liberty Macaron4

Faux Liberty Macaron-2

Faux Liberty Macaron14 

Did any of you participate in the Sew Weekly Reunion challenge? I'm really hoping to hear more from these ladies in the future, I missed them :)

xx
Jen

PS) I'm really sorry that I've had to post this Macaron out of order from the OP7B dress. The Sew Weekly dress just needed to be up by the 1st September, where as my first dress needed to be up on the 2nd September and I thought two Macarons in subsequent days might be too much. So, I'm sorry about the small timing issue here, that'll teach me to participate in simultaneous challenges :) As an apology, David made me a jumping GIF with an 'in-air' shimmy. This was the one he wanted posted, so, here you go...


Doesn't my hair look awesome when I'm up in the air?

One Pattern, Seven Bloggers - Inspiration

Monday, August 26, 2013

Wowzers guys, thanks so much for all of the support for this challenge! It would seem you are possibly even more excited about it than we are!! So today I thought I'd share my Macaron fabric combination with you.

I didn't go into this challenge with this specific combination in mind. In fact, I really had no idea what I was going to make my Macaron with. I normally have some idea when doing these kinds of challenges, but for some reason, this time I just had no idea (even though this has been on my 'To Make' list ever since it came out!)

As it happened, I literally stood in the fabric store staring at their range for about an hour, um-ing and ah-ing, looking a bit dazed and confused, picking up bolts, putting them back and just generally having no idea what I was actually going to buy.

I found the blue and white large gingham cotton drill first, luckily there was just enough fabric left on the bolt to squeeze the main sections of the dress out. Once I had made up my mind about the main body, it was quite obvious I'd need to go with a white for the contrasting yolk and sleeves. But I didn't want to go with just any white. It needed to be a little bit interesting. So I found this lovely pin tucked white cotton that I thought quite nicely and subtly mirrored the gingham drill.

I ended up underlining the yolk and sleeves with another thin white cotton from my stash so that it wouldn't be too see through, but over all, I'm really happy with my chosen fabrics.

When I started cutting out my pattern though, I realised the white yolk cotton squares weren't really very 'square' or evenly distributed and I also seemed to have conveniently forgotten how annoying working with plaids can be. But I am really proud of my finished dress and managed to get most of the pattern matching up.

Do you ever get overwhelmed in fabric stores and just stand there staring? I hope I'm not the only one :)

And remember, there is still time to enter the amazing giveaway over here if you haven't already!

XX
Jen

One Pattern Seven Bloggers - The Sequel

Monday, August 19, 2013

Two years ago, myself and six other lovely bloggers took part in a challenge to make one dress from the same pattern. The aim was to infuse the pattern with our own tastes and styles to eventually come up with a dress completely different to everyone else's, while still having the same base. And, well, we're doing it again! We couldn't believe it had been 2 years since we had done the original and thought it was high time to revisit the challenge again. Two years older and hopefully, two years wiser.

So, a reminder of who we are...

Reana Louise from Reana Louise
Rachel from My Messings
Sam from Buckingham Road

This time, the challenge will happen over three blog posts, next week we will be talking about the inspiration for our dresses and any other tidbits we feel like sharing and then the following week we will be doing the big reveal.

Last time, I finished my challenge dress just before heading off to Vancouver for three weeks and this time around, I'm moving back home to New Zealand (!!). In fact, the movers have been and gone today with my sewing machine (and just about everything else we own...). I won't see it until late November now because there is also an epic Italian/UK adventure thingy happening in there as well. But never fear, I actually finished this dress and took photos of it a few weeks ago, because this little bunch of bloggers is so super organised that we planned this back in May!

We have chosen the Colette Patterns Macaron Dress as our base - an oldie but a goodie. This pattern has been on my 'To Make' list ever since it came out (a long time ago) and this challenge finally pushed me to get it done. And guess what? After I made my first dress, I hopped straight back to it and made a second dress. This pattern is pretty awesome, I'm wondering what on earth took me so long to make it!

Now for your chance to win!!

To celebrate the One Pattern Seven Bloggers project, we are hosting a huge giveaway thanks to 8 fabulous sponsors!


The Prizes
1 x Macaron Pattern thanks to Colette Patterns
1 x Macaron Pattern thanks to Guthrie & Ghani
1 x Macaron Pattern thanks to Stitch 56
1 x Pattern of your choice thanks to Sew Squirrel
1 x Colette Pattern of your choice thanks to Indie Stitches
1 x Colette Pattern of your choice thanks to The Haby Goddess
1 x $20 gift voucher thanks to Fabric Worm
1 x $30 gift voucher thanks to A Fashionable Stitch

To enter, all you need to do is comment on this post before Saturday 31st August with your email address! Make sure you head on over to all of the other participants blogs for up to 7 chances to win!

Terms & Conditions
  • Prizes will be randomly allocated to each of the 8 winners across all seven blogs.
  • One entry per blog.
  • You can comment on each of the 7 blogs for 7 chances to win (!).
  • The winners will be drawn and contacted by email on the 2nd September 2013.

I am so honoured to be included with this amazing bunch of sewing ladies. I've seen some sneak peaks of their dresses and they are rather fabulous!

xx
Jen

The Darling Buds of Mae...

Friday, August 9, 2013
I was lucky enough to be asked to test another Blue Ginger Doll pattern a few months back and now that it's been released, I can finally show you my version of Abbey's newest pattern, the Mae Blouse.
Mae8

Mae11

Mae1


It's a beautiful 1940s inspired blouse with a scalloped neckline (who doesn't love a good scallop, of the edible and patterned variety!), a button up back and a lovely fitted silhouette.

I made my Mae using a vintage mystery fabric that I'm pretty sure is a silk georgette with some beautiful vintage shell buttons. I actually had this combination saved for another 40s button up blouse that I hadn't quite gotten around to making yet, but as soon as I saw Mae, I knew they would be the perfect match for each other.

Mae16

Mae6

Mae3

Abbey recommends using a stiffer fabric for the blouse to support the scallops, but so that I could use my lovely fabric, I used interfacing on both the blouse scallop and the scallop facing to give it the structure it needed, and it seems to work really well.

I'm wearing my Mae tucked into my 1940s Swing Pants, but Abbey has designed the pattern so that you can make it longer and wear it over the top of a pencil skirt (very 40s!) or with jeans for a more modern look.

Mae4

Mae7

Mae12

Mae9

This pattern is such a quick and satisfying make - I made mine in less than a day all up. It's also the perfect pattern for a beginner looking to start adding new techniques to their repertoire like button holes and scalloped edges.

Right now Abbey has 10% off the Mae Blouse pattern using the code LOVELYMAE2013 and she has free world wide shipping! So there are no excuses not to add this beautiful pattern to your stash. And while you're at it, you may as well get the Billie Jean dress pattern too, I wear mine all the time!

xx
Jen

Tutorial - French Seams

Monday, August 5, 2013

French seams are a pretty way to finish off your seams if you have delicate, sheer, slippery or prone-to-fraying fabric because the raw edge ends up being enclosed in the seam. I used french seams in my Airelle Blouse because I was using a light weight, semi-sheer voile. They give a lovely professional finish without bulk and they are really simple to incorporate into your garment.

The trick to using French Seams is figuring out your seam allowances before you cut your fashion fabric. You could do this anyway you saw fit, as long as your first seam is smaller (or the same size but can be trimmed down) as your second seam, you should be fine.

For reference, the Airelle Blouse comes with a standard 5/8" seam allowance. For my side seams, when cutting out my fashion fabric, I decided to add an extra 1/8" to my side seams so I had a total of 6/8" seam allowance. Keep reading for more explanation of why I did this in picture form...

1. Rather counter-intuitively, pin your garment wrong sides together.


2. Sew your first seam together. I sewed mine at 3/8" seam allowance (half of my seam allowance of 6/8").


3. Trim your seam allowance down (I trimmed mine by about 1/8"leaving 2/8") and press your seams open.


4. Turn your garment inside out and press your seam flat. Pin in place and sew again at the remaining 3/8".


5. You now have a lovely, perfectly enclosed 3/8" seam.


You don't have to use my measurements for your French Seam though. For example, I cut the standard 5/8" seam allowance for my sleeve seam. I made my first seam 1/8" and then my second seam 4/8", ending up with a larger 4/8" finished seam.

Choosing how much to add to your seam allowance (if any) really depends on how much of a finished seam you want left at the end!


I hope this was helpful, please let me know if you have any questions in the comments...

xx
Jen

Auto Post Signature

Auto Post  Signature