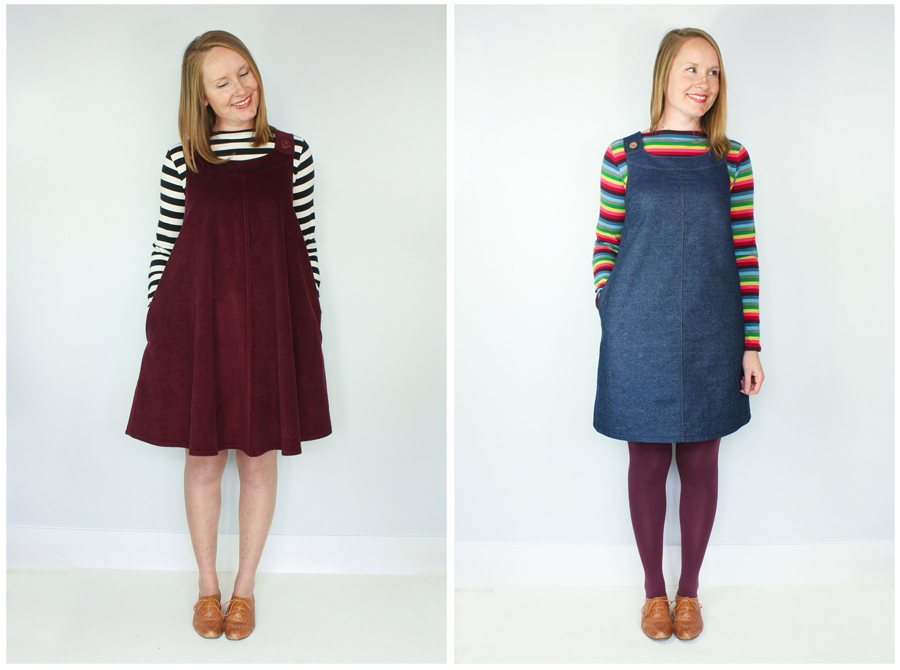
Image Slider

How to make an Unlined Ivy Pinafore...

Monday, October 31, 2016

I was planning this post for the second or third of the Ivy Pinafore Tutorial Series, but I've had so many people ask me how to do it since Ivy was released, that I thought I'd better just jump in and share how to do it sooner rather than later.

The technique I'm showing you below requires no flat pattern adjustments (yay!!), but there are lots of different ways to achieve the lining-less look. I like this one because it's relatively easy and it allows you to keep the pattern intact throughout the whole process, making it much easier to line up pattern pieces and match notches and curves as per the instructions included with Ivy. You'll end up with a flawless Ivy, that is unlined, yet still clean inside and out, without having to make any guesses, or 'wing' any part of the construction.

So, onwards to a long-ish and photo-heavy tutorial...

Note - I'm only using half pattern pieces in the tutorial below (un-interfaced) and only showing the front of the dress most of the time since the technique is exactly the same for the back. The technique is the same for both views.

You'll need -
Note - making your own bias binding is super easy, in fact, here's a tutorial I prepared earlier. Even if you hate making bias binding, you don't need much for this unlined Ivy Pinafore variation.

Steps - 

1. Cut out all required Ivy pieces except for the lining. Assemble front and back dress pieces as per the instructions. Attach pockets (if using them) and sew together dress side seams as per the instructions (don't attach the yokes yet!!).


2. Measure the length of both armscyes and add an extra 5-10cm (2-4") to this total length. Make that length of bias binding using this tutorial. Cut length in half (one for each armscye).

3. Take your bias binding and right sides together, pin down along the armscye, matching raw edges. Stitch down using the 1.5cm (5/8") seam allowance included, from one side of the armscye to the other. Repeat for other armscye.


4. Press binding up on both armscyes, so that both raw edges match with the raw edge of the dress armscye. Attach both front and back yokes as per the instructions included with Ivy. Top stitch as per instructed if you want too as well (I haven't for this tutorial).


5. Finish the bottom raw edge of both your front and back facing yokes. I have overlocked mine, but you could finish with a zigzag stitch, bias binding or using pinking shears. I would avoid turning and stitching the raw edge under as this could result in a bulky facing.


6. Right sides together, pin your facing to your dress.  Repeat for back yoke.


Make a note of where your bias binding stitching intersects with your yoke stitching on the front of your dress (circled below!) - this is where you'll start your stitching to attach your facing yoke.


7. Stitch your yoke down as per the instructions included with your pinafore, starting at the intersection you marked above. Back tack at each end. Repeat for back yoke.


Note - I turned my sewing around and stitched my yoke down with the underside of the dress facing me, this made it easier to make sure I placed my needle directly into that intersection for a precision start.

This is what it'll look like from the 'right side'.

8. Trim down seam allowance and notch corners/curves along the top of the yoke only. Leave the armscye section.


9. Trim down the facing seam allowance only.

10. Unpick the first few stitches of the stitching attaching your bias binding to your yoke within the seam allowance. If you've top stitched, you'll need to unpick the same amount of that as well.


Leave enough stitching to match the remaining seam allowance you've left around your yoke from step 8.

Repeat steps 8-10 for back yoke.

11. Trim down and notch the remaining seam allowance around your arm scye, removing the 'bottom' of the bias binding at the same time (aka the side of the bias that is right against the dress seam allowance). Make sure to keep the 'top' of the bias binding!!

12. Turn your front and back yokes right-sides out. This will naturally bring your bias binding around to the underside at the same time. Press.


13. Gently lift your facing yoke piece and tuck the raw edge of your binding under (essentially folding the remaining bias binding edge in half). Do this along the entire armscye. Pin in place.


Repeat steps 9-13 for the other armscye.

14. Top-stitch binding down at the same time as top stitching your entire yoke down (as per the instructions included with Ivy). Because you've folded your remaining bias in half, the raw edge will catch nicely.


And that's how you do it folks!! You could make your bias approximately 3mm (1/8") smaller in width (so 2.7cm width instead of 3cm), to make the top-stitching catch the very outer edge of your bias binding in step 14, but I always like to make it a little bigger, just in case...

Gosh, that was a long post huh? I just wanted to make sure I captured every step of the process with as much detail as possible, so, er, hopefully this helps if an unlined Ivy was on your list of 'Things to Make'. Let me know in the comments if you have any questions, or if anything is confusing.

Will you be making an unlined Ivy Pinafore? 

xx
J
Shop Patterns     .     Instagram     .     Newsletter      .     Facebook    .     Pinterest   .   Podcast

The Auden Men's Cardigan Pattern - Coming Soon

Tuesday, October 25, 2016

Well, hello there!

I'm currently putting the final touches onto the Auden Men's Cardigan pattern and when next week rolls around, I'll be introducing you to my very first menswear pattern! Eep!

If you'd like to be the first to know when it arrives (as well as get the subscriber only discount) then make sure you sign up to the newsletter here - I promise it only graces your inbox on the odd occasion. It's an elusive wee beasty.

And just because I like to be helpful, this could be the perfect christmas present for the men in your life, christmas is only 8.5 weeks away now. You're welcome.

PSA over and out.

xx
J
Shop Patterns     .     Instagram     .     Newsletter      .     Facebook    .     Pinterest   .   Podcast

A Handmade Day Podcast - Episode 2

Friday, October 21, 2016
Hello, hello...

Okay, so as it turns out, I quite like this video-podcasty-thingy. So much so that I'm officially turning my 'Ask Jen' series into a little podcast of my own, with 'Ask Jen' becoming a segment of it.

Podcasting is such a great, easy and quick way for me to share completed projects that I've not had the time to photograph (most of my personal sewing/general 'handmadie-ness' is made for a very specific purpose these days and therefore, is usually put to use virtually straight away - ain't no time to take a pretty photo!).

My podcast is officially called A Handmade Day! It'll be one of those crafty podcasts, featuring sewing, knitting, baking, gardening and pretty much anything that could be considered 'handmade' that catches my fancy. I'll talk about current WIP's, finished projects and up and coming personal projects, as well as a look into current sewing pattern designs, where I get my ideas and, more than likely, a stash/sewing room tour.

In today's episode, I'm talking about up and coming patterns, as well as giving you a little insight into my latest pattern, The Ivy Pinafore.


I'm hoping to publish A Handmade Day at least once a month, but depending on time and what I have on that month, fortnightly could also happen.

Sewing tutorials will still be a thing, but I've popped them onto their own playlist, to keep them seperate.

I hope you enjoy this new episode and please do subscribe to my channel so that you never miss an episode. Next time, I'm going to be delving into finished projects and current WIP's - knitting is probably going to feature heavily (of course, now that we're heading into summer, all I want to do knit!).

xx
J
Shop Patterns     .     Instagram     .     Newsletter      .     Facebook    .     Pinterest   .   Podcast

The Ivy Pinafore Tutorial Series...

Tuesday, October 18, 2016
Howdy folks!

Over the next few weeks I'm going to be taking you through a series of tutorials for The Ivy Pinafore. Ivy is a relatively straight forward make, so these tutorials will be focusing on what could be pressure points when making the dress, as well as some ideas on different construction techniques you could consider.

As always, if there is something specific I've not listed that you'd like to have included, please feel free to send me an email (jen at jenniferlaurenhandmade.com) or leave me a comment on this blog post, I'd be more than happy to add them!

Tutorial Posts will include -
Talk soon,

xx
J
Shop Patterns     .     Instagram     .     Newsletter      .     Facebook    .     Pinterest   .   Podcast

All Patched Up - A Gable Top Tutorial (with FREE Pattern Piece)

Monday, October 17, 2016

Hello All!

As promised, today we're talking about adding elbow patches onto your Gable Top, and I've made a free pattern piece for you, just to make it even easier.

Elbow patches will give your Gable Top a more casual vibe and they're a super easy addition - so why not use up some of those fabric scraps and go wild with fun fabric combinations?


Patches are added to your sleeve while it is flat, so follow the steps below first and then continue to make your Gable Top as per the instructions.

You'll need - 
Optional - 
  • Interfacing, depending on the type of fabric you're using for your patch
Steps - 

1. You'll need to try on a long sleeved Gable (or other knit top) to pin point where to place your patch accurately on your sleeve. Let your arms hang naturally at your sides, then have someone place a pin in the sleeve, right where your elbow sits.

Transfer this marking to your paper pattern piece and when cutting out your sleeves, use a tailor's tack to transfer that mark to your fabric pattern pieces.

2. Cut out two patches in your fashion fabric. Depending on fabric choice, interface your patches on the wrong side and overlock (or zigzag) the outer edges.

Note - I used a red stretch knit for my patches (some of the left over knit from my 3/4 sleeved Gable) so I didn't need to finish the outer edges since this knit doesn't fray. For aesthetics, you may decide to finish them, it's completely up to you. I also didn't use an interfacing since it's a decorative patch, as opposed to a functioning patch, but if I was going to, in this case I'd use a knit interfacing.


3. Line up the centre of your patch with the mark you made in step 1. Place the wrong side of the patch onto the right side of the sleeve and leaving long tails, stitch down using a 3mm or 1/8" seam allowance all the way around. Pull thread tails through to the wrong side, tie in a secure knot and repeat for the other sleeve.


4. Press and continue making up your Gable as per the instructions.


Adding a patch is SO EASY and definitely changes up the look and feel of Gable, making it more relaxed and weekend ready.

Do let me know if you make a patched up Gable, I'd love to see them :)

xx
J
Shop Patterns     .     Instagram     .     Newsletter      .     Facebook    .     Pinterest   .   Podcast

PS) I'm wearing this Gable Top with an Ivy Pinafore.

Black Ivy...

Wednesday, October 12, 2016
Wow, thank you all SO MUCH for the Ivy love this past week! For purchasing, for the amazing comments and emails, the convo's and the likes. I'm so so happy you like it and I can't wait to see more of them popping up around the internets.

Today I wanted to show you one of the wearable muslins I made for View 2 of the Ivy pinafore. I actually have a podcast coming where you can see this exact outfit in action (because when an outfit works, it is therefore allowed to be worn multiple times in one week, right...?! Actually, to be fair, these photos were taken a week and a half before I filmed the podcast, so, you know...).


I make a lot of muslins when I'm drafting patterns - some wearable, some not so much. I ended up with three wearable muslins at the end of the drafting phase for View 2, the first made from a brown corduroy, the second a rosey, pink-y vintage wool and then this one.

This version has the tiniest issue at the back with some excess fabric and I also ended up adjusting the darts on the bust ever so slightly on the final pattern. These adjustments are so small though, that walking down the street, I doubt anyone would notice them at all.

It's made in a navy pinwale corduroy (not that you'd ever guess it was navy, it looks black, even in real life!) and I went for contrasting white top-stitching and some vintage metal buttons (with clouds stamped around the border! Oscar is endlessly fascinated with them). The straps are non-functional on this version, and that was mainly because I couldn't be bothered putting in button holes - the dress easily pops over your head, making it an even faster make for those of you wanting some instant gratification sewing.


I'm wearing it here paired with a long sleeved Gable top made with fabric that might look familiar? Originally, I was planning to make the long sleeved sample for Gable from this red and white striped knit, but as luck would have it, I got an end-of-bolt and therefore had enough to make a short and a long sleeved Gable! Woohoo! I added contrast elbow patches (made from the same fabric as my 3/4 sleeve Gable Top) and there will be a free pattern available for you first thing next week, just in case you fancy adding an elbow patch (or two - who's counting) onto your Gable top.

FYI about the balloon prop. This was totally unplanned, even though I know it looks very planned. David had taken Oscar out the morning we took these photos and someone very kindly gave him this balloon. The only problem? Oscar seems to have a love/hate relationship with balloons. He loves them, wants to pick them all up and hug them AND THEN bursts into tears when holding them. Real, achy, puddles-of-tears-hide-the-balloon-quick, kind of tears. We aren't sure what the exact issue is, one has never popped in front of him nor has he had a bad experience with them, but we now officially avoid balloons. Please, no balloons!

When David got home, he threw the balloon into my sewing room & shut the door.  Once Oscar was down for his nap, we snuck into my sewing room to take these photos and David casually mentioned I should pose with it. So I did. Couldn't resist. It was too perfect.

Thanks Oscar ;) And thank you guys again...

xx
J
Shop Patterns     .     Instagram     .     Newsletter      .     Facebook    .     Pinterest   .   Podcast

PS) Just a reminder that there's only one more week left to purchase your Ivy Pinafore and Gable Top bundle! Quick, quick!!

Introducing The Ivy Pinafore Dress Sewing Pattern

Wednesday, October 5, 2016


Classic lines meet everyday comfort when the Ivy Pinafore Dress is in town. Designed to be layered with your favourite collared shirts and fitted knit tops, Ivy can be worn year-round with limitless possibilities.

With two completely different silhouettes - an A-line style tent dress and a slim fit variation - Ivy transforms the everyday overall into a feminine and comfy garment with an option for everyone.

Make Ivy in casual denim or cosy corduroys and wools. Button-down straps can be functional or stitched in place and top stitching can add a subtle or contrasting detail.

Fully lined and with pockets to boot, Ivy is a sturdy little number that is just as at home relaxing on the couch as it is kicking leaves and splashing in puddles. Team Ivy with boots for coffee on the weekend, wellies for digging in the garden or slippers for some fireside knitting action.


This time around I'm doing something a little different - not only can you purchase the Ivy Pinafore by itself, but as you may have noticed, The Gable Top pairs perfectly with Ivy. So, it made sense to offer them together, in a bundle!

Usually, it would cost $23.99USD to purchase both, but for two weeks only*, you can purchase them together for $18.99USD - that's a $5 saving (or just over 20%).


So, what do you think of Ivy? View 1 is a bit of a different silhouette for me and I had fun doing something a little different this time around. 

As always, there'll be a few tutorials that go along with Ivy that I'll be posting about very soon.

I would love to see your Ivy Pinafore's if you make one - leave a comment or flick me an email! 

xx
J
Shop Patterns     .     Instagram     .     Newsletter      .     Facebook    .     Pinterest   .   Podcast

* Sale ends 9am Wednesday 19th October (GMT +12)

Auto Post Signature

Auto Post  Signature