Image Slider

Knitty Gritty...

Sunday, December 21, 2014

We've been having some really random weather lately, winter is still hanging around but we've had a few promising glimpses of summer. The cool temperatures and with Christmas just days away, has had me thinking about knitting quite a bit, or rather, getting back into it. I've knitted a dishie or two, but I've been dreaming of warm wooly shrugs and cardigans lately.

I'm still yet to finish my Aiken - I got to the bottom of the body, and I'm not so sure about it. The arm holes are huge (they seem to go down to my waist!) and it feels a bit like it's on the larger side, both in width and length (even after removing rows and increasing the decreases around the waist). So, it's in my 'I can't see you' pile. Everyone has one of those right? I don't know how to frog back to a certain point, and undoing the entire thing would be heart breaking, so, I'm ignoring it. The best way to deal with a problem, yes?

This means I'm officially onto shiny-new-knitting-project planning - it's almost as good as finishing projects in my opinion. So, what's in my Ravelry queue at the moment?

1) I seem to be in a shrug mood at the moment, and as soon as I saw the Maeve pattern, I needed it. How gorgeous is it?? While I want to challenge myself in the knitting department, I also don't want it to be so hard that I end up putting it into the I-can't-see-you pile (which honestly, is not actually that hard to get into). I'm thinking Luxury wool in Denim Blue. It'll go with pretty much everything in my wardrobe.

2) The Quick Silver Lace Shrug. I've had some 8ply Wild Barley Luxury wool (now discontinued but very similar to Leaf, it's in the photo above) just waiting to be turned into this. Perfect for layering in this chilly weather.

3) The Owls Sweater. I've had this pattern in my favourites for a while now and I've seen a fair few people make it. I'm a bit worried about it being knit from the bottom, since I'll need to take quite a bit off to hit me at my waist (my preferred length) which means some scary knitting math (oh the horror!). I'm thinking Stellar yarn in Lapis Lazuli for this. I was considering Garnet, but realised I'd get much more use from another blue knit. What can I say? I really like wearing blue...

4) Boring, but essential I-can-watch-stuff-while-knitting-this dishie knitting. I've got a bunch of lovely coloured cotton yarn sitting in my shopping basket from Bendigo Woollen Mills (seriously, that place! I could buy it all). I currently just do the standard one with lace borders, but I'm keen to expand my repertoire and try out this one (which they technically call a face cloth).

I'm a veeeeery slow knitter, so I'm pretty sure this list will easily last me until at least this time next year.

Are you knitting at the moment? What's on your list? And are there any easy shrug patterns I should be keeping an eye out for?

xx
J

The Anemery Dress

Friday, December 5, 2014


You guys, it happened.... my blog got boring!

I really didn't mean for it to turn into one of those 'all about my patterns' blogs, because, I reeeeally like sewing other people's patterns. And it's been way too long, so, I'm sorry (I know, it's my blog, I can do what I like with it, blah blah. But still, let's be honest, even I was bored!!)

I actually finished this dress before we moved into our house at the beginning of the year. I wore it on my birthday for Me Made May and then I never actually got around to blogging about the pretty little thing that it is. So, here it is!

I've called it the Anemery dress for fairly obvious reasons - it's the Anna Bodice and the Emery skirt.


Now, is it just me or does Anemery remind you of that scene in Finding Nemo where they can't pronounce anemone? Every time I say Anemery I feel like I should be saying anemone. Monemone? Namenome?

Anyway, I digress.

The fabric is a beautiful Japanese lawn, that I should have underlined at the bodice, but didn't (I hope it holds up!) that is covered in a lovely paisley print - which, might I add, look like microscopic sea creatures...totally not planned.


A quick and easy dress to stitch up, just like my other Anna and Emery.

Have you made an Anemery? Are you tempted? I totally recommend it :)

And, here's to more 'not all about my patterns' posts. I hope...

xx
J

The Enid Sweater - New Pattern Release!

Tuesday, December 2, 2014
I've been working on this pattern for months and months and I'm so happy to be able to finally put it out into the world -


I'd had the idea for a while now, ever since I took part in my first Me Made May in 2013 where I'd get lots of questions about where all of my cropped cardigans and sweaters came from. Since they're pretty much all vintage items, I'm afraid I was rather unhelpful. So, it occurred to me that there may be a few people out there, who are handy with a sewing machine and who might just appreciate a quick make, reminiscent of those cute vintage sweaters.


Enid has been designed with those in mind who might want fitted vintage sweaters, but can't find them and have neither the time nor the inclination to knit one. 

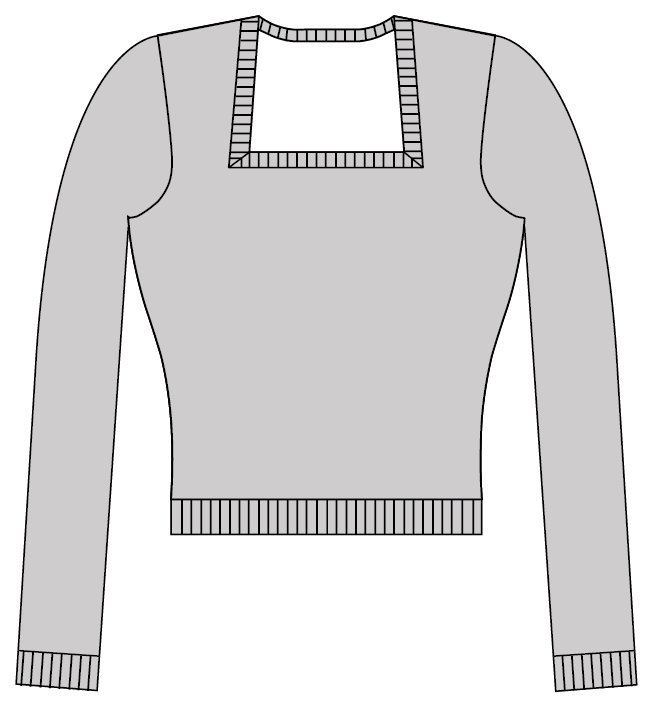
Enid is practical and warm, designed to be made with soft, snuggly zero-stretch sweatshirt fabric. The cropped length means that you can wear it with all of your high-waisted dresses, skirts and pants. The two different necklines, an angled square or a lightly rounded V-neck, make it easy to switch it up depending on your mood.

Due to the bias cut bodice, Enid is a flattering sweater that hugs you in all the right places and has you covered, whether you're out walking the dog or about to head inside to read by the fire.


And in other news... I've added bigger sizes! I've been meaning to add bigger sizes to my patterns for a while now and decided that Enid was the perfect opportunity to do just that. So, I've added 2 new sizes to the upper end of the range and now cover sizes from an NZ6 to 24. I will also be going through my back catalogue to add those sizes to my older patterns soon.

Since Enid is a fitted sweater, if you prefer a looser fit, more appropriate for layering, I'd suggest going up a size.


I will be providing tutorials in the New Year for adding more room for fuller busts as well as a guide for attaching the neckline bindings, which are the trickier steps to making up Enid.

Other than that, Enid is a quick make, just in time for the cold weather blast (in both the Northern Hemisphere AND the Southern one. I swear summer has decided to go on holiday down here...).


Enid is now available in instant, downloadable pdf form, in my easy to print, use and put-together format (no more rearranging your living room!). 


I hope you enjoy :)

xx
J

SALE - 15% OFF ALL PATTERNS!

Friday, November 28, 2014
 Jennifer Lauren Etsy

Well, it's nearly Black Friday/Thanks Giving, and although NZ doesn't actually really do either of those things, since so many of you live in places that do, I thought I may as well get in on the fun :)

So, for this whole weekend, I'm giving you 15% off all patterns in my Etsy shop using the code THANKYOU (all one word) because really guys, thank you! It's been a rather amazing year, both personally and professionally and I'd really like to thank you all for that.

The code expires on Sunday, so if you've been meaning to get yourself a little something, there's no time like the present. And if I may say so, from what I've seen on my instagram feed, not many of you will be straying too far from your houses due to a bit of that cold, white, wet stuff.

Stay tuned for a little something fun on Monday and have a lovely and cozy Thanks Giving to those that celebrate it and a lovely, cozy weekend to those who don't.

xx
J

Gettin' in the Way...

Monday, November 17, 2014

Well, there certainly hasn't been much sewing around these parts lately has there? I'm of the opinion that this isn't a bad thing though (right?). Sometimes you need a break from doing the things you love lest you get a visit from the dreaded burn out.

David and I have been back from visiting family and hanging out in the glorious Sydney weather for a week today (you can now call me Ms Dr. Jennifer Lauren #notthatkindofDr). I've pretty much tried to avoid the internet and sewing during this past week, mostly because my sewing room and computer have become uncomfortably attached to my leg over the past few months, not from blogging (obviously) but with the responsibility that comes when you release a sewing pattern (or two...). I really love answering emails and questions I get about my patterns - to the point that almost as soon as I get one, I'll answer it within seconds if I'm not asleep and close to my computer (and will be one of those annoying people tap-tap-tapping away on their phone if I have to). I feel a big responsibility to those people who are buying my patterns, and I want to provide the best customer service that I can.

This, however, is sort of leading to a tiny bit of the aforementioned burn out.


While we were away, we stayed with my parents for a long weekend. They live about 20minutes out of the city I grew up in, in a small community filled with native trees and beautiful bird song and are severely lacking cell phone coverage. Now, contrary to what some might think, we don't live in hobbit holes or mud huts in NZ. We're a westernised country with internet, and cell phones and heck, even Starbucks infiltrated when I was still in high school. And this little place in NZ is only a handful of well habited places that lacks cell phone coverage.

I have to admit though, it was lovely. Normally the first thing I do when I wake up is reach over for my phone to check my emails. I couldn't do that there. I had to wait until we'd driven over the hill, into the township to get at my inbox.


In Sydney, while we had internet where we were staying, I didn't have cheap access to internet when we weren't there (and we were very rarely there. We literally came home to sleep, and spent the days catching up with friends and eating our way around Sydney). So, when I may normally have checked my phone for emails or convo's on the train back and forth between various Sydney suburbs, I couldn't, unless I wanted to pay a pricey premium (uh, no thanks...). This meant that I had only set times I could check emails, and most of the time, once we had arrived back to our accommodation, we'd chat to my friends (who we were staying with) and then promptly crash out for the night to get ready for the next busy day ahead.


I've been trying to keep some of the same distance that was forced on me during our time away (and honestly, failing slightly miserably).  But it's been a good lesson in being constantly available. Nobody can sustainably be constantly available.

Life gets in the way, as it should.

xx
J

Away...

Friday, October 31, 2014

Hi All,

Just a quick note to let you all know that I'm going to be away with unknown internet access until Sunday next week. David is graduating with his PhD!

So, if you try to get in touch and I don't answer you straight away, that's why.

I'm looking forward to some warm spring Sydney weather, see you soon...

Photo from my Instagram.

Pattern Parcel #6 and some House Keeping...

Tuesday, October 28, 2014

So, if you've been living under a rock (which I totally don't blame you for, I really need to get one of those...) you may not have been aware that Pattern Parcel #6 (all about the ladies!) is currently out in the world and I was completely honoured to have contributed The Bronte Top to the parcel pack.

Not sure what the Perfect Pattern Parcel is? Basically, you get to decide how much you want to pay for a bunch of awesome patterns while supporting independent designers AND contributing to some wonderful charities all at the same time. Selfish sewing just got a whole new meaning.

In their own words...

Support Indie Designers:
Independent designers create patterns that are innovative, imaginative and in line with current style trends. Their patterns encompass a broad range of sizes and fabulous “out of the envelope” fit because they're thoroughly tested by real people. Indie designers are approachable, providing support, suggestions, publishing additions to your favourite designs, and hosting interactive sewing events. When we are patrons of indie designers, we are supporting small businesses. We are developing the community around us. We are helping make dreams come true.

Support PPP:
We ask you to dedicate part of your purchase to support the mission of Perfect Pattern Parcel. Our mission is to support indie designers, give to charity, and expand awareness to further those two primary goals. PPP funds cover the cost of all hosting and payment processing fees so the designers and charities don't have to. With any dollar we spend as a PPP expense, our goal is to earn that dollar back and then some. Every dollar that isn't used to cover expenses is reallocated to charity.

Support Children's Education:

Donors Choose is an organisation that matches up the needs of teachers and their students for specific projects with willing donors. The funds raised from each Pattern Parcel sale will go to help K-12 students in minimising educational inequality and encourage a community where children have the tools and experiences necessary for an excellent education. From pencils for poetry to microscopes for mitochondria, your support will help address educational inequality and grow generations to come. To date, you've helped us raise over $13,000! 

As of posting this there are currently just over 4 days left to purchase your very own Pattern Parcel #6 before it's gone forever. If you're still sitting on the fence, then let me tell you, the amazing-ness of the patterns contained within has meant that this parcel has been the biggest one yet! So, what are you waiting for? 

In other news, did you see the new Sewing Pattern Directory is now live? Jane has done such an amazing job. And, oh, there's a wee interview from yours truly featured on the front page, you know, just in case you're interested. The Sewing Pattern Directory is pretty much where it's at if you like using patterns produced by independent designers. They feature the ones you already know and you'll be able to discover new ones.

Phew, what a month it's been, and November looks set to be another busy one, but in a whole different way...

xx
J

Introducing The Cressida Skirt Pattern

Thursday, October 16, 2014


View 1 - Front
View 1 - Back


It's an age-old conundrum for seamstresses across the world - what do you love more? Buttons or pockets? Well, why do you have to choose? Your love affair with both buttons and pockets need no longer be kept a secret, as you show both your craft and love in the ultimate skirt, Cressida.


View 2 Cressida Skirt worn with a Long Sleeved Bronte Top

Cressida is a gently flowing semi-circle skirt with your choice of a single or double breasted button placket, sweet button belt tabs and inseam pockets, which means you certainly won't disappear into obscurity.

Any number of different fabrics can be used to make your Cressida skirt, from breezy summertime linens to cozy woollen fabrics worn tucked up by the fireside. Deep pockets leave plenty of room for hiding all of your treasures, tokens and secret love notes.


It was bound to happen wasn't it? It's no secret my love of a circle skirt and a button or two, so why not combine the lot, add in a pocket and call it a day (or a Cressida).

So, what do you think?


xx
J

Oh Where, Oh Where have you been...?

Wednesday, October 8, 2014


Well, I've certainly not been in London visiting with the Queen, though she did ask... *wink*

I haven't really been anywhere to be honest. I've just needed some time out from the ol' blog to concentrate on new patterns and catching up on various things-that-are-all-of-a-sudden-important things. We're off to Sydney at the beginning of November for David's graduation, stopping to see my parents on the way, so there has been planning for that under way. We've been building fences, planning spring and summer vege gardens (while it's been snowing of course...), fixing silly website issues and a whole host of other things.

Ah, patterns :) I've received the feedback for the Cressida skirt, which I'm working my way through at the moment to hopefully have to you next week. The cosy Enid Sweater - I'm just polishing off the instructions (and making more line drawings because I always forget to make one or two) and then it'll be ready for testing. And then a dress. Oh yes, another dress. More on that later.

xx
J

Pictures are from my Instagram feed - mostly from around our house & garden.

Tailor's Tacks for Dalloway...

Tuesday, September 16, 2014

Tailor's tacks are a super little way to transfer pattern markings onto your fashion fabric.

Because they are essentially a loop of thread, they stay in place where you need them to (and don't rub off!) and you can remove them easily, without leaving a trace.

When I talk about using tailor's tacks for marking the horizontal pleat lines on the Dalloway skirt, I'm not talking about the little teeny ones you might use on a bodice (though the technique is exactly the same). Nope, I'm talking about heavy duty tailor's tacks here guys.

They should be at least 2cm (3/4inch) long or bigger to be of any use to you when assembling and pressing in your pleat folds. So, how do you make a tailor's tack for the Dalloway skirt horizontal pleats?

Supplies:

  • Dalloway skirt paper pattern (both the skirt and underlining pieces)
  • Fashion fabric
  • Needle
  • Contrasting thread (using a contrasting thread makes it so much easier to see your tacks!). You can use silk if this if your preferred thread for pattern marking, but I use regular ol' polyester thread.

Steps:
1. I talk about using 3-4 tailor's tacks per 'line' to mark your Dalloway skirt horizontal pleats. The important thing is that they all sit horizontally, directly on top of a marked pattern line. They do not need to be neat and all matching up to each other between the different lines though.

These markings are there for you to be able to fold and stitch your pleats in accurately and will be taken out eventually, so there is no need for neatness (except along each individual line).


The red lines on top of the skirt underlining pattern above mark out where you might choose to place your heavy duty tailor's tacks. As you can see, while they don't have match up between each line, they are all placed accurately along each line.

You are also more than welcome to use more or less, depending on how confident you are feeling. I have found that 3 is perfect for me, but when I was first testing Dalloway, I think I used 5 or 6 per line!

2. Take your needle and thread it with one long piece of your contrasting thread (you will need to re-thread as you go, so how long you make it is up to you!). Don't knot the end.

Generally you'd double thread your needle for small tailor's tacks, but because you'll be doing so many, I tend to use a single thread.


3. Take your needle, line it up with one of the skirt pattern lines and thread through all layers of paper pattern and fabric (since the skirt is cut on the fold, that will be three layers total). Leave a long tail.


4. Since we're making big tacks, move along the line 2cm or so and come back up, making sure you are coming through the marked line on the pattern. Don't pull too tightly, you'll want a little loop at the back.


5. Go back through the first stitch you made, and then come back up the second - again, don't pull too tightly. Then, leaving a long tail, cut your needle loose.


You've now made a tailor's tack! Repeat these steps for as many tacks as you need before proceeding.

6. Cut the top loops of your tacks and gently remove the paper pattern sitting on top.


7. Gently pull your two layers of fabric apart, being careful not to pull your thread all the way past the top layer (this is why you should leave long tails), and cut to divide your tack.


Now you'll have a bunch of nice little neat rows of tailor's tacks spanning across your entire skirt ready for you to press in your pleats!

xx
J

Auto Post Signature

Auto Post  Signature