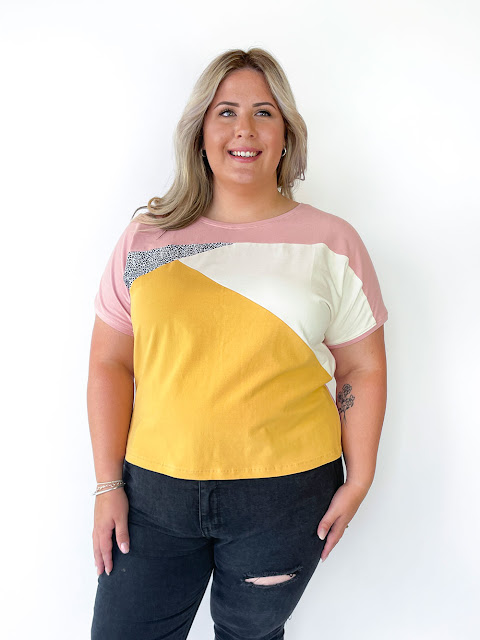
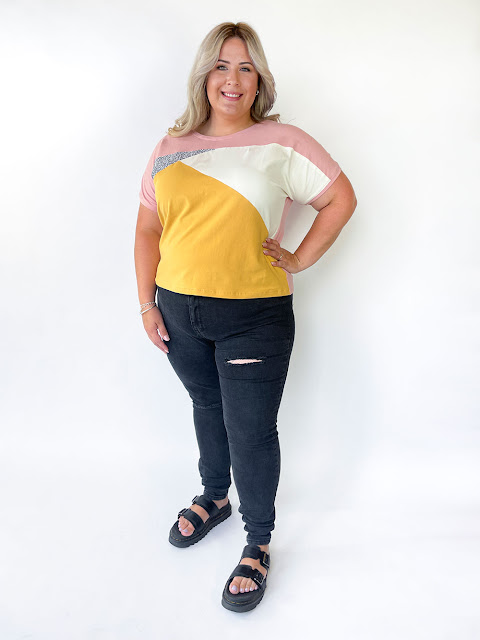
Monday, May 20, 2013

Me Made May - Week 3

Another Me Made week down!

I don't know about any of you, but it's starting to get harder to get dressed in the morning. I find myself checking my instagram far too often to figure out if I've already worn a combination before or to make sure that there have been sufficient days in between before I can wear the same piece again.

It's been great for forcing me to think a little more creatively about what I wear each day, to pull out those Me Mades that don't get any wear and to not just throw on the same old thing each day. But it's definitely becoming a challenge.

All I can say is, thank goodness for cardigans and their ability to transform the same outfit into something new.

Day 14 - 
It's started to get much cooler in the evenings here now. Today I invented a new fashion - pj's under dresses. Comfy and warm!

Wearing - Polka Dot Billie Jean

14May 2013 1


Day 15 -
I can't even remember what I did that day... but I really like those shoes.

Wearing - Self-drafted Grey Circle Skirt

15May 2013 1

Day 16 - 
Today you got a bonus glasses shot. No, they are not 'for show'. I wear them all day every day so I can see you :)

Wearing - Stripes and Stripes Dress

16May 2013 1

16May 2013 3

Day 17 -
I did baking today. I made a gluten free version of these. Yum.

If you plan to make them, put chocolate chips into the muffin batter as well. You won't regret it. Promise.

Wearing - Self-drafted Black Circle Skirt

17May 2013 2

Day 18 - 
It's Saturday! We went to look at art and made an impromptu stop at the Australian Museum. They have snakes and lizards there. Awesome.

Wearing - 60's McCalls Wool Skirt

18May 2013 2

18May 2013 1

Day 19 - 
Mostly couldn't be bothered getting dressed today. But I did get a lot done. Watch out for a bunting tutorial coming up on the blog this Friday (with a free downloadable pattern I drafted!).

Wearing - Vogue Violet Wrap Dress

19May 2013 1


Day 20 - 
Ahhhh Monday, we meet again.

Wearing - Self-drafted Blue Circle Skirt

20May 2013 1

xx
Jen
 

Friday, May 17, 2013

Tailors Ham 101


You guys - I made ham!

Okay, I made a tailors ham. But it was still delicious to make. Simple and I used up some fabric scraps to boot.

I used this free pattern from Chance of Rain (bonus, it also has a kidney shaped ham and a sleeve roll, all in one) and also mostly followed her tutorial.

Since I didn't have any sawdust to hand, I did some research on whether I could just use poly-fill, and found that while you can, if you want to be fancy and do it like the pro's, sawdust is the stuffing of choice. Fabric scraps are widely regarded to be just as good, but your ham may need re-stuffing in a few years since they squash down over time (have any of you had any experience with this?).

I also ended up using 5 layers of fabric in total. The inner layer is calico/muslin, the bottom layer is a scrap of vintage rosey pink wool left over from this skirt and the top is a scrap of floral fabric left over from this dress, as well as the underlining from it. The scrap I used still had the under lining attached so I just went with it and thought that it would give some extra smoothness to the finished ham.


I managed to find my sawdust from a pet shop, but the smallest bag they had was 1 kilo. I still have enough to make a sleeve roll and a several more hams from it I think.

Also, just a quick note when stuffing your ham with sawdust, it's best to do it outside. I ended up with it all over the courtyard, myself and Monty, who was innocently snoozing in the sun. To be fair though, it was windy...

xx
Jen

Wednesday, May 15, 2013

Patterns and Spots

So, something quite exciting happened a few weeks ago. I was asked to be a pattern tester for a new indie pattern company that Abby was starting called Blue Ginger Doll. I was quite chuffed to be asked really. I've never done any pattern testing before (except for my own adventures in pattern drafting) and so I jumped at the opportunity to be involved.

I received a lovely big package in the post a few weeks later that turned out to be the pattern for Abby's first dress, the Billie Jean.

14May 2013 2

14May 2013 1


It's a truly lovely pattern to work with. I didn't really need to make any alterations besides the ones I normally have to make to most patterns.

I did end up pinching a bit of excess out of the neckline though, probably about 3cm all up. The dress straps are designed to sit off the shoulder but I wanted to be able to wear the dress as an 'every day' dress and so needed to be able to wear a bra without the straps showing.

This is really very easy to do - simply cut out the front pattern piece in a muslin, place it on yourself or your dress form and pin the shoulder straps where you would like them to sit. Pinch out the excess on the neckline evenly on both sides, iron the excess down so that you have a flat pattern piece and redraw. Do the same for the back pattern piece so that the shoulder straps line up. You will need to slightly true up your pattern piece around the neckline after that, but it's really very minimal.

14May 2013 4

14May 2013 3

14May 2013 5

I made version 2 of the dress but made the skirt less full. My version is made from a light cotton black and white polka dot fabric and is lined in the same fabric.

The Billie Jean dress is Abby's first pattern and is available for pre-sale at the moment in both downloadable pdf and paper variations. Check out her website for other variations of the dress, you'll see that it's really a great pattern for mixing and matching different fabrics and styles.

xx
Jen

Monday, May 13, 2013

Me Made May - Week 2

Time for my weekly Me Made May round up! Follow along daily on Flickr or Instagram.

Day 7 -
Simple and comfy for a day of running errands. I actually wear this combination a lot in real life (not just Me Made May life).

Wearing my self drafted blue circle skirt.

7May 2013


Day 8 - 
Blending in nicely with my background.

Wearing my 7 Bloggers 1 Dress Burdastyle dress.

8May 2013 2


8May 2013 3


Day 9 - 
I'm still mad at the plaid, but I really like this dress so can't stay mad at it for long.

Wearing my Mad at the Plaid dress.

9May 2013 2


9May 2013 3


Day 10 - 
Felt very uninspired today.

Wearing my 60's McCall's Rose Wool skirt with self drafted belt tabs.

10May 2013


Day 11 -
Ahh, nothing like freshly washed hair and a sunny, warm Sydney autumn day to get out of a rut. Also, my first repeats of the month.

Wearing my Sleeveless Jasmin Blouse and Self-drafted Red Circle Skirt.

11May 2013


11May 2013 2


Day 12 - 
Sundays are for sewing (and making gluten free lemon meringue pie!!! Major sugar overload...).

Wearing my first Afternoon Blouse and Self-drafted Black Circle Skirt.


12May 2013 3


12May 2013 2


12May 2013 1


Day 13 - 
Feeling uninspired again today and my face looks weird in all the photos that were taken.  Below is the best one. Maybe this is what it always looks like on a Monday?

Wearing a Self-drafted Floral Circle Skirt. (I'm thinking about cutting my hair that short again too. I am in major need of a hair cut!)

13May 2013


How are you doing so far in Me Made May? We're nearly half way through, can you believe it?

xx
Jen

Saturday, May 11, 2013

Tutorial: Replacing Facings with Bias Binding


I've mentioned before that I love bias binding. I especially love using it in place of facings on arm holes and where appropriate, neck lines. It moulds nicely around curved edges and leaves you with a lovely clean finish on the inside (and outside!) of your garment while reducing the bulk that facings can sometimes leave. 

I have a tutorial on how to make your very own bias binding here

Supplies:
  • Bias Binding (the required length depends on the facing you are replacing)
  • Pins

Optional - Needle and thread (if you are not going to machine topstitch your binding down)

*Note - in the pictures below I am replacing the neck line facing but I did also replace the arm facings on this dress.

Steps:

1. Right sides together, pin your binding along the closest ironed line to the facing area you are replacing. Pin all the way around and leave about 1 inch loose at each end (ignore the fact that I didn't leave said inch in the photo below!).


2. Once your binding is pinned all the way around, pinch the loose ends of bias binding together (right sides together) and pin. 

*Note - I forgot to take photos of steps 2 & 3 on the dress and so recreated them later. I just realised the binding is pinned to the wrong side of the fabric on these though! Sorry!!


3. Sew ends together along the pin. Trim seam allowance and iron flat.


4. Machine stitch your bias binding in place following the folded line you have pinned down.


5. If you don't want any binding showing (as in the headline image), fold the binding all the way over your raw edge, iron and pin in place. You can then either invisible hand stitch the binding in place or top stitch using your machine.

*Note - As I used an underlining on this dress, I hand stitched my binding to my underlining using a whip stitch instead.


OR

If you want to make a feature of your binding, fold it down around the raw edge of your garment so half of your binding is exposed. Hand stitch or machine stitch as desired. An example of where I have done this is here.

And, that's it!!

xx
Jen

Wednesday, May 8, 2013

That's a {Violet} Wrap {Dress}

Please don't ask me how I come up with those post title gems...

5May 2013 4


This pattern has been sitting in my pattern stash for at least a year (probably longer). I fell in love with the violet dress on the front as soon as I saw it, but the only problem was that I just couldn't seem to find the right coloured fabric! It needed to be a violet wrap dress. No other colour would do.

Needless to say, I found the right fabric a few weeks ago, but guess what? It's actually cotton quilt backing! I know, I'm such a rebel.

I firmly believe that you can go ahead and use quilting cottons (and backings!) if they fit with the style of garment you are making. If the garment calls for a stiffer fabric, then go ahead and walk straight over to those quilting cottons and gush as much you like! 

Also, the best thing about buying quilt backing for a project? You get twice the amount of fabric for the same price because it's folded over double on the bolt. You really can't lose folks.


5May 2013 5


While the dress itself was relatively simple to make up, I spent so much time on hand sewing I could cry. I really really didn't want to lose the clean lines down the front of the dress by top stitching my facings in place by machine, and so I did it all by hand. If I didn't know how to do an invisible hand stitch before, I sure do now. But just look at that hand stitching! Oh wait, you can't...


5May 2013 6


I also added some purple hem lace to the front line of the skirt. This was actually lace left over from our wedding and I still have a bunch of it in all sorts of happy colours. I really love the result and think my next few garments will probably all have lace detailing of some kind on them. Need a tutorial on how to do this? Let me know in the comments.


5May 2013 3


Last but not least, I swapped out the arm facings for bias binding. I have a tutorial on how to make your own bias binding here and will have a tutorial on replacing arm facings with bias binding on the blog on Friday!

So, tell me, have you ever used quilt backing or quilting cottons for a garment? Did it turn out well?

xx
Jen

Monday, May 6, 2013

Me Made May - Week 1

Okay guys, here is the first round up of outfits for Me Made May. You can follow daily on Flickr or my Instagram!

Day 1 -
Off to a good start. A polka dot wrap blouse and self-drafted black circle skirt.

1May2013 7

1May2013 3


Day 2 -
Hmmm - realise that taking photos everyday is going to be hard when your photographer needs to leave in the mornings. Hence, a lesser number of photos was taken than necessary resulting in a uni-foot in all head to toe shots.

I thereby declare all Thursdays to be renamed 'Uni-Foot Thursday'. Now there's a theme for #MMMay13!

Wearing my sleeveless Jasmin blouse.

2 May 2013 2

2 May 2013 1


Day 3 -

A bit chilly this morning - vintage cardi's were at the ready. Then a beautiful afternoon, thanks Sydney!

Wearing this floral 50's dress made back in October for spring, but it's actually the perfect autumnal dress. Still love the colours in this floral cotton lawn.

3May 2013 2


3May 2013 1

Day 4 - 

O Hai Unifoot. Fancy seeing you here again, it's not even Thursday...


4May 2013 1

4May 2013 4

4May 2013 2
Obligatory sunnies shot - where you can't even really see the sunnies...

Day 5 - 

Finally finished my 60's Vogue violet wrap dress last week and wore it on Sunday (will be blogged this week!). I love this colour, must add more violet to the wardrobe!

5May 2013 4

5May 2013 5

Day 6 - 

Sleepy Monday eyes this morning, but I've made it through my first week of Me Mades!  This dress is the first version of the Simplicity floral dress I wore on Day 3, but with added pleats!

6May 2013 1


6May 2013 3

How was your first Me Made week? 

xx
Jen