Image Slider

Me Made Maternity: Week 35 - Hello? Is it Me You're Looking For?

Monday, April 27, 2015
Wow, it's been a while since I've done one of these, and as you can see, the bump has most definitely grown in the past five weeks. He's very active, wriggly and is not a huge fan of my ribs (I, personally, am rather attached to them. Ha ha, geddit? I haven't lost my (bad) sense of humour just yet...).


My slippers are knitted, but not by me AND I'm hanging out on our new deck to take these!!

I haven't meant to leave it this long between bump shots, but we've been so busy around here that we tend to forget about them until it's too dark to take any photos. 

To be fair, you haven't been missing any new 'Me Made' clothing action, considering I'm still wearing essentially the same things I have been for the past few weeks. These dresses have been on pretty much constant rotation - I'm way too tired and round now to care if I'm wearing the same thing day in and day out. If it fits and is comfortable, I'll wear it.


Other 'baby' related things over the past 5 weeks that I meant to talk about:

1) Maternity bra shopping - my head is about to explode on this one. How am I supposed to know what sizes to buy when I have no idea how big they're going to get? Any tips? Bras are expensive and I don't want to end up with a draw full that never see the light of day.

2) We've been attending regular antenatal classes, and no, you don't sit around in a circle and learn to breathe (they assume you know how to do that, considering you've been doing it quite successfully for a few years now). David and I were both kind of disappointed...

3) As I learnt on Saturday, don't scoff your cereal in the morning, because when your stomach has limited space and is squashed somewhere where your lungs should be, and there is a small foot using it as a kick boxing bag, your cereal will want to make a reappearance if it's gone down too quickly. Slow and steady wins the 'food staying in your stomach' race.

4) Heart burn, please-go-away, I'm trying to sleep.


There are still quite a few things David and I need to do before the Bebe arrives, mostly house related things (but also lots of loose ends for my business so that it keeps running at least semi-smoothly while I take some time out), but I'm trying to give myself a bit of a break from this (long) self-imposed list.

Do you remember me talking about the not-so-great March stuff bubbling on into April? Well, as it turns out, it's decided to stay for the whole month (well, pretty much, considering it's May this week!!). It's not the same annoying stuff, it's more of it in different forms, that seem to be compounding and growing and just being, well, poo-ey. I do tend to err on the half-full side of the glass, but, I am ready for a little break...

Luckily, David is home for most of the week, so we're going to tackle as much as possible and then, we'll just take it as it comes. And eat cookies. Mmmmmm...cookies. And admire the autumn leaves before it gets really cold. Though, we've already had a small amount of snow, so, I guess that doesn't bode well for a mild winter...

How are you lot?

xx
J

*I can't believe I wrote 'poo-ey' on my blog. I suppose you might need to get used to it, considering I've heard babies have a lot of it!

The Felicity Dress Sew Along - Grading at the Hips with Yoke Pockets

Friday, April 17, 2015

The hips on both versions of the Felicity Dress are free, but sometimes, you might want to grade up (or down) for whatever reason. This is generally a pretty straight forward process, but when it comes to yoke pockets, they require a few extra steps.

The Felicity dress comes with all-in-one yoke pockets, which means you don't have two separate pieces. Instead, you fold them in half to get the full pocket. You can see on the diagram below that once folded in half, the pocket fits exactly into the skirt pattern piece.


Yoke pockets (and actually, pockets in general) are usually designed to fit exactly into each graded size without the pocket size itself changing as above (though the top of the pocket shape changes slightly per size for View 1 of the Felicity Dress, since the waist curve changes as it grades up). This means while it's still simple to grade the hip on the skirt as usual (by following the grade out to the next size), you'll also need to alter the pocket pattern to fit the new grade (and since it doesn't have any individual grade lines on it to follow, this is what makes it a tad more time consuming).

In this example, we're going to be grading from a size 12 at the waist (red pattern piece) to a size 14 at the hips (green pattern piece).

1. Lining up notches, tape the 'back' of your yoke pocket piece into the size you want to keep consistent at the waist, in this case, it's the size 12. This means we now have a complete base to work off when grading at the hip (since the 'back' of the pocket makes up a section of the total waist line).


2. Place some paper under your pattern at the hip and starting from the end of the waist line (or the end of the pocket) grade out to the next size at the hip as you normally would, as indicated by the black arrow on the diagram.


Continue down until you reach the bottom of the pocket along the side seam (indicated by the red arrow). Fill that extra bit in with spare paper, and you have now graded the 'back' section of your yoke pocket piece.

3. Now you need to grade the 'front' of your pocket piece to fit the back and new side seam. The first thing you'll need to decide is which pocket curve you want to follow. I'd personally follow your original pattern piece (the size 12) since it means you won't end up needing to change the pocket curve to meet down the bottom at the new size.

Mark where your pocket curve ends on the adjusted pocket piece (indicated on the diagram with a black arrow).


4. Remove your pocket pattern piece and fold it in half along the dashed line included on the pattern.

Now we can see how much we need to add to the 'front' section to make it match the back. Fill in that section with some spare paper (marked in orange).


5. Now you can grade the actual skirt pattern pieces at the hip to match with the pocket. Tape some spare paper underneath the front skirt piece, then tape in the 'back' side of your new pocket piece into the front of your skirt piece (as in step 1), trace along the new pocket line. The last step is then to true up your back skirt piece to match.

And there you have it, graded hips with yoke pockets!!

Next week we are finally doing some sewing! So if you're following along in real time, make sure you wash your fashion fabric this weekend :) If you still haven't bought your fabric, you can read all about selecting appropriate fabrics for Felicity here.

xx
J

The Felicity Dress Sew Along - How to Remove Yoke Pockets

Wednesday, April 15, 2015

Removing yoke pockets is a really easy flat pattern adjustment to make to the Felicity Dress and you can also use this tutorial to remove yoke pockets on various other patterns...

1. Tape the pocket pattern piece into your front skirt pattern piece, matching notches along the waist line.

Note - for Felicity, since the yoke pockets are all-in-one, you'll be taping what is essentially the 'back' pocket section into your skirt to make up the total waist length.

2. Place some paper underneath your pattern and trace around the outside of the yoke pocket - indicated in the diagram below with red arrows.

3. Remove your yoke pocket pattern to reveal your newly traced waist line.

4. Cut out around the traced pocket pattern and Ta Da! A skirt piece without yoke pockets!

Easy!!

xx
J

JLV Patterns Update - March

Friday, April 10, 2015

Goodness, I can't believe it's time again for another one of these - a tad over due even... I've actually been feeling a bit burnt out lately, and while it was unintended and unannounced, taking most of this week away from blogging has been a really good thing for me. I hope everyone had a great Easter, however you celebrate.

March was a funny ol' month. A great high and a few lows that when combined, did put a bit of a dampener on the whole thing. It's trickled on into April as well, but I've pulled my big girl pants up and have (hopefully!) graciously accepted the good with the bad - I can't control everything, and sometimes these things are for the best. After all, it can't (and most certainly isn't!) good all of the time for anyone, no matter how perfect their lives look on the outside. I'm only human, and without the not-so-great, how can you appreciate the actual great?

So, focussing on the positives then, let's move onto what I wanted to achieve in March shall we?

Business-wise -
  • The Bronte Top re-release with extra sizes is now live! BUT...

    I had been in discussions with Etsy about whether people who had bought the older file would be able to access the new one - I had hoped it would be like Ravelry, where all versions of a pattern you had bought were automatically available to you. As it turns out, this is not the case and there's no easy solution.

    I investigated downloading sales spreadsheets, at Etsy's recommendation, to find the individual sales from those, but as it turns out, they are completely useless since none of them come with email addresses. And trying to send out an updated digital file to people with no access to their email addresses is a little, well, ironic.

    SO, if you bought the Bronte Top Pattern before I updated it with the two extra sizes and would like the newer version, please forward me your Paypal Receipt or Etsy Direct Checkout receipt to jenniferlauren.is@gmail.com - I will collate them and once a week send a bulk email to all those who requested the latest version.

    Thank you for your patience with me on this one. It's potentially going to be a huge task and this is the best way I can see doing it for the mean time. Etsy has taken my suggestions on board though and have sent them on to their development team. Let's hope something comes out of it!

  • The Felicity Dress Sew Along - we're in full swing. The post for this week will go up on Wednesday next week, and the Wednesday one on Friday, so I don't fall behind. I've been adding things and changing the order of some posts as I go and there has been some really great discussion going on. I love it! I love sharing my thoughts, ideas and processes with you all and I really love hearing about yours and whether you agree or disagree with me on various aspects.

    I don't think people need to or should agree with each other all the time, with sewing techniques or anything else for that matter (cause that'd be boring!), but I think listening to others view points, while it may not change our own (nor should it), opens us up to new ideas and ways of looking at things that we may not have thought of.

  • The Great Sewing Room Tidy - I've actually stalled a bit on this now. It's pretty much looking exactly as it did when I talked about it last time. It hasn't regressed, thankfully, but there's still some things that need sorting. Then I'll take you on a tour :)

  • Re-branding - this has slowed quite a bit unfortunately. Though, I've pretty much designed my new logo and can now get to work gearing up for re-designing the Bronte Top pattern for print, which was the catalyst behind the whole re-branding thing anyway. The website may take a bit of time to catch up, but we'll get there.

  • And possibly the most boring of last month's tasks, taxes. I spent a good week sorting everything out and we're nearly at the end of the road on that one. No more detail necessary - my brain can't handle it. I vow to keep much better records this year, all in one place. I'm sure with a new born, it'll be a breeze...

And this month, what's happening this month?

  • Well, the focus will still be on the re-branding and new layout of the Bronte Pattern for paper. I'm not sure if I'll have the paper pattern before I take some maternity leave around the end of May, but I tend to be on the optimistic side of the glass, so you never know.

  • The Felicity Dress Sew Along will continue - as always, if there is something you'd specifically like to know about, please let me know.

  • A new pattern (sort of). This really isn't going to be ready until the end of the year realistically. Some of you may remember when I announced I was pregnant, that I was planning to release a maternity pattern in March/April? Yeah, waaay too optimistic on that one.

    I have the idea and have started drafting the pattern and stitching samples, but there is no way I'm going to have it ready any time soon. I could rush the pattern and release it, but it'd probably be crap. I like to take my time with these things, it's not a race and I don't want to release a pattern just for the sake of it.

    The pattern itself has also morphed from a maternity pattern into a standard pattern that is breastfeeding friendly and can be easily adapted to accommodate a growing bump (why yes, it is another knit!). As much as I'd like to release a maternity-specific pattern, I've realised that making a pattern that is so specific to one thing really isn't what I'm into. I hate the thought that you could only use the pattern for one event, and a relatively short one at that, so making it more versatile and open for everyone to use, just makes more sense to me.

    Again though, while that will be my next pattern, it's not due anytime soon. But, I'll be testing it's breast-feeding ease while I adapt my samples, and maybe that'll be a great time to let you into my pattern making process? From idea to actual pattern? I've never released a pattern idea before it's been turned into an actual pattern before, so it'll be a new one for me!
  • Free patterns! I've been working on some small free patterns that I hope to make available soon. They are mostly bebe related though, so, apologies if that's not really your thing :) I'm also working on the Maternity Bronte Pattern hack tutorial, so, watch this space.

I can't believe we're a third of the way through April already...

xx
J

Felicity Dress Sew Along - Full Bust Adjustment and How to Pivot (Rotate) Darts

Friday, April 3, 2015

Like I said in the SBA post, Felicity is not meant to be really fitted in the bust area, but making a muslin will show you if there are any fit issues because, you may like it just as it is! If you still think you want to do a full bust adjustment, you'll need to draw in your 'dart' lines just as you would have when doing a Small Bust Adjustment. I wrote a detailed post about how to do that, with lots of diagrams here (it's right at the very start!).

Again, I'm not going to go into the specifics of measuring etc, but this post on FBA's is a great one (with pictures included on getting your high and over bust measurements).

Full Bust Adjustment:

Once you've drawn in your cutting lines, you can slash and spread following along with the tutorial for the Emery dress above - it's exactly the same principle. But the next issue you'll have is when it comes time to finish the darts you've created because you'll be left with darts in a dart-less bodice.

So, how do we deal with them?

First up, you are more than welcome to sew them in. I'd personally get rid of the waist dart, but the side dart, you probably wouldn't even notice it. Just make sure you end the points of the dart back from your bust apex, unless pointy Madonna boob is the look you're going for (and hey, no judgement here).

The easiest way to eliminate the waist dart and return your waistline to it's original length, is to move the bottom right corner of your bodice (in red) back to it's rightful place next to line A and then true up the lower centre seam:

1. Take the pattern piece in red and move it left, to match back up with the piece next to it.


2. True up your lower centre front seam (the line in red).


If you don't want to stitch in a side bust dart, we can easily rotate it into the gathers at the neckline! It's actually much easier than you think and you can use this tutorial to move ANY darts around a bodice - it's the same principle. For Felicity, use the 'cut' lines as your dart legs.

Pivoting Darts:
Supplies:
  • Adjusted Pattern Piece from above.
  • Large piece of paper, big enough to put your adjusted pattern onto (and then a tiny bit bigger).
  • A pin (could be a mapping pin or a pin from your pin cushion. You'll need something small and sharp).
  • Pin board or something soft that you don't mind puncturing with the pin above.
  • Pattern Weights (or something heavy to stop your pattern moving. I wouldn't use pins as they could get a little fiddly and you only need your pattern weighed down temporarily).
  • A pen or something to trace with.

1. Take your large piece of paper and place your pattern on top. Put the weights on top of your pattern to stop it moving temporarily.

2. Mark a point somewhere along your neckline within the section that will be gathered. This can be anywhere, as long as it's between the notch and the centre front stitching line. Make sure it's long enough to mark your pattern piece and goes off onto the paper your pattern is sitting on. In the diagram below, it's the red line.


3. Starting from the 'top' dart leg (where the red arrow is pointing - if you were pivoting a waistline dart, this would be the left leg of the dart), trace around your pattern moving up and over the shoulder line, until you reach the mark you made in step 2.


Note: My 'tracing' is done in red and I've deliberately made it a bit bigger than my pattern piece so that you can see it. You'll want to trace your pattern as closely to your original pattern as possible.

4. Take your pin and poke it through the top pattern layer and into the paper underneath at the tip of the dart (marked as a pink dot below), then remove your weights and rotate your pattern piece up (or clockwise, however you want to say it) until the 'bottom' leg of the dart sits where the 'top' dart leg sat (basically from where you started tracing, at the red arrow).


5. Replace your weights and continue tracing the rest of your pattern, starting from the line you marked in step 2 on your neckline that is on the pattern you are tracing, not the piece of paper underneath.


6. Remove the pattern you were tracing from. I've left the red arrow in the diagrams so that you can see where you started and how now, your side bust dart is closed!! Instead, you have a gap in the neckline.


7. All you need to do now is true up your neckline starting from the notch to your centre front seam (marked in black), and your dart has now been magically rotated into your neckline gathers.


Like I said above, this method can be used for rotating any dart around any bodice to anywhere you feel like putting a dart. It can definitely make for some interesting pattern lines if you feel like being a bit different the next time you stitch up a tried and true bodice.

I hope everyone has a great Easter break!!

xx
J

Felicity Dress Sew Along - Small Bust Adjustment and Reducing Neckline Gathers

Wednesday, April 1, 2015

This post ended up being way too long when detailing Small Bust Adjustments and Full Bust Adjustments together, so I've decided to break them up into separate posts. I'll post the FBA on Friday!

If you're making a Felicity Dress, you may want to do an SBA (small bust adjustment) if you're smaller than a D cup, which my patterns are drafted for. That basically means reducing the amount of fabric around your bust if you get pooling or have excess fabric around that area when you try on your muslin, without altering the shoulders or waist line (which should fit you well).

Felicity isn't supposed to be a super fitted dress around the bust though. It's supposed to be a slightly more relaxed fit for summer, while still providing a flattering silhouette. For this reason, I totally advocate grading at the side and centre front seams first if you think you might need an SBA. I say this because with the style of the neckline, I think you could get away with not doing a full on SBA if you're a C cup or even a B cup - you may find that you just want to take away a few gathers at the neckline and you can read more about how to do that below. Though always make up a muslin to check the fit first.

There are so many great tutorials on doing bust adjustments already out there. A quick google search brings up tonnes! I personally still really like this FBA that was done for the Emery Dress, so I'm not going to go into too much detail on how to get your measurements etc. However, when choosing a size to cut for your dress, I'd recommend going off your waist measurement for Felicity.

Once you've got your muslin on, you'll be able to determine how much excess bagging you have around the bust, and therefore, how much you need to remove, by pinching it out and measuring it. Remember though, since we are only working with half a pattern, you'll need to divide your total excess in half. (There are other ways to determine how much to take away which include getting your over and under bust measurements, adding the difference I incorporate into my patterns and figuring out the maths from there - but again, with the neckline, you may not want to take away as much as you might calculate, or you might want to take more, depending on your personal preferences. And, if you're going to go to the trouble of doing an SBA, then you'll want to make a muslin first anyway).

Once you've figured out how much you want to reduce your bust by, the main issue with Felicity is that it doesn't have any dart points on the front bodice, so, how do you go about locating them?

Step 1 - Locate your bust apex

The bust apex is pretty much the point along your bust line that sticks out the most from your body - generally this will be where your nipple is, though boobs come in all shapes and sizes, so use that as a general guideline only :)

Since Felicity doesn't have side bust or waist darts, locating your apex isn't as easy as just following the tips of those darts through, so below are two ways you could locate your apex:

The fast (and less accurate) way - hold your paper pattern up to you and mark your apex from there. When doing this with Felicity, mark your apex line running from under your arm (or the side seam).

* The slower (but more accurate) way - cut out a muslin, stitch it up and pin in a zip. Try the bodice on, mark your apex, unpick your muslin and transfer your mark to your paper pattern.

* Remember, you've made a muslin anyway when determining fit issues, so this shouldn't actually take that long sine you'll just use the same one!

Step 2 - Draw in your cutting lines

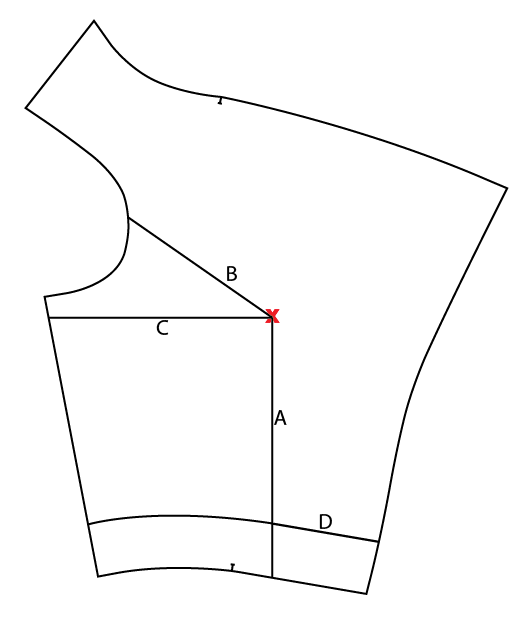
The next step in doing a traditional bust adjustment is drawing in where you'll be cutting into your pattern to perform the adjustment. Now that you've located your Apex (X on the diagrams below), this is relatively straight forward to do.

Using your grainline as a guide, draw in the side bust line at a 90 degree angle to the grain line.


For the waistline line, use your side dart line to mark a line up to your apex that runs at a 90 degree angle to it (this wouldn't necessarily be accurate for a waistline dart due to the fact that the waistline is curved, but it serves our purpose for a bust adjustment.)


Now you can draw in the cutting line to the centre (or close too) your armscye. Make sure you also draw in your lengthen/shorten line (D), of which you can find a detailed post here on how to do that.

Small Bust Adjustment:

1. Measure out, from your apex toward the centre, the difference you calculated that you need to reduce your bust by (remember, this going to be half of the total difference since we are working with half a pattern piece).

Draw this line in (the dashed line on the diagram) parallel to line A.


2. Cut along lines A and B, leaving a pivot point in the armscye (this is the end of line B where the black dot is. Normally you'd cut to the stitching line, but since the end is essentially what would be your stitching line, having your pivot point there is perfectly accurate). Pivot the apex point (and the entire piece of pattern in red) up to the dashed line. Tape in place.


3. Cut along line C, leaving a pivot point at the apex (where the black dot is) and rotate the pattern piece in red towards the armscye so that the line marked A has been lined up with your dashed line. Tape in place.

Note - you could do steps 2 & 3 at the same time if you wanted to.


4. Cut along line D and the pattern piece marked in red. Move that piece up so that it slots back into position, lined up with the bottom of the rest of the pattern and the centre front seam.


5. Now we need to bring your waist measurement back to its original size, since it's now going to be slightly too small. To to this, cut along line D and A on the pattern section highlighted in red. Move that section to the left, so that it lines up with the bottom piece on the right (marked in blue).


6. Now we can true up our side seam and arm scye. You'll want to remove the little triangle sticking up into your arm scye (marked in pink) and then add some paper underneath your pattern piece at the side, and draw in a new side seam (marked in red).


7. Lastly, you'll need to true up the back bodice piece length so that it matches the front. Draw in your lengthen/shorten line and adjust the length to fit in with the new length of the front bodice (matching side seam length).

On a side note, since we've shortened the bodice with the SBA method above, you may want to re-lengthen your front bodice to match your back bodice if that was sitting perfectly at your waist to begin with.

Reducing Gathers at the Neckline:

Another thing you may want to consider with Felicity, if you have a smaller bust, is to remove some of the gather at the neckline. How much and if you actually even want to remove any at all will depend on making a muslin and seeing what fits your particular body shape and your personal preferences.

When making the pattern, I did pay careful attention to making sure there weren't too many gathers that you'd feel overwhelmed, but again, it all comes down to personal preference.

To remove excess gathers, simply skim off some of the pattern from the centre seam and taper to nothing (highlighted in pink).

I'll be back on Friday to show you how to do an FBA and how to pivot darts into the neckline!

xx
J

Auto Post Signature

Auto Post  Signature