Image Slider

The Harvest Apron - A Free Pattern.

Friday, December 23, 2016

Hello everyone,

My last little gift to you this year is The Harvest Apron.

Last year I released a little circular half-apron pattern just before Christmas, and this year I've not only updated the instructions and look of the pattern, but I've also included a new gathered version.

The Harvest Apron is a complete sewing pattern with full instructions and diagrams to walk you through the construction process. The pattern also comes with your choice of either a standard print-at-home tiled pattern or an A1 size print shop copy. All for free. From me to you.


Little half aprons are so lovely and perfect for all kinds of different things. The new gathered version is particularly perfect for gathering Christmas treats from the garden (or weeds or flowers...) and squirreling away sweet tidbits for later.

They're also great stash busters, quick to make and, oh, if you've left your gift making to the actual last second and therefore don't really have the time to make one, print out the print shop version, choose some fabric from your stash and gift a little Harvest Apron sewing kit to someone special.

Top off your gift with some lovely pins for the sewer, seeds for the gardener, paint brushes for the artist or wooden spoons for the baker, tie it all up with string and voila, a beautiful gift that anyone with even the smallest inkling of a crafty urge would love to receive.

I do hope you all have a wonderful day on Sunday, however you choose to celebrate. Stay safe, look after each other, and I'll catch you all one more time before the start of the new year...

xx
J
Shop Patterns     .     Instagram     .     Newsletter      .     Facebook    .     Pinterest   .   Podcast

How to Make a Tailor's Ham - with Free Pattern

Tuesday, December 20, 2016

Hello everyone,

Gosh, how did it get to be less than a week until Christmas?

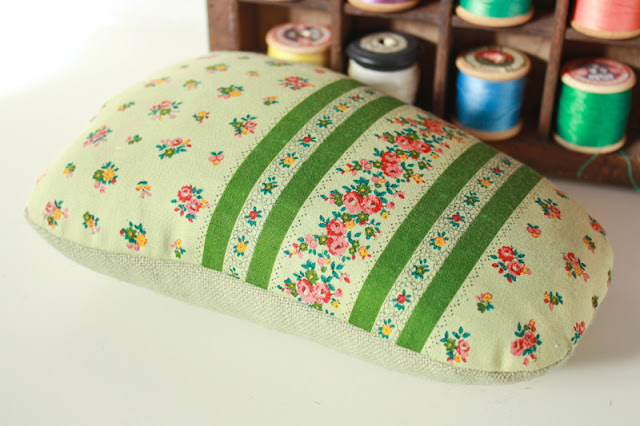
Today I wanted to give you all a little pre-Christmas gift in the form of a free Tailor's Ham pattern and tutorial. There's nothing like sewing your own sewing supplies right?

Many many moons ago, I posted a mini-tutorial on how I made my own (very loved) Tailor's Ham. While the process hasn't actually changed, unfortunately, the website where I had gotten that pattern from has long since disappeared. My copy of that pattern has also long since disappeared (in-between moving countries, buying a house and having a baby...), so I thought with Christmas looming, now might be the time to get my A into G, make a new pattern for you and write a complete tutorial.

This ham is slightly bigger than my original, but I've found that having two different sizes has been pretty handy over the few months I've been using my new ham. To make a smaller ham, cut an even amount off the outer edges, all the way around.


Fabric Options - 
You'll need relatively sturdy and breathable fabrics to make your ham. It gets stuffed tight and will probably be used quite often with a steamy iron, so using fabrics that breath and will dry quickly after use is a must.

The two inner layers should be made from a fabric with a tight weave to make sure your stuffing doesn't work it's way through the fabric (calico/muslin is perfect for this). The bottom outer layer should be cut from a wool (or a fabric with some grip - felt is a good choice) and the top layer should be a pretty cotton or linen of some description, quilting cottons are great - pretty and sturdy.

For the sake of the tutorial, I'll be referring to the inner layers as calico, the bottom outer layer as wool and the top outer layer as quilting cotton.

Stuffing - 
The traditional stuffing for tailor's hams is sawdust. This is what I used in my original ham, but do you think I could find it here in NZ? Nope. Well... I could if I wanted several cubic metres of it, but I'm really not planning on turning into a tailor's ham manufacturing plant. So...

I used wood chips. Don't use wood chips by the way. They are dense, but hard to pack tightly, and you end up with a ham that moves more than you want it too. I'm going to be taking mine out and stuffing it with fabric scraps in the interim, knowing that I may need to re-stuff in the future as the ham starts to settle.

I've also considered using pea-straw. It's easy to find in gardening stores here, and I think it has the same consistency as sawdust when it comes to being reasonably easy to pack in tightly.

I honestly have no idea how this would go in the long term though, but I'm thinking that if you use pea-straw, just make sure it's completely dry before stuffing. Pea-straw, when used in the garden, can sometimes sprout a pea plant or two (coming from experience) because the straw hasn't been completely dried before bagging. Not a major issue in the garden, but to avoid any germinating hams, (or even worse, a mouldy ham), popping your straw in a dry room in direct sun or an airing cupboard for a few days, should ensure you don't get any unwelcome guests in your sewing room.

You'll need -
  • Your free Tailor's Ham Pattern
  • Fabric (Cotton & Wool - see above for more details)
  • Stuffing (see above for more details)
  • Needle & Thread
Steps - 

1. Print out and piece your ham pattern together using the print layout below.


2. Cut out 2 of the pattern in calico, one in wool and one in quilting cotton. You'll have 4 pattern pieces in total.

3. Right sides together, place your quilting cotton and wool on top of each other.  Then sandwich those layers between your calico layers.


4.  Starting at the bottom notch, stitch all the way around your ham as indicated on the pattern piece. Back tacking at each end.

5. Trim away seam allowance and notch curves.

6. Turn your ham right-sides out and get stuffing! You want to stuff your ham as tight as you can possibly get it, and then some. Layer your stuffing to get a smooth outer edge by using small amounts and building up towards the bottom open edge.

Then stuff some more.


7. Stuff some more. Close your ham with a slip stitch - flatten your wool bottom layer over the stuffing, then tuck the raw edge of the top layer under, and secure with a needle and thread.


And that's it, all done. A lovely little Tailor's ham...

xx
J

Shop Patterns
     .     Instagram     .     Newsletter      .     Facebook    .     Pinterest   .   Podcast

How To Make - Beeswax Kitchen Wraps

Wednesday, December 14, 2016

Hello everyone!

Since it's nearly Christmas, I have a few little things I'll be posting over the next couple of weeks that would make lovely handmade, inexpensive, yet awesome gift ideas.

Today, let's make some beeswax kitchen wraps!! In episode 3 of my podcast, I mentioned having made my own beeswax kitchen wraps this year (you use them in lieu of plastic kitchen wrap) and mentioned that I'd do a tutorial for them, so here you go.

These really would make amazing gifts - they're not only super pretty, but they're functional, can save you money and the less disposable plastic you can use in life, the better for the environment right?!

Oh, and did I mention that they're so so easy to make?

The supplies list is below and if you want to jump ahead to the various different topics covered within the tutorial, I have a list with start times after the video.

You'll need -
  • Fabric (I use cotton fat quarters, but I do go into more detail about options in the video)
  • Beeswax Pellets or shavings 
  • Baking Paper
  • Baking tray with a lip
  • Iron
  • Drying rack

Topics Covered -
  • 0.01 - Introductions: what is a beeswax wrap & different uses
  • 1.49 - Taking care of your beeswax wraps & how to use them
  • Supplies:
    4.01 - Fabric options & finishing edges
    6.19 - Beeswax
    7.58 - Other supplies listed above.
  • Extra Notes:
    8.46 - Different size wraps to consider for different uses
    9.45 - Shelf-life & re-waxing older wraps
  • 12.22 - Let's get started with the tutorial already!
  • 16.55 - The results of your hard work (and a note on jojoba oil & antibacterial things).
  • 18.33 - Storage of your beeswax wraps
  • 18.42 - Closing thoughts on this particular way to make beeswax kitchen wraps
I bought my beeswax from Candle Creations here in NZ, but if you just google 'beeswax' in your local area, I'm sure you'll find plenty of places close to you who stock it.

Let me know if you have any questions or if you make some! I'd really love to see them :)

xx
J
Shop Patterns     .     Instagram     .     Newsletter      .     Facebook    .     Pinterest   .   Podcast

A Late Spring Garden Interlude

Thursday, December 8, 2016
Filmed over a few days at the end of November, here is that little garden interlude I mentioned in the last episode of my podcast. Bees are buzzing, chooks are scratching, toddlers are foraging for strawberries and kitties are happy.

Enjoy.


Warning: Contains wild & unruly grass - David literally did the lawns the day after I had finished shooting the final videos for this. But, if it had been mown, I wouldn't have got that amazing shot of the bee buzzing over the daisies at the very start, so, there's always something to be said for a bit of imperfection and unkempt-ness. Especially where gardens are concerned.

xx
J
Shop Patterns     .     Instagram     .     Newsletter      .     Facebook    .     Pinterest   .   Podcast

PS) I quietly, and finally, launched my very own storefront yesterday. It's been a work in progress for sometime now, and while it still needs a bit of finessing, it works and I'm so happy with it. Won't you take a look?

A Handmade Day Podcast, Episode 4 - Tea & Books

Friday, December 2, 2016
Hello everyone,

A new episode of A Handmade Day is now live. Tea & biscuits feature heavily in this episode, along with a healthy dose of reading with the introduction of a new segment, Oscar's Bookshop.

Each episode, I'll be sharing one or two of our favourite books that we've been reading with Oscar lately, the first book is a beautiful mixture of art, ABC's & the heartwarming (and at times heartbreaking) world of homesteading.

Of course, the usual handmade-goodness is peppered throughout, with knitting & sewing plans afoot.


Below you'll find the start times of each thing, in case you want to skip ahead...

0.01 - Introductions & chatter

4.20 - Baking of the episode: Bluebells Cakery Vol 1, Chocolate Chip Biscuits

9.51 - What I'm Wearing: An Ivy Pinafore, with weather and earthquake updates, er... naturally?

13.34 - WIP's from last episode & some new ones:
* The Belfast Cardigan by Carrie Bostick Hoge
* The Anouk Cardigan by Andi Satterlund

21.36 - Making Plans:
* Owls & Owlets by Kate Davies
* A Christmas Felicity Dress by Me
* Easy Peasy Baby Pants by Climbing the Willow

~ Tea & Cookie Interlude ~ 28.17

* An Heirloom Quilt

33.46 - Oscar's Bookshop:
* The ABC's of Homesteading by McKenzie Elizabeth Ditter

I hope you like this episode, thanks so much for watching and if you'd like to make sure you never miss an episode, do subscribe to my channel.

xx
J
Shop Patterns     .     Instagram     .     Newsletter      .     Facebook    .     Pinterest   .   Podcast

How To: Flat-felled Seams, An Ivy Pinafore Tutorial

Tuesday, November 29, 2016

I love flat-felled seams. They're strong and sturdy and are great for seams that require a less-bulky finish when using medium/heavy-weight fabrics. You can make them a feature by using a contrast thread, or have them blend into the background with a matching thread.

The Ivy Pinafore has flat-felled seams down the centre front and centre back where the pattern pieces are joined. In this tutorial, I'll be taking you through how easy they are to make.

Note - The steps in this tutorial are referring to the Ivy Pinafore specifically, but it is the same technique no matter what you're using a flat-felled seam for.

You'll Need -


Steps -

1. Wrong sides together, stitch your centre seam closed, back tacking at both ends. Press seam open.


2. Trim down one of the seam allowances to less than half its width.


3. Fold the remaining seam allowance down and then fold in half, tucking the raw edge under. Press.


4. Secure with a line of top stitching 3mm or 1/4" away from the folded edge.

Yeah, that was easy peasy right? Repeat the same steps for the centre back seam and you'll be away laughing!

xx
J
Shop Patterns     .     Instagram     .     Newsletter      .     Facebook    .     Pinterest   .   Podcast

Cyber Monday Sale - 30% OFF!

Sunday, November 27, 2016

Happy nearly Cyber Monday everyone!

Let's get started a little early with this sale then, shall we? 

From now until the end of Monday* you can get 30% every single pattern in my little shop! Woohoo! Just use the code MONDAY at the check out to have your discount applied.

xx
J
Shop Patterns     .     Instagram     .     Newsletter      .     Facebook    .     Pinterest   .   Podcast

* Well, Tuesday for those of us in the southern hemisphere - so, let's make it 8pm Tuesday 29th November NZDT.

What is Fabric Nap? An Ivy Pinafore Tutorial

Wednesday, November 23, 2016

Hello everyone!

Today I'm going to be talking a little bit about some of the different options you might want to consider when deciding on fabric to make up your Ivy Pinafore, mostly though, this post is about nap.

More specifically - what even is nap?

Some fabrics, like velvet and corduroy (and faux fur for that matter - not that you're going to be making a faux fur Ivy... probably...) have what is called a 'nap'.

Fabrics with a nap are made up of a flat base layer that have little fibres sticking up from it - a bit like the hair on your head (with your skin being the base layer). The nap is basically the direction those little fibres on the base layer want to face. There will be a 'wrong' way and a 'right' way and that usually aligns with the grainline of the fabric.

If you run your hand against the grain, you'll find that, just like with your own hair (or your pet's hair, especially if it's short) you'll get resistance - this is the wrong way. Whereas, if you run your hand along the grain, it'll go down smoothly, or the right way.

I recommend making sure you cut your pattern pieces with the fabric nap running down towards the ground, unless you're doing the opposite as a design decision. This is mostly a gravity thing really, it's more comfortable to have the nap running down because that's how our arms hang.

Make sure you cut all of your pattern pieces with the nap running the same way - if you cut two pattern pieces with naps running in opposite direction to each other (or even slightly off), you'll notice in the final garment because the fibres will catch the light differently. One piece will end up looking lighter and the other, darker.

So, what fabrics work with Ivy?

I recommend making Ivy up in a medium weight, woven fabric that has some drape. My favourite's are pin-whale cord and denim, but jacquard and wool are equally lovely and cosy.

Be careful about making the slim-fit Ivy in a fabric that has too much bulk though, as you could run into some issues with making the bust dart lay flat (though you can trim the dart excess out to see if that helps if you're running into this issue).

And although Ivy was designed to be made in slightly heavier fabrics for the cooler months, now that you know how to make an unlined version, you could certainly make it in lighter fabrics. The full version of Ivy in a soft, flow-y fabric would be beautiful and cool in the summer and would make a perfect dress for throwing on over your swimsuit at the beach, or riding your bike down the lane with your dress billowing daintily behind you (we can all dream...).

xx
J
Shop Patterns     .     Instagram     .     Newsletter      .     Facebook    .     Pinterest   .   Podcast

Get 'em Before They're Gone... $2 World Wide Shipping!

Monday, November 21, 2016

Hello, hello!

I took a mini internet break last week to focus on getting the Gable Dress Expansion Pack out to my lovely testers.  Now that it's away, I can finish up the Ivy Pinafore Tutorial Series and get another podcast up :)

But before I do that, I wanted to let you know that I have $2 world-wide shipping* on my Bronte Top Paper pattern and I only have a very small handful left, and once they're gone, they are gone! 


Unfortunately at this stage, paper patterns haven't really made much sense for me. I'm too far away to offer competitive shipping, and the cost of getting paper patterns printed down here has proven to be exceptionally high. That means, I won't be doing any more in the foreseeable future - so, er, if you want one, now's your chance - get in quick!

These would make lovely christmas gifts for your sewing buddies, and if you buy them now, they should be on your doorstep before Christmas. I'll get them posted asap anyway.

If you're on my newsletter list, you got first dibs, so if you're not, make sure you sign up so that you not only get special discounts on new patterns, but also get access to subscriber-only sales.

xx
J
Shop Patterns     .     Instagram     .     Newsletter      .     Facebook    .     Pinterest   .   Podcast

*USD and while stocks last.

A Handmade Day Podcast, Episode 3 - Whatcha been up to?

Wednesday, November 9, 2016
Hey all,

I have another podcast for you today - I'm sharing some of the makes that haven't made it to the blog this year (for one reason or another). There's some knitting, some sewing and a little bonus bees wax wrap in there (you can use them in place of plastic wrap in the kitchen!). I'll do a proper post on those soon if you want to see how I made them.

This podcast is a long-ish one, well, for me anyway, so I've listed the start times below (as well as links to the things mentioned in the post) so that you can skip along if you're not interested in some of the other things I'm talking about.

Before you begin though, huge apologies for the occasional random auto-focus/buzzy noise issues in this episode. I had no idea that was happening until I went to edit the video, sigh... I've figured out the issue though, so it shouldn't be a problem in the future.


0.01 - Introductions & chatter (baking of the episode - Nigella's Chocolate Stout Cake)
3.43 - The Auden Cardigan
6.11 - The Ivy Pinafore (How to make an unlined Ivy tutorial is here!)
8.28 - The Gumnut Hat - by A Makers Burrow
16.34 - Knitted Dishies - by Very Pink Knits
20.37 - The Belfast Cardigan - by Carrie Bostick Hoge
28.13 - Easy Peasy Baby Pants - by Climbing the Willow
36.07 - Roman Blinds
41.48 - Bees Wax Wraps

If you'd like to be friends on Ravelry, you can find me here.

I've had lots of questions for 'Ask Jen' already, but keep sending them in if there's something you'd like answered. I'm hoping to get to one or two in the next episode.

Speaking of the next episode, I'll be sharing some of my new personal making plans - knitting features heavily, funnily enough, and a Christmas dress of course...

xx
J
Shop Patterns     .     Instagram     .     Newsletter      .     Facebook    .     Pinterest   .   Podcast

Introducing, The Auden Men's Cardigan Sewing Pattern

Wednesday, November 2, 2016


With a contrasting neckline and elbow patches, View 1 offers the ability to customise Auden to your own tastes and preferences, while retaining the unique saddle shoulder design and slim fit body.
View 2
For those who prefer more subtle details, the saddle shoulders and sturdy cuffs on View 2 of your Auden Cardigan remain the stars of the show — offering just enough unique elements to remain classic and stylish while still being a little bit different.

Influenced by the classic lines and tailored subtlety of the 50s, The Auden Cardigan is the smart yet casual men's cardigan that is equally comfortable exploring the city streets as it is strolling down country lanes.

Made from cosy and comfortable sweatshirt knits and featuring a modern slim fit body and unique design lines, Auden is a deceptively quick make. Easily customisable to even the most discerning of tastes: you can mix and match fabric colours and prints on the body, sleeves, cuffs and neckline for a truely unique garment.

Auden is perfect for those new to making menswear, gently easing you in while building on current sewing skills — you'll always end up with a garment that is sure to impress.

Saddle shoulders offer a unique perspective on this dapper cardigan. Perfect for the weekend gentleman.


With Christmas only a few weeks away, Auden could make the perfect gift for the gentlemen in your life (or yourself!). 

Can't wait to see your creations!

xx
J

ps) A big happy birthday to my favourite menswear model!!

Shop Patterns     .     Instagram     .     Newsletter      .     Facebook    .     Pinterest   .   Podcast

Auto Post Signature

Auto Post  Signature