Image Slider

My Pledge, Me Made May '14

Wednesday, April 30, 2014

Well people, May starts tomorrow (for me!) and it's high time I wrote my pledge. I've taken a bit more time over it mostly because I wanted something that was achievable for me.

'I, Jen from Jennifer Lauren Vintage, sign up as a participant of Me-Made-May '14.  I endeavour to wear at least one me made garment each day for the duration of May 2014 with a round up of outfits each week'

Yep, my pledge is exactly the same as it was last year (as well as the photo!). Zoe talks a lot about how our pledges should be a challenge for us, as that's kind of the whole point, so I wracked my brain about what I could do that was challenging and different from last year. I slowly realised that May is going to be one heck of a busy month for me, and that actually, my pledge from last year is going to be just as challenging this year, but in different ways.

Since May last year, I've worked hard on sewing items that I enjoy wearing and that actually get worn. They mix in with the wardrobe I already have and I'm actually really proud of my wearable hand-made wardrobe (plus I've been working on my second, third and fourth patterns that hopefully fit in with this theme of a wearable hand-made wardrobe for everyone! Watch this space for a few sneaky peeks of my test garments during May).

So, have you made your pledge for this year? Remember to sign up on Zoe's blog and join the Flickr group and the Pinterest group*.

xx
J

* If you already followed me on Pinterest before the Me Made May '14 board was created and you want access to pin to it, please send me an email (jenniferlauren.is@gmail.com) with a link to your pinterest profile. I had a number of followers before that board was created, and I don't really have any way of knowing who of those initial followers want to participate. So, it's a bit easier if you email me to let me know you'd like access. Ta!

Quick Tips for Sewing with Silk

Sunday, April 27, 2014

Silk is such a luxurious fabric to wear, unfortunately, sewing with it is not so luxurious. In fact, it's a real pain in the butt if I'm being honest. So today, I wanted to share a few tips about sewing with silk (and other fine/slippery fabrics) that I've picked up in my time sewing with it, just in case you fancy making your Afternoon Blouse from it.

The major issue I've always encountered with silk is that because it's so slippery, it tends to move off grain during cutting. Unfortunately, you can muslin a garment as many times as you like to get the fit right, but if the pattern pieces slip off grain when it comes time to making it with your fashion fabric, chances are the final garment won't fit right. So...

1) Think about cutting one pattern piece at a time instead of folding your fabric to cut out 2 pieces. It might take longer, but generally, the pattern piece that is going to slip and go off grain is going to be the bottom piece. For pattern pieces that are placed on the fold, I would recommend re-tracing the pattern piece into one whole piece, and cutting in a single layer from that.

2) If you prefer to cut your fabric on the fold, try putting it between 2 pieces of tracing paper. Sounds weird I know, but the tracing paper has more grip than silk, which means it will hold those slippery pieces together. To do this, fold your fabric along the grain and pin your selvedges together. Place your folded fabric on top of a piece of tracing paper, and then put another piece of tracing paper on top of that. Pin your pattern pieces on top of the tracing paper, making sure to get all four layers secured, and cut your pattern pieces out.

3) Use silk pins AND pattern weights. For some reason, there is a mindset that you either need to be in one camp or the other when it comes to securing pattern pieces to your fabric, but this really is not the case, especially when it comes to cutting silk and other difficult fabrics.

Most people have their favourite way to secure patterns (mine is with pins) but use both if you have to. I use cans from the cupboard and weigh my pattern piece down in the centre (use as many as you like!), then pin the outsides of the pattern with pins (again, use as many as you like). It might sound a bit overkill, but if you've ever experienced the dread of ruining a lovely bit of fabric, you'll do anything to stop this happening in the future.

4) Which brings me to pins. If you don't have silk pins, and have no plans to buy any, ONLY PIN INTO THE SEAM ALLOWANCE! Pins will leave little holes all throughout your silk that are nearly impossible to make go away, no matter how hard you try to push them closed. And actually, even if you do have silk pins, I would still try to keep them within the seam allowance, just in case!

5) When it comes to silky necklines, you should think about stabilising the seam to give it a bit more structure. Silk is designed to flow, so if you have a neckline that needs to hold it's shape like the Afternoon Blouse, giving it a little extra love will help it to retain the original design lines.

Not sure how to stabilise seams? Check out my post here.

6) Take your time! You just can't rush sewing with silk - if you do, it will come back to bite you in the bum. Enjoy the process, listen to the fabric (fabric whisperer?) and you should end up with a lovely garment at the end.

If you have any more tips for sewing with silk, I'd love to hear them! I'm always on the lookout for ways to make it easier (and hopefully not ruin any more beautiful fabric!).

xx
J

Stabilising Seams - Tips & Tricks

Thursday, April 17, 2014
 photo Stabilising-Seams-Banner_zps87eaa748.jpg

If you're planning on making an Afternoon Blouse from a lightweight or slippery fabric like silk or rayon, you're probably going to want to stabilise your neckline seams to stop them from drooping out of shape.

Stabilising seams is a simple technique used to give a bit of extra oomph to a seam, whether it's to the shoulders on knit tops to stop them stretching out, or the neckline on your Afternoon Blouse to help it keep it's shape. It only takes a few extra steps and is totally worth the effort.

You can use almost anything with a bit of strength to stabilise your seams. Twill tape or ribbon work just fine, but if you're using a really light weight fabric you'll want to minimise seam bulk, so try using an interfaced bias strip of the same fabric or if you're feeling fancy, a bias strip of silk organza.

Note - Using a bias strip is best if you are trying to stabilise a curved seam as it will bend and curve with your seam.

There are two ways you can sew your stabilising strip onto your garment. You can either sew it directly onto the seam line (Picture 1 & 2) or you can sew it as close as you can get it to the seam line but within the seam allowance (Picture 3 & 4). They both have their place, but for the Afternoon Blouse, you'll want to sew it onto your seam allowance and not into your seam. This will ensure you have a lovely delicate but stabilised neckline, without the bulk.


Picture 1 & 2 - Place your stabilising strip right on top of your seam line, and sew in place.


Picture 3 & 4 - Place your stabilising strip as close to the seam line as you can get, within the seam allowance, and sew in place.

Note - I've used a small width twill tape in the pictures above to illustrate where you should place your stabilising strip but it's totally up to you how wide your strip is. For the Afternoon Blouse, since you'll be sewing it into your seam allowance, I would go with a strip that is just under the seam allowance width or smaller.

Another way you could think about stabilising your neckline is to add piping to it as Melissa did - the piping essentially works as a decorative form of seam stabilisation. However, do be careful with the type of piping fabric you use here, as it can add a lot of extra bulk. If you think you might want to give piping a go, I have a tutorial on making and inserting inseam piping here.

I personally don't think there is any need to stabilise the neckline on your Afternoon Blouse if you're using a sturdier fabric like cotton voile or lawn as they should hold their shape just fine, but feel free to do this if you feel your fabric is especially lightweight, or if you just want to see what all the fuss is about.

xx
J

Autumn Dresses and Giveaways...

Monday, April 14, 2014
In an attempt to break up all the Afternoon Blouse spam on my blog lately, I thought I should show off a newly finished sewing project and perhaps do a little sneaky giveaway while I was at it.

It has officially started getting cold here - the days are shorter, the leaves are turning, I've pulled out my knitting again and I can feel myself leaning towards darker colours and snuggly, comfortable outfits that work well with tights and a cardigan. Cue, Winifred (and my smurf legs!).


Winifred is Abby's newest pattern - a cute variation on a shirt waist dress, except that this one is probably way faster to make up than any shirtwaist dress I've ever seen. I do love the classic button-up version, but they can take a while, what with all them buttons. Winifred however, has no fastenings what so ever, you just pop her on over your head, throw on your favourite coloured tights and you're ready to go play in the autumn leaves.

So, what's the trick? She has a comfortable elasticated waist at the back. Perfect for expanding tummies around lunch and dinner time (and Easter time, let's be honest here. I've probably already eaten my fair share of chocolate eggs over the last few weeks).


I made my Winnie (as Caitlan and I have affectionately called her) from a chocolate brown suiting cotton I picked up from my favourite charity haunt a few weeks ago (I got a huge roll of it for about $5). The fabric drapes beautifully but has a lovely weight which makes it the perfect fabric for my autumn version of Winnie.


There are two things I'd watch out for with this pattern though, both of which tripped me up when I was making it. The first are the sizings on the back. I really had no idea what size waist I should be cutting out because the sizings listed are big. I ended up cutting out a straight size 8 because that was my bust size (and I figured that my waist is really nowhere near 34 inches which is the size that corresponds to the 35inch bust, even after all those easter eggs).

Erm, wrong! The dress fit, but only because of the bigger back piece (due to the elastic). Instead of having side seams though, the front was so small around my waist and hips that I had front/hip seams! I gather the 34 inch waist is actually the finished garment waist size (?), sans elastic, but not taking into account that the front is fitted and doesn't have any elastic... So, I ended up cutting a second front and graded out one size at the waist and two at the hips to accomodate my big ol' lower half.

Even now, the skirt side seams are sitting forward a bit but not nearly as much as they were in my previous attempt. With the drape of the skirt, I kinda think they look like extra pleats, so I'm going with it. And I actually quite like it.

So, the lesson here? Measure your pattern pieces, and email Abby if you're not sure (as I didn't!!).

The second thing I'd point out is the collar instructions. I found them a tiny bit confusing at the end when it comes time to finishing the inside raw edges of the collar. Basically it's up to you how you finish it, but if you've never attached a collar before, it could leave you feeling a little puzzled. I would consider myself reasonably okay at sewing, but even then, I muddled through a bit (I've never actually inserted a collar before though). I still don't know if it's quite right quite, I inspected one of David's shirts to see how it was done and I've given mine a grade of 'passable'. I ended up folding the bottom raw edges of the back of the collar under and hand stitched them in place for a clean inside finish.

But even with these things, I'll definitely still be wearing my Winnie a tonne over winter.


Other small changes I made were to use a smaller width elastic and binding on the back (13mm binding and 7mm elastic), lower the placement of the back elastic by an inch and leave off the faux belt, lower the bottom of the darts by 1/4inch and lengthen the darts by about 1/2inch all up. I top stitched around the entire collar and neckline and opted to sew in my sleeve hems flat before sewing up the side seams. I also took my hem up by about 2 inches to a length I prefer to wear and for my next Winnie, I'll lower the neckline opening as well, as it's a tiny bit hard to get my head through as it currently is (it's no biggie though, I just can't do my hair before I get dressed!).

*Thank you all so much for entering, the competition is now closed*

Win your own Winnie!

I'll definitely be making another Winnie soon, and you can too! To celebrate the release of Winifred, Indie Stitches and I are giving away a copy of the pattern to one of you lucky folk! All you have to do to enter the giveaway is leave a comment below and you're entered.

The competition is open world wide and will be drawn at random in two weeks time (Monday 28th April NZ time). The winner will be contacted by email.

Stay tuned this week for more Afternoon Blouse fun :)

xx
Jen

Printing & Assembling PDF Patterns...The Afternoon Blouse

Friday, April 11, 2014

If you're new to sewing or dress-making, seeing a PDF pattern can either be the boost you need to get going because it's so instant, or it can be intimidating, because, how the heck does that all work anyway?

As I've just released my first pattern, The Afternoon Blouse, which is currently only available as a PDF pattern, I've written a quick tutorial on putting it together, so you can see just how easy it can be.

Now, the way I've laid out my pattern is a little different to your conventional PDF pattern. Why? Well, I've made it easier!

Instead of having to print out every-single-piece and join them all together in one big lump, I've broken them up for you. You can choose to print out each pattern piece individually, which means if you are only wanting to make one version, you can select the page numbers of the pieces you need, and print out those pieces only. This makes putting your pattern together faster (because you aren't taping a huge sheet together and therefore don't need to rearrange your entire living room to make enough floor space) and it also minimises paper wastage, because you aren't printing out unnecessary pattern pieces. So really, it's a win-win in my book.

Before we get to the printing and assembling bit of The Afternoon Blouse pattern, first you should decide what option you are wanting to make (and you're totally allowed to make both. In fact, it's encouraged!). You'll need to choose the following page ranges depending on the version you are making -

Version 1
Pages 3-5 (Facing Pieces) & 6-23 (Front and Back pieces)

Version 2
Pages 1-3 (Facing Pieces) & 6-14 (Back piece) & 24-31 (Front piece)

Supplies:
Afternoon Blouse PDF Pattern
A4 or Letter printer paper
Adobe PDF Reader Software (free to download here) or other PDF Reader
Tape or Glue
Ruler
Scissors (optional!!)

Steps:

1. Once you've downloaded and saved your Afternoon Blouse pattern and instruction sheet to your computer, open your PDF Pattern and select 'Print'

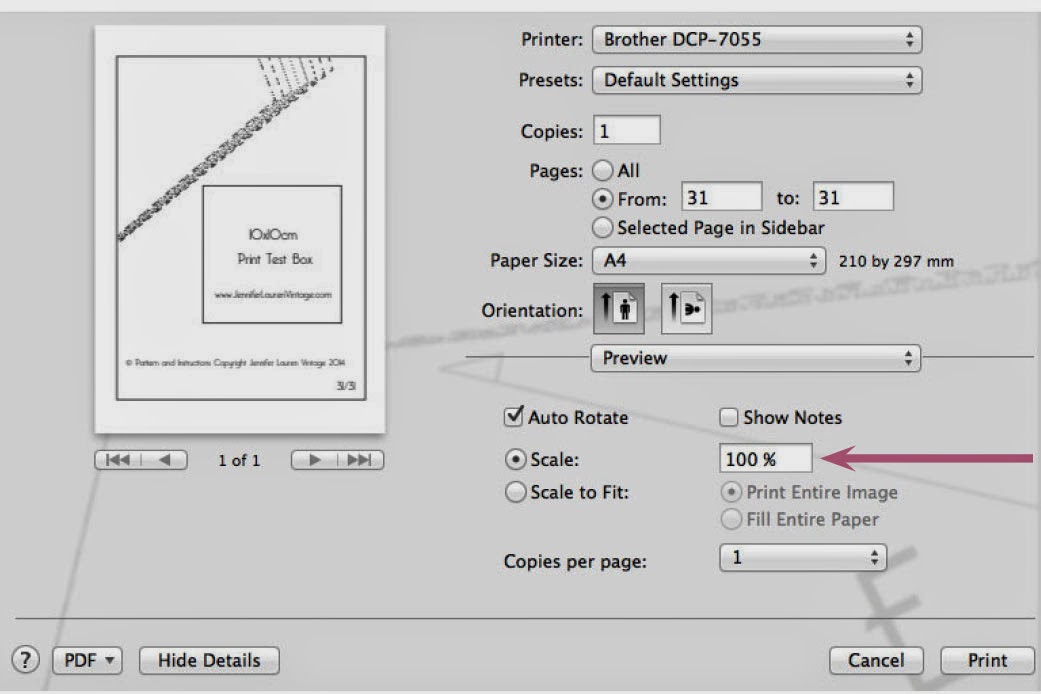
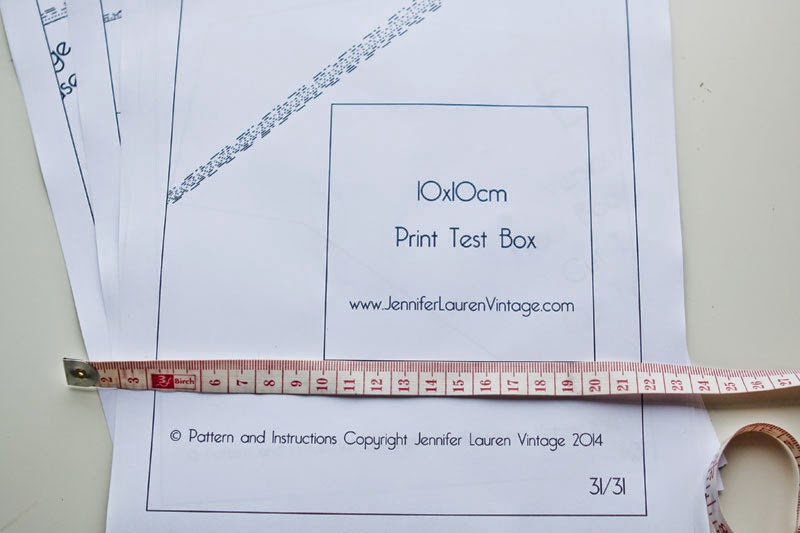
2. In your print options, select 'Actual Size' or 'Scale 100%' depending on which setting you have (I have the Scale 100% setting in my print options) and print page 31. This page has a handy Print Test Box that you can use to ensure you are printing to the right scale. Take your ruler and measure the sides of the box, they should measure 10cm x 10cm.


3. Once your print test box is measuring the correct size, you can go ahead and print out your pattern. You can choose to print just one version by selecting the page ranges you require (listed above).

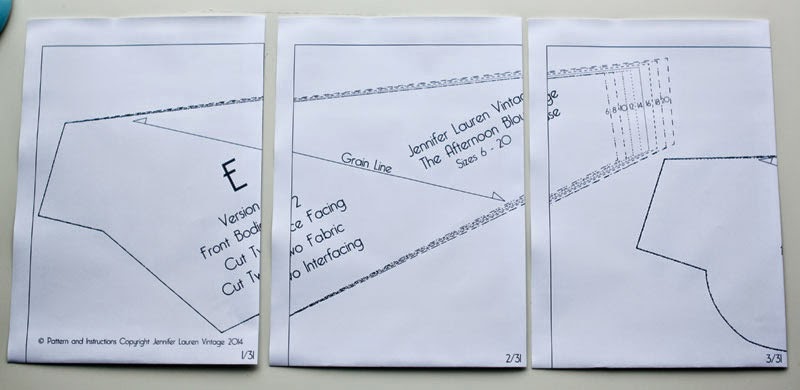
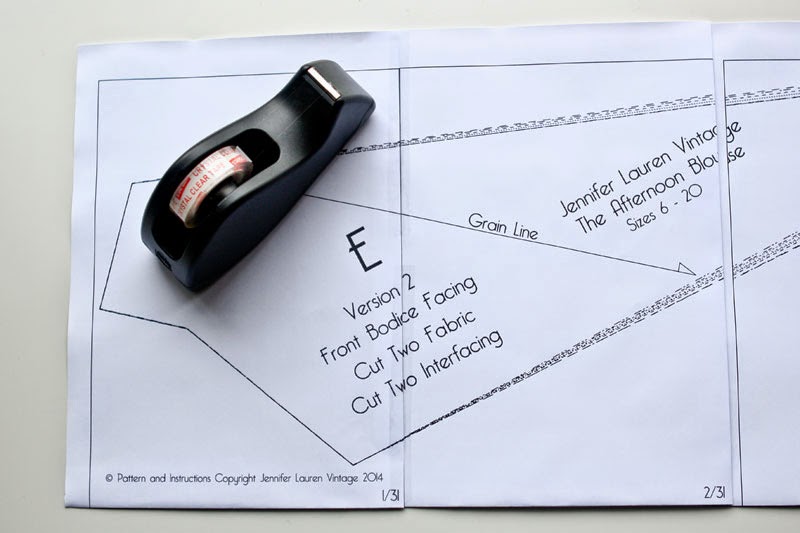
4. Once your pattern is printed, you'll notice that there are page numbers at the bottom of each printed page. To ensure your pattern piece is up the right way, these need to be in the bottom right hand corner.

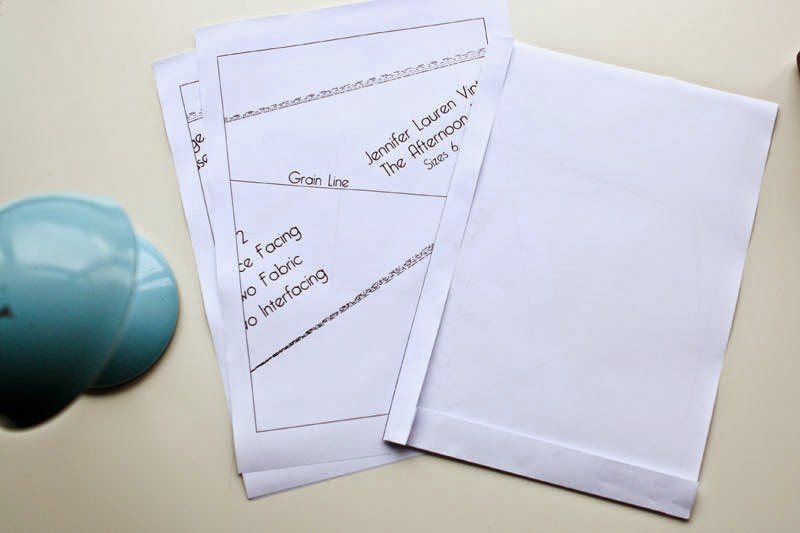
5. At this stage, you can either choose to fold your borders back, or cut them. Fold or cut the bottom side and the right side of each pattern piece in order to make it easy to lay them on top of each other to join them together.


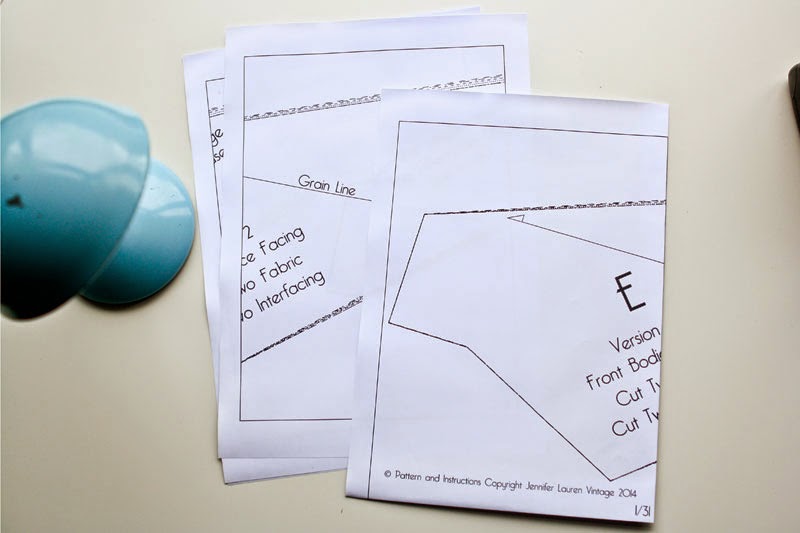
6. On page 3 of your instructions, you'll find a Lay Plan of how you should lay each piece of paper together. Follow this guide and lay out your pieces of printed pattern.

7. Join each pattern piece together, making sure to line up borders and pattern lines from each piece to the next and tape or glue in place.


8. And, erm, that's it! Now you're ready to trace your pattern and spend the afternoon sewing.

xx
J

The Afternoon Blouse is Here...

Friday, April 4, 2014
Well folks, you can now buy your very own Afternoon Blouse pattern right here. Just in time for some Easter Weekend sewing!


Thank you so much for all of your sweet comments last week when I announced that I had been working on my first pattern. It's really rather a nerve racking thing to have worked to hard and spent so much time on something and not know how people are going to react. I said it in my last post and I'll say it again - your comments have been so supportive and really very humbling. THANK YOU!

I've decided that I'm not going to be running a sew-a-long per say, mostly because it's such an easy pattern, but I will be writing a number of posts about the blouse on things like stabilising seams (especially useful if you plan to make the blouse using silks, rayons or other 'slinky' fabrics), pattern hacks (a sleeveless version anyone? Or how about adding waist-ties for a bit more definition if you want to wear it untucked?) as well as a tutorial on printing and assembling your Afternoon Blouse Pattern as I've chosen to lay my pattern out a bit differently to other PDF patterns, which hopefully means it's easier to put together and you'll have less paper wastage!


So, ummmm, I guess all there is to do now is go get your own copy of the blouse, find that amazing vintage button that for some reason you only have one of, set aside an afternoon and get sewing, huh?

If you make an Afternoon Blouse, well, I'd REALLY like to see them, so please let me know if you've blogged about one, or feel free to email me a picture :)

Yay!

xx
J

Me Made May '14

Tuesday, April 1, 2014
Now that it's April (what?!?) that means that Me Made May is just around the corner! And this year, I'm so excited and very honoured to be helping Zoe a little with Me Made May '14. Yippee!


I took part in my first Me Made May last year and I loved it - it had rather a huge impact on me as a dress-maker. As with a lot of the participants, I really struggled with my goal towards the end. I found myself having to reach for those me-mades that I actually didn't really like wearing. This forced me to analyse why I wasn't wearing those me-mades, which lead me to write this post about why we don't wear our hand-mades - and thankfully, many of you agreed with me.

Yep, May 2013 was my magical lightbulb moment when it came to figuring out what to spend my precious sewing time making. I realised that I needed to focus on making things I actually liked wearing and that fit into my everyday life. Earth shattering stuff, I know. But really, it's just something we don't think about. We're happy to go out and buy those basics that make up a wardrobe that we'll wear everyday, but we aren't happy to sew them. How does that work?

So this year, Zoe and I have some really awesome posts lined up to help get you through your Me Made May goals, but first, you had better head on over to Zoe's blog to read about the challenge in a little more detail and sign yourself up!

Along with the traditional things (like the flickr pool and #mmmay14 hash tag) we've set up an official Me-Made-May'14 Pinterest board so that you can get pinning all your favourite Me Made outfits during May and perhaps glean some inspiration from your fellow participants. You'll need to follow the board first, and then I'll need to invite you to pin to it - it may take up to two days for you to have access, so please be patient. That goes for the flickr pool too :)

I'm going to be posting my pledge a bit later on in the month - but if you already know what your goal for Me Made May is or you want to know a little more about how Me Made May works, then head on over to see Zoe.

You guys - I seriously cannot wait for May (even though I can't believe it's nearly May again already...).

xx
Jen

ps) THANK YOU so so so much, from the bottom of my heart, for your kind comments about my first pattern release. I am really so very very humbled by them. I can't wait to release the pattern for you all. I've received all the feedback from my lovely testers, will putting that into action this week, and by Friday, I hope to unleash it upon you. Thank you, thank you!

Auto Post Signature

Auto Post  Signature