

Before we even get to interfacing anything on our Willa Wrap Coats, my main piece of advice right now is to work with your fabric! Case in point - it turns out, my fabric is incredibly thick. Much, much thicker than I thought it was going to be.
It was purchased from the same place as Kyla's cream coat, is almost the same composition and had the exact same description, so, I just assumed I was getting the same fabric, but in a different colour. WRONG!

As I was pressing my fabric prior to cutting, I could tell straight away that it was heavier and thicker than the fabric I used for Kyla's coat. And when it came to cutting out the pattern pieces, that was a job all in itself. I got a callous and a bruise on my thumb and fingers where the scissor handles dug into my hand as I was cutting and my hand was solidly achy for several days. That's how thick my fabric was.
I initially wondered whether I should get a different, lighter fabric, to work with, but instead, it actually turned out to be a blessing for this Sew Along. It's given me the opportunity to show you how to 'follow the instructions' for sewing, while also making allowances for the fabric you are using. So I hope, if you've also chosen a fabric that is challenging for you, that you can see you have permission to work with it however you need too, without always following the rules (just bending them a bit to fit your fabric's will).
So, the first thing to say is, I only interfaced the hems of the outer coat and sleeves on my Sew Along coat. I opted to leave off the interfacing for the Front and Back Facings as well as the belt, as it was just going to add too much unnecessary thickness in these areas, and my fabric was doing just fine without any of this additional hold.
However, if you have a really light fabric, like a mammoth flannel, you may choose to not only interface all of the pieces suggested in the instructions, but also the Front Outer Coat piece itself. This will give you extra hold around the collar, helping it to stay in place and look neat during wear. Use The Front Facing piece as a pattern for your interfacing here. It's not exact, but it will give you a good approximation as you can see below:
And, make sure you do a quick test of your interfacing on a scrap of fabric before you begin! Just to make sure the interfacing doesn't somehow mess up your nice fabric.
Right, grab your press cloth, turn on your iron and lets go!
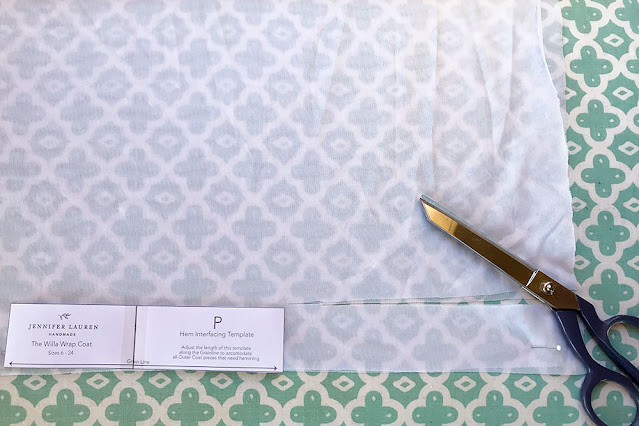
Cutting out your Hem Interfacing (Pattern piece P)

Why interface the hems? The interfacing template is the width of the hem allowance on the outer coat, and the reason why it's a good idea to interface your hems on a coat like Willa is because there isn't a line of stitching holding your hem in place. Interfacing gives the hem a stronger hold when pressed up, so that it's not as tempted to sag down when worn. For Willa, we still give our hems a little help with sagging by sewing seam allowances together (more on that later!) but interfacing just adds a little extra oomph.
The hem pattern piece included is a template to get the right thickness for your hems, not individual hem pieces for each section of coat that needs them (because wow, that would be A LOT of unnecessary pattern pieces...).
I fold my length of interfacing in half, and then cut long strips that is the template's width, and then cut each strip to size as I'm pressing my interfacing in place...
Attaching Interfacing


Interface the hems of all the Outer Coat pattern pieces as well as the sleeves.
And that's us all interfaced! Yay! Tomorrow we start assemble our coat belt and hang/belt loops if you're choosing to use them.
You can purchase your Willa Wrap Coat Sewing Pattern here.
xx
J


Post Comment
Post a Comment
Thank you so much for stopping by to leave me a comment, like most people, I really do appreciate them all!
Due to the large amount of spam I receive here, unfortunately I have had to turn comments off. If you'd like to get in touch with me, please send me an email :)
Note: Only a member of this blog may post a comment.