

There is an additional video showing the shoulder construction as well, for all of you in-action video learners.


4. Pin in place. Then, back tacking at each end, sew the back neckline together, from drill point to drill point, sewing directly on top of your stitching guides.


2. Gently pivot your front piece down and around, so that the shoulder line matches to the back shoulder line.


5. Snip into the back inner shoulder seam allowance, up to the pivot point.


Repeat the above for your lining pieces too.
Adding Stitching Guides
Just like we did yesterday for the back lining, we need to add stitching guides to our front neckline/collar (outer and lining pieces) and back neckline/shoulders (outer). And again like yesterday, I encourage you not to skip this step! It really helps when it comes to that fiddly bit I mentioned above...
Steps:
1. Starting from the outer, edge sew in a line of contrasting basting stitch into your front coat piece, pivoting at the drill point labelled on your pattern piece. You will be sewing with a seam allowance of 1.5cm (5/8") as this is the seam allowance for the coat.
These become the guides that you will follow when attaching your front and back coat pieces together at the back neckline/shoulder.
2. Repeat the same stitching guides along the back neckline and shoulder.
Here they are below on my green Sew Along coat sample.
Don't forget to do these on your front lining pieces too!
Attaching the Back Neckline
1. Right sides together, pin your back collar together. Back tacking at each end, stitch in place. Do this for both the outer coat and lining.
2. Trim down seam allowance and press seam open.
3. Right sides together, match the front coat to the back coat, matching up the back necklines. The drill points should match as well as your stitching guides from earlier.
Note: it might feel a bit strange at this point because the front of your coat will look like it's flipped upside down. This is normal and will be magically flipped back around when we move on to attaching the shoulders.
Attaching Shoulders
I've taken pictures of this step as well as filmed a short video of me doing this step when making Kyla's coat.
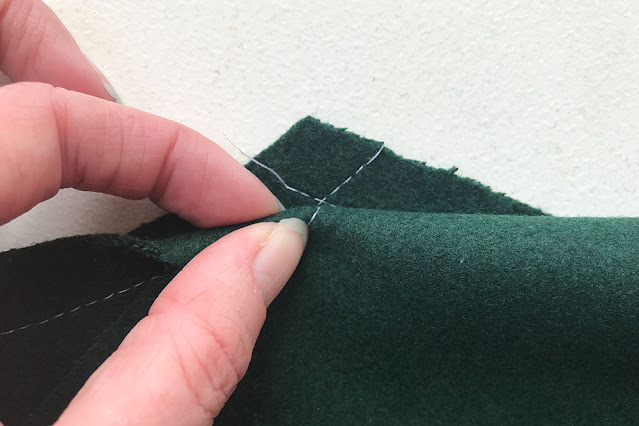
1. Take a pair of sharp embroidery scissors and trim, on an angle, the front coat seam allowance, down to the drill point only. Do this on both sides.
3. Matching your stitching guides, pin your shoulder in place. Back tacking at the end of the shoulder, sew right up into your drill point (where you stopped attaching your back neckline in the earlier steps) along your stitching guides.
You can back tack at the inner shoulder drill point if you feel comfortable. Otherwise, just leave long thread tails and tie them in a knot.
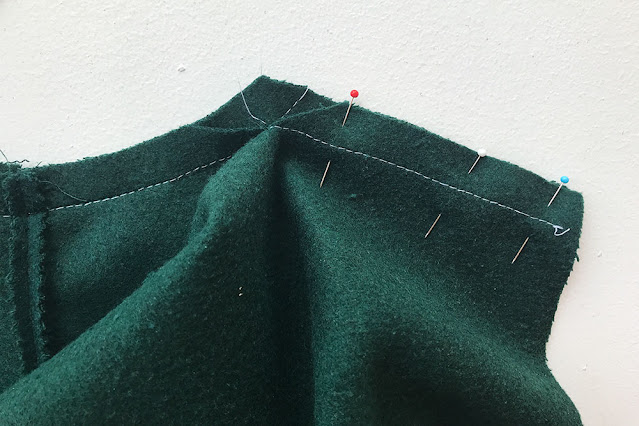
4. Repeat the remaining steps for the other shoulder then gently and carefully, remove your contrast basting stitches. This is what you should end up with! Sewing the inner shoulder point exactly, without getting puckers can be fiddly, but again, take your time, you can do it.
6. Trim down and press shoulder seam allowances open.
7. Gently trim down (and if you like, grade) the entire back neckline seam allowances, then press down.
You will need some seam allowance here to use later on when attaching the insides of your lining and outer coat together, so don't get too trim-happy here!
Phew! How'd you go? Let me know if you have any questions! Tomorrow requires much less concentration, we're sewing up our side seams.
You can purchase your Willa Wrap Coat sewing pattern here.
xx
J


Post Comment
Post a Comment
Thank you so much for stopping by to leave me a comment, like most people, I really do appreciate them all!
Due to the large amount of spam I receive here, unfortunately I have had to turn comments off. If you'd like to get in touch with me, please send me an email :)
Note: Only a member of this blog may post a comment.