It's Pocket Week here at the Willa Wrap Coat Sew Along! Today we are going through the construction of the simple patch pocket that is included with Willa, but I'll also be walking you through how to line your patch pocket tomorrow (with a free lining pattern piece included) as well as how to add in-seam pockets if that's more your style (along with a free pattern piece for those too).
Because I already have several coats with the patch pocket style, I'm opting to use the in-seam pockets in this Sew Along version of Willa, so I'm not actually sewing the pockets onto my coat today, they'll just be pinned so you can get an idea of where they go and how to attach them.
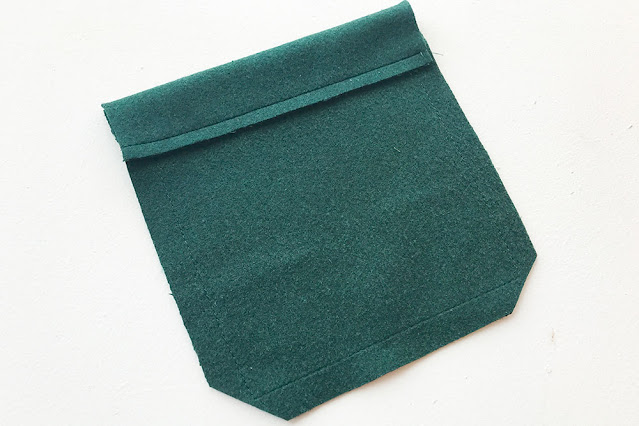
If you like, interface the top hem of your pocket. As I mentioned in the Interfacing post here, my fabric is very thick, so I have chosen not to interface my pocket hem (the number of layers once the seams are folded in would just be far too bulky for my machine to cope with).
Let's get started!
Steps:
1. Finish top pocket seam allowance if need be (my fabric is felted wool, so there is no need for me to finish any edges). Then press the top hem down to the wrong side, at the notches indicated on your pattern.

2. I like to sew a line around the bottom and sides of my pocket at the seam line (1.5cm or 5/8") as a guide when folding my sides in. It's also helpful for the next bit if you choose to trim your corners out.
Trim your bottom corners out, leaving approximately 3mm (1/8") of fabric at the seam line. I choose to do this because my fabric is especially bulky, and sewing over that much fabric at the corners would be too much for my machine.
DON'T do this if your fabric is fray-prone, instead, finish all raw pocket edges and simply fold as per step 3. You will have bulkier seams at the corners, but your pocket will last longer this way. Alternatively, you can line your patch pocket.
3. Secure your top hem down - you can choose to use a single line of stitching or multiple. You could even use a decorative stitch here!
4. Press your pocket side seams and bottom seam into the centre on the wrong side. My fabric is thick, which is why I needed to pin it down here, it didn't want to stay, but you will not need to do this.
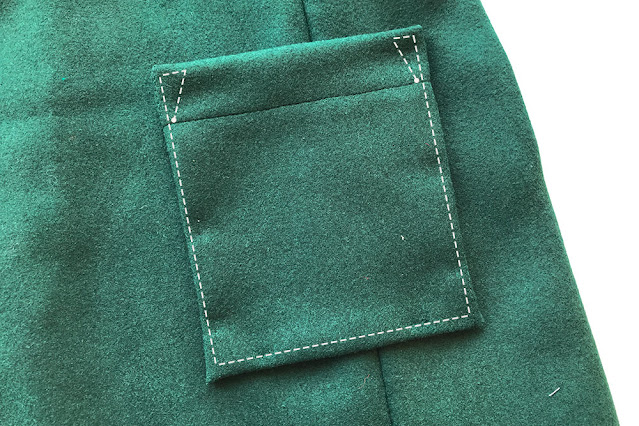
5. Right sides up, place your pocket onto your coat using the markings provided on your pattern piece to get the right placement. You are able to try your coat on at this stage, so if you wish to adjust the placement, try your coat on and adjust to suit. Pin in place.
6. Secure your pocket on with a set of stitches. I like to use the stitch pattern below as it provides extra security at the top of the pocket, where there is the most strain. Starting at your pocket stitched hem line (circles below) stitch up to the top of the pocket on an angle, pivot across the top of the pocket to the edge, then stitch down the side etc.
I like to leave about 3mm (1/8") at the outer edge for 'seam allowance', but you can choose any seam allowance width you like.
And you're done!
xx
J


Post Comment
Post a Comment
Thank you so much for stopping by to leave me a comment, like most people, I really do appreciate them all!
Due to the large amount of spam I receive here, unfortunately I have had to turn comments off. If you'd like to get in touch with me, please send me an email :)
Note: Only a member of this blog may post a comment.