

It's the start of Pattern Adjustment Week here in the Willa Wrap Coat Sew Along! We're going to be starting out by walking through how to do a Bicep Adjustment, whether you have narrow or full biceps.
The steps for both are essentially the same, it's just whether you take away circumference or add it. Before you make this adjustment, check out the Additional Finished Garment Measurements included in the Willa instructions and work out whether you really need to do one first.
Also note, we will be cutting up our pattern pieces, so if you don't want to re-print your sleeve patterns, I'd suggest tracing your pattern first.
How much should I adjust by?
It's difficult to give an exact amount you should adjust your bicep by because it depends! And this is where comparing the Finished Bicep measurements of Willa to a coat you already like (or know you want to adjust) comes in handy.
To get your bicep measurement, make sure you measure when your arm is bent and keep in mind that you do need wearing ease! How much is completely dependent on you, but I would suggest 10cm or 4" is a good place to start (this is what is included in the Willa sleeve pattern).
Also note that you shouldn't use this method to adjust your bicep by any more (or less) than 2.5cm or 1". In that case, consider sizing up in the sleeve and toiling that first.
You'll need:
- Your Willa Wrap Coat Sleeve pattern pieces (both the outer and lining sleeves)
- Measuring tape
- Ruler/paper scissors/tape
- Additional scrap paper
Note: You can use a craft knife for steps 3 to 5 to make all pattern cuts, so that you don't have to break the pivot point at the hem in step 3.
Steps:
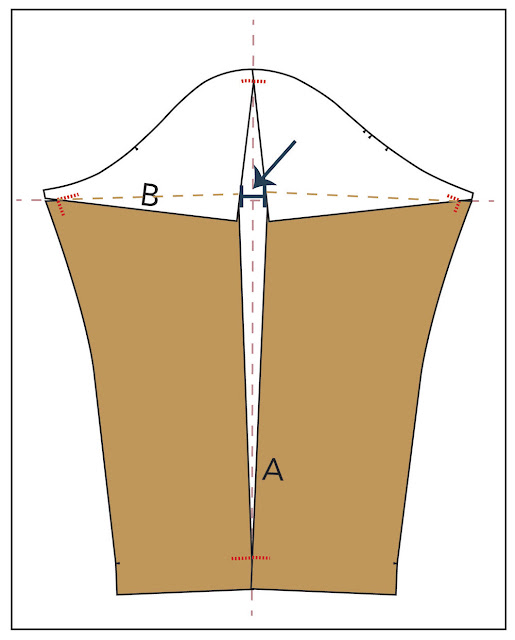
1. Draw in your seam allowances. You can do the entire sleeve, or choose to draw them in at the four key points we need - the 'underarm' corners, the centre top sleeve head and the centre bottom hem.

2. Draw in two lines.
Line A runs top to bottom, matching notches at the sleeve head and hem.
Line B runs horizontal, from the seam allowance corners at the under arm. This is your 'Bicep Line' and the line we use to measure out our adjustments.

3. Cut up line A from the bottom hem until you reach your seam allowance marking at the sleeve head. Then snip down from the top of the sleeve head, leaving a pivot point at the red seam allowance marking (AKA your stitching line).


Full Bicep Adjustment:

Narrow Bicep Adjustment:


And that is how you do a bicep adjustment! Make sure you do this to both your Outer Coat sleeve and your Lining sleeve.
You can purchase your Willa Wrap Coat pattern right here.
xx
J


Post Comment
Post a Comment
Thank you so much for stopping by to leave me a comment, like most people, I really do appreciate them all!
Due to the large amount of spam I receive here, unfortunately I have had to turn comments off. If you'd like to get in touch with me, please send me an email :)
Note: Only a member of this blog may post a comment.