

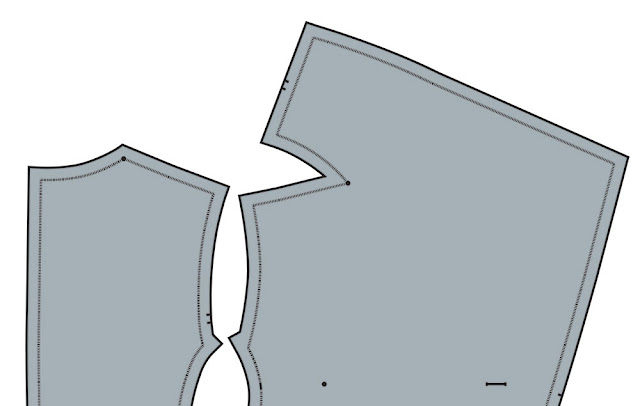
Performing a forward or backward shoulder adjustment on Willa may seem like it's going to be hard because of the grown-on collar, but it's actually as just straightforward as for any pattern in my opinion. The key is making sure you keep track of the neckline dots on the pattern - but first, let's figure out how much of an adjustment you need...
How much to adjust by...
Hello toile! Have I hammered in how important making a toile is? This is your key piece of kit when trying to figure out if you need this (or any!) adjustments. Pop it on and standing straight, have a look at the shoulder seam. It should be sitting straight out from your neck, along your shoulder line, to the top of the sleeve head. If it is sitting to either side of the top of your shoulder line (either towards the back or towards the front), you will want to perform a forward or backward shoulder adjustment.
Along the end of the shoulder seam (around the top of the armscye) measure how much your seam is sitting off the top and use that measurement to see how much of an adjustment you'll need.
A Forward shoulder adjustment will be a more common adjustment to make as our 21st century lifestyle's have us hunched over computers/car steering wheels/phones etc more often than not, making our shoulders sit forward rather than straight.
Note: this tutorial shows a Forward Shoulder Adjustment, for a Backward Shoulder Adjustment, do the opposite.
You'll need:
- Your front and back Willa Wrap Coat pieces (both the outer and lining pieces)
- Ruler
- Tape, scissors and spare paper
Steps:
1. The first thing I recommend you do before doing any shoulder adjustments is to draw in your seam allowances. You don't need to do them around the whole pattern piece as they are here, just around the shoulder/back neckline is fine.


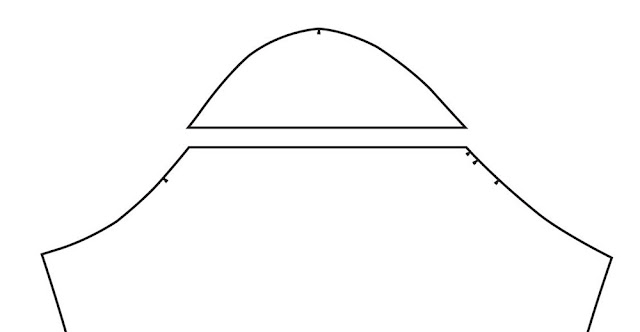
7. The last thing to consider is whether you need to adjust your sleeve cap. If you've only made a small adjustment (approx 1cm at the shoulder line max) then you can probably leave the sleeve as is. If you've made a larger adjustment, I'd recommend moving the sleeve cap over so that it sits as comfortably into the armscye as possible, giving you maximum movement.
Cut a straight line along your sleeve cap (I do this above the notches).


Post Comment
Post a Comment
Thank you so much for stopping by to leave me a comment, like most people, I really do appreciate them all!
Due to the large amount of spam I receive here, unfortunately I have had to turn comments off. If you'd like to get in touch with me, please send me an email :)
Note: Only a member of this blog may post a comment.