

I love bias binding. I use a lot of the stuff in my garments so therefore, I make a lot of it.
Making your own bias binding is easy as pie and it's extremely useful for all sorts of things. I tend to use it in place of arm facings on sleeveless garments a lot. I think that using bias binding reduces bulk around the sleeve and leaves you with a lovely clean finished edge (and check back next week for another handy tutorial on how to do just that!).
As I am just finishing up making a 60's violet wrap dress, with which I am predictably replacing the arm facings with binding, I thought I'd photograph the steps I used so that you can make your very own.
So first up - what is the bias?
The bias is the diagonal line that rus through the cross and length wise grains in your fabric. The bias is nice and stretchy, making it perfect to mould around circular edges like an arm hole, without bunching or pulling at your fabric.

Supplies:
- Large square of fabric cut on the grain (mine is about 30cmx30cm however, it doesn't matter if you can't make yours that big as we end up sewing our bias strips together to make one long one)
- Fabric Scissors
- Ruler or seam gauge
- Marking utensils
- Iron
Optional - An awesome bias binding thingy (this is what I'm talking about! You can get them in a bunch of different sizes). But you can make bias binding perfectly fine without one and I show you how to do this below as well.
Steps:
1. Fold your square in half on the diagonal and lightly press.

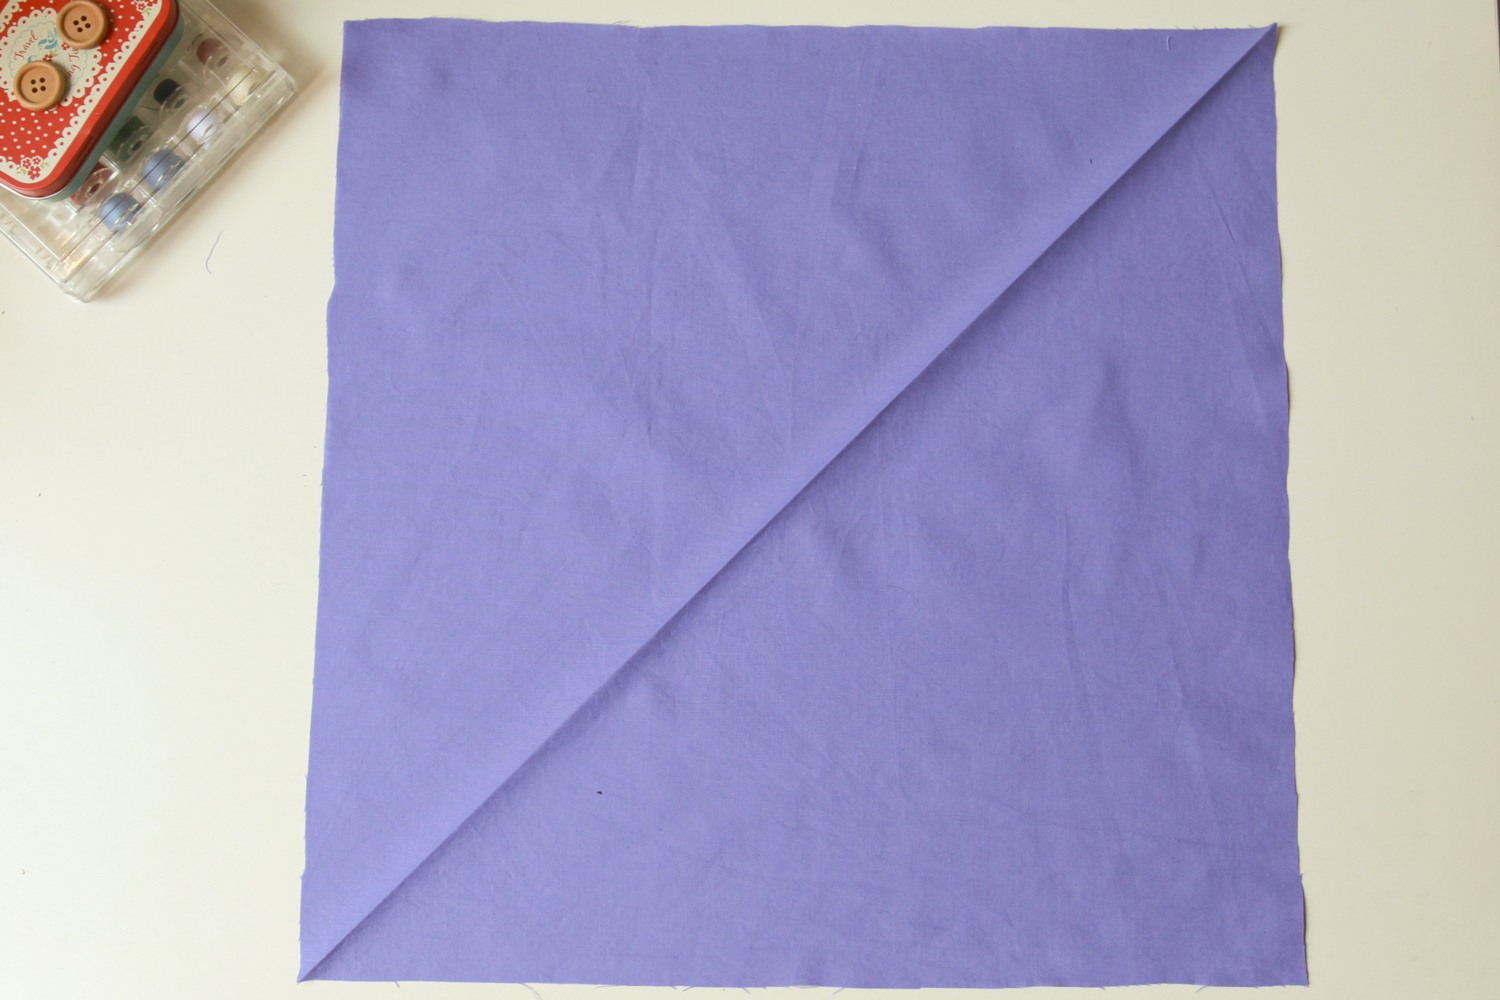
2. Your lightly pressed centre line will be the line that we will base all other bias strips off and it will become the centre of your first (and biggest) strip of bias binding.
At this stage, you need to decide how big you want your finished binding to be. I personally like a binding that ends up being about 1cm when it's all folded, but you can make it any size you need. The rule is, if you want 1cm showing at the end, times that length by 4 and that is the width you want to mark out.
Measure out your widths using a ruler or seam gauge using your centre line to base off all measurements.
Note: for this binding, I wanted it to be slightly smaller and measured out 3.2cm so my finished binding ended up as 8mm.

3. Draw in those lines that you've marked. You can then mark the rest of your bias strips right next to each other, there is no need to leave a gap. Now you are ready to cut your strips!

4. Once you've cut your strips, square up the ends of your binding to make it easier to sew them together.

5. Place your strips, right sides together, at a 90 degree angle. Sew across the 'square' they make along the diagonal.

6. Trim your seam allowance and press open. You have now joined your strips together.


7. Continue joining them together until you have your desired binding length. Now you can use your handy dandy bias binding thingy to pull your bias strip through and iron as you go.

OR
If you are using the iron, fold your binding in half (wrong sides together) and press lightly. Then fold your outside edges in, lining them up with the centre crease you made earlier. Iron them down.


8. Once your outside edges have been folded in towards the centre (either by using your bias binding thingy or just your iron), fold your binding in half again and iron flat. Ta da! You have just made your very own bias binding. How clever you are!

You can, of course, buy your bias binding, but why would you when it's so easy to make?
xx
Jen
Note:
Don't be afraid to mark your fabric on the underside in a more permanent way when marking out your binding (I used a ball point pen in this tutorial so that the lines showed up in the photographs).
I used to be petrified to mark my fabric with anything more permanent, but the truth is, if you do it correctly, nobody will ever see it. I find that chalk rubs off too quickly and easily for my liking and I would rather have accurate markings that stay where I need them to than have them rub off half way through ending in me 'winging it'. Just remember, if you are using a light/sheer fabric, choose your marker accordingly.


What a fabulous tutorial! I have avoided making my own as I didn't know about the little thingie that folds it. Now I can't wait to try...I just need my sewing machine to get fixed.
ReplyDeleteThanks so much for sharing.
Great tutorial Jen. I've lots of fabric which won't make anything, but would be great for bias binding. I just need to get down and make it!
ReplyDeleteI always have to reference bias tape making when I go to make it. I just can't seem to remember all the little steps involved. Thanks for the refresher.
ReplyDeleteAwesome tutorial! I've made bias binding a couple of times for quilts but I never think to make my own for clothes.
ReplyDeleteThanks so much for this! Next I hope you'll show how to use it.
ReplyDeleteI did a dress some time ago that required a huge amount of bias tape. I actually spent what seemed like an eternity with a lot of red and white polka dot fabric making it, also using one of those little tape-makers and my iron, and ended up getting so into the groove of making it I made about 2 yards too much. I'll use it eventually. :)
ReplyDeleteGreat tutorial!
Thank you so much! This really helped me :)
ReplyDeleteSarah x
I LOVE how you say thingy :)
ReplyDeleteThanks for the tutorial was about to go and buy some but has the bias maker thingy and will use it. Save money on bias binding -make your own
ReplyDeleteVery helpful indeed. Is there an official name for the little 'thingy' that pulls the material through all folded?
ReplyDeleteTehee, yes, it's called a Bias tape maker or a bias binding maker or something along those lines. I think people call it any number of things, but if you do a quick google for the two above you'll find them ;)
DeleteFab tutorial. I've been putting off making my own binding, as thought it was difficult to make, but you have shown me different, many thanks. I too love sewing, vintage and cats ! I've somehow ended up with 12 of them. Luckily I live in a cottage in the woods. Love your site.
ReplyDeleteSusan ��
Great tutorial! I am new to sewing and actually forgot to buy bias binding before beginning my pattern and voila! I made my own and now finally completed a project. Thanks so much ☺️
ReplyDeleteFabulous tutorial!
ReplyDeleteQuick question, is there a way to calculate how much fabric I need to make a given length of bias binding?
Thanks Belinda! I'm sure you could, but it would depend on how big your initial square was and how wide the binding was that you were planning to make. Sorry that's not much help!! I always err on the side of caution and cut a bigger square, but if worse comes to worse, you can always cut more :)
DeleteThx for this hint of squaring off the ends and then sewing at diagional!!!! I'm recovering a hope chest and have to do piping and this is a great help!!
ReplyDeletethank you very much! I love your style, and you explained this all very well! I love the idea of a patterned binding - making a 60's style apron - and it needed that extra special touch! thank you again!
ReplyDeleteCynthia