

You'll need your long line bodice pattern pieces (we'll be adjusting the length of those for this tutorial) and it's helpful to have a long line cardigan already made up to get a better idea of where you want your final hip version to sit, but it's not necessary.
Please remember, all adjustments are made without the seam allowance!
You'll need:
- Your Juniper Cardigan long line bodice pattern pieces (both front and back) & the hip band pattern piece
- A ruler/tape measure/french curve
- Pens and paper
- Cellotape
- Optional - an already made long line Juniper Cardigan
1. First you'll need to decide where you want your finished cardigan to sit. If you already have a long line Juniper made up, you can pop it on and play around with the length then place a pin or make a mark at the side seam when you're happy. If you don't have a cardigan to try on, you can try the pattern paper up against you or measure the side seam of another cardigan you like the length of to get an approximate finished length.
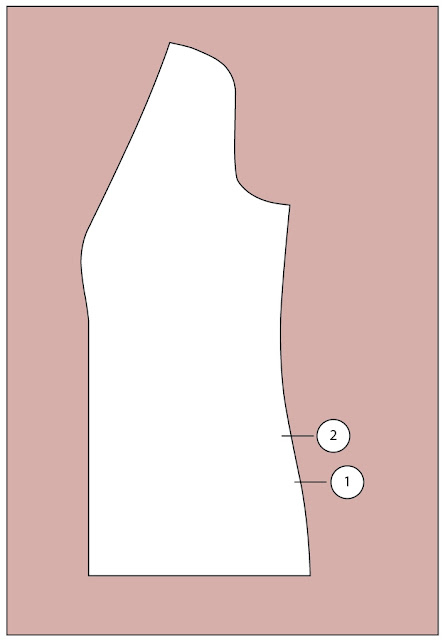
2. Once you know your finished length, transfer this mark to the side seam of your front bodice pattern piece - (1) on the diagram below.
You'll then need to account for the band that runs around the bottom of the cardigan. This band has a finished width of 5cm, so you'll need to measure up 5cm from mark (1) and place another pin there - (2) on the diagram below. This will be your cutting line.
3. Draw a line straight across and trim off the bottom. Repeat for the back bodice piece.


4. Depending on how far up you are ending your cardigan, you may need to slightly true-up the bottom of your side seam using a french curve for a smooth line (marked in red below).

You'll see on the band that there are notches along it, these match up to the side seams on your original cardigan. Measure the new hip seam line length for both the front and back of the cardigan, and remove the excess from each end of your Hip Band pattern piece.

6. Replace all seam allowances and you're ready to get sewing!
Note - if you want a more fitted hip (and to help prevent any drooping in this area over time) you may want to take a little extra length off the hip band. You can experiment with this, but 5mm-1cm on each side might be a good starting point. If you do this, you will need to ease your band evenly into your cardigan when attaching, but you will end up with a lovely fitted hip area.
Note - if you want a more fitted hip (and to help prevent any drooping in this area over time) you may want to take a little extra length off the hip band. You can experiment with this, but 5mm-1cm on each side might be a good starting point. If you do this, you will need to ease your band evenly into your cardigan when attaching, but you will end up with a lovely fitted hip area.
Let me know if you have any questions about this adjustment, otherwise, see you at the end of the week when we'll finally get some sewing done!
xx
J


Post Comment
Post a Comment
Thank you so much for stopping by to leave me a comment, like most people, I really do appreciate them all!
Due to the large amount of spam I receive here, unfortunately I have had to turn comments off. If you'd like to get in touch with me, please send me an email :)
Note: Only a member of this blog may post a comment.