

If you're making a Felicity Dress, you may want to do an SBA (small bust adjustment) if you're smaller than a D cup, which my patterns are drafted for. That basically means reducing the amount of fabric around your bust if you get pooling or have excess fabric around that area when you try on your muslin, without altering the shoulders or waist line (which should fit you well).
Felicity isn't supposed to be a super fitted dress around the bust though. It's supposed to be a slightly more relaxed fit for summer, while still providing a flattering silhouette. For this reason, I totally advocate grading at the side and centre front seams first if you think you might need an SBA. I say this because with the style of the neckline, I think you could get away with not doing a full on SBA if you're a C cup or even a B cup - you may find that you just want to take away a few gathers at the neckline and you can read more about how to do that below. Though always make up a muslin to check the fit first.
There are so many great tutorials on doing bust adjustments already out there. A quick google search brings up tonnes! I personally still really like this FBA that was done for the Emery Dress, so I'm not going to go into too much detail on how to get your measurements etc. However, when choosing a size to cut for your dress, I'd recommend going off your waist measurement for Felicity.
Once you've got your muslin on, you'll be able to determine how much excess bagging you have around the bust, and therefore, how much you need to remove, by pinching it out and measuring it. Remember though, since we are only working with half a pattern, you'll need to divide your total excess in half. (There are other ways to determine how much to take away which include getting your over and under bust measurements, adding the difference I incorporate into my patterns and figuring out the maths from there - but again, with the neckline, you may not want to take away as much as you might calculate, or you might want to take more, depending on your personal preferences. And, if you're going to go to the trouble of doing an SBA, then you'll want to make a muslin first anyway).
Once you've figured out how much you want to reduce your bust by, the main issue with Felicity is that it doesn't have any dart points on the front bodice, so, how do you go about locating them?
Step 1 - Locate your bust apex
The bust apex is pretty much the point along your bust line that sticks out the most from your body - generally this will be where your nipple is, though boobs come in all shapes and sizes, so use that as a general guideline only :)
Since Felicity doesn't have side bust or waist darts, locating your apex isn't as easy as just following the tips of those darts through, so below are two ways you could locate your apex:
The fast (and less accurate) way - hold your paper pattern up to you and mark your apex from there. When doing this with Felicity, mark your apex line running from under your arm (or the side seam).
* The slower (but more accurate) way - cut out a muslin, stitch it up and pin in a zip. Try the bodice on, mark your apex, unpick your muslin and transfer your mark to your paper pattern.
* Remember, you've made a muslin anyway when determining fit issues, so this shouldn't actually take that long sine you'll just use the same one!
Step 2 - Draw in your cutting lines
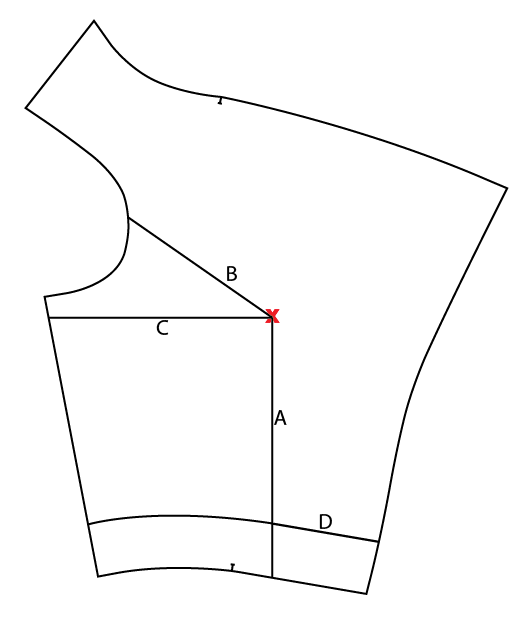
The next step in doing a traditional bust adjustment is drawing in where you'll be cutting into your pattern to perform the adjustment. Now that you've located your Apex (X on the diagrams below), this is relatively straight forward to do.
Using your grainline as a guide, draw in the side bust line at a 90 degree angle to the grain line.

For the waistline line, use your side dart line to mark a line up to your apex that runs at a 90 degree angle to it (this wouldn't necessarily be accurate for a waistline dart due to the fact that the waistline is curved, but it serves our purpose for a bust adjustment.)


Small Bust Adjustment:
1. Measure out, from your apex toward the centre, the difference you calculated that you need to reduce your bust by (remember, this going to be half of the total difference since we are working with half a pattern piece).
Draw this line in (the dashed line on the diagram) parallel to line A.

2. Cut along lines A and B, leaving a pivot point in the armscye (this is the end of line B where the black dot is. Normally you'd cut to the stitching line, but since the end is essentially what would be your stitching line, having your pivot point there is perfectly accurate). Pivot the apex point (and the entire piece of pattern in red) up to the dashed line. Tape in place.


3. Cut along line C, leaving a pivot point at the apex (where the black dot is) and rotate the pattern piece in red towards the armscye so that the line marked A has been lined up with your dashed line. Tape in place.
Note - you could do steps 2 & 3 at the same time if you wanted to.

4. Cut along line D and the pattern piece marked in red. Move that piece up so that it slots back into position, lined up with the bottom of the rest of the pattern and the centre front seam.


5. Now we need to bring your waist measurement back to its original size, since it's now going to be slightly too small. To to this, cut along line D and A on the pattern section highlighted in red. Move that section to the left, so that it lines up with the bottom piece on the right (marked in blue).


6. Now we can true up our side seam and arm scye. You'll want to remove the little triangle sticking up into your arm scye (marked in pink) and then add some paper underneath your pattern piece at the side, and draw in a new side seam (marked in red).

7. Lastly, you'll need to true up the back bodice piece length so that it matches the front. Draw in your lengthen/shorten line and adjust the length to fit in with the new length of the front bodice (matching side seam length).
On a side note, since we've shortened the bodice with the SBA method above, you may want to re-lengthen your front bodice to match your back bodice if that was sitting perfectly at your waist to begin with.
Reducing Gathers at the Neckline:
Another thing you may want to consider with Felicity, if you have a smaller bust, is to remove some of the gather at the neckline. How much and if you actually even want to remove any at all will depend on making a muslin and seeing what fits your particular body shape and your personal preferences.
When making the pattern, I did pay careful attention to making sure there weren't too many gathers that you'd feel overwhelmed, but again, it all comes down to personal preference.
To remove excess gathers, simply skim off some of the pattern from the centre seam and taper to nothing (highlighted in pink).

I'll be back on Friday to show you how to do an FBA and how to pivot darts into the neckline!
xx
J


Hi, Im a newbie seamstress and I love the look of this dress. However Im a small B- cup on top and Im intimidated by doing a SBA as I havent done any fitting before. However you mentioned that one might get away with only grading at the side and center front seams. Do you may explain how to do that please? I would really appreciate any help. :) Thanks in advance!
ReplyDeleteHey Monica! Absolutely - basically all you'll be doing is drawing a line from your waist size (possibly a size 12) to, maybe a size 10 in the bust, pinching out the excess from the sides. I'm happy to draw you a wee picture to help illustrate if you like?
DeleteYou may find that because the sizes are quite different (from a D to a small B) that you will still have some pooling in the bust area. You could also cheat this out by subtracting a little from the centre front seam before you do the gathers. You'll need to be careful about taking too much out of the side seams, as that will create a smaller armscye.
Flick me an email - jen@jenniferlaurenhandmade.com and I'll send you some pictures to help :)
xx