

Gosh, how did it get to be less than a week until Christmas?
Today I wanted to give you all a little pre-Christmas gift in the form of a free Tailor's Ham pattern and tutorial. There's nothing like sewing your own sewing supplies right?
Many many moons ago, I posted a mini-tutorial on how I made my own (very loved) Tailor's Ham. While the process hasn't actually changed, unfortunately, the website where I had gotten that pattern from has long since disappeared. My copy of that pattern has also long since disappeared (in-between moving countries, buying a house and having a baby...), so I thought with Christmas looming, now might be the time to get my A into G, make a new pattern for you and write a complete tutorial.
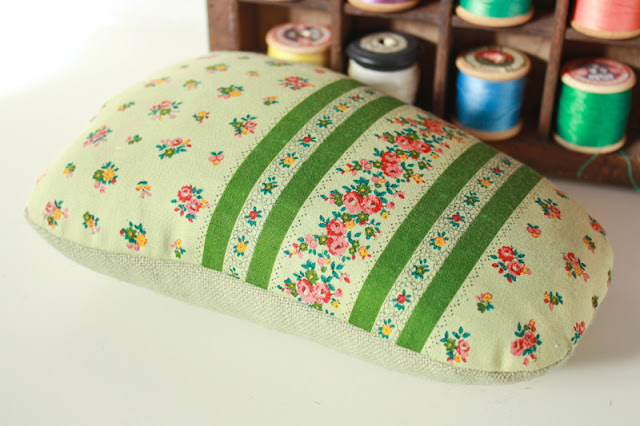
This ham is slightly bigger than my original, but I've found that having two different sizes has been pretty handy over the few months I've been using my new ham. To make a smaller ham, cut an even amount off the outer edges, all the way around.
Fabric Options -
You'll need relatively sturdy and breathable fabrics to make your ham. It gets stuffed tight and will probably be used quite often with a steamy iron, so using fabrics that breath and will dry quickly after use is a must.The two inner layers should be made from a fabric with a tight weave to make sure your stuffing doesn't work it's way through the fabric (calico/muslin is perfect for this). The bottom outer layer should be cut from a wool (or a fabric with some grip - felt is a good choice) and the top layer should be a pretty cotton or linen of some description, quilting cottons are great - pretty and sturdy.
For the sake of the tutorial, I'll be referring to the inner layers as calico, the bottom outer layer as wool and the top outer layer as quilting cotton.
Stuffing -
The traditional stuffing for tailor's hams is sawdust. This is what I used in my original ham, but do you think I could find it here in NZ? Nope. Well... I could if I wanted several cubic metres of it, but I'm really not planning on turning into a tailor's ham manufacturing plant. So...I used wood chips. Don't use wood chips by the way. They are dense, but hard to pack tightly, and you end up with a ham that moves more than you want it too. I'm going to be taking mine out and stuffing it with fabric scraps in the interim, knowing that I may need to re-stuff in the future as the ham starts to settle.
I've also considered using pea-straw. It's easy to find in gardening stores here, and I think it has the same consistency as sawdust when it comes to being reasonably easy to pack in tightly.
I honestly have no idea how this would go in the long term though, but I'm thinking that if you use pea-straw, just make sure it's completely dry before stuffing. Pea-straw, when used in the garden, can sometimes sprout a pea plant or two (coming from experience) because the straw hasn't been completely dried before bagging. Not a major issue in the garden, but to avoid any germinating hams, (or even worse, a mouldy ham), popping your straw in a dry room in direct sun or an airing cupboard for a few days, should ensure you don't get any unwelcome guests in your sewing room.
You'll need -
- Your free Tailor's Ham Pattern
- Fabric (Cotton & Wool - see above for more details)
- Stuffing (see above for more details)
- Needle & Thread
Steps -
1. Print out and piece your ham pattern together using the print layout below.

2. Cut out 2 of the pattern in calico, one in wool and one in quilting cotton. You'll have 4 pattern pieces in total.

3. Right sides together, place your quilting cotton and wool on top of each other. Then sandwich those layers between your calico layers.


4. Starting at the bottom notch, stitch all the way around your ham as indicated on the pattern piece. Back tacking at each end.

5. Trim away seam allowance and notch curves.

6. Turn your ham right-sides out and get stuffing! You want to stuff your ham as tight as you can possibly get it, and then some. Layer your stuffing to get a smooth outer edge by using small amounts and building up towards the bottom open edge.
Then stuff some more.


7. Stuff some more. Close your ham with a slip stitch - flatten your wool bottom layer over the stuffing, then tuck the raw edge of the top layer under, and secure with a needle and thread.


And that's it, all done. A lovely little Tailor's ham...
xx
J


Great tutorial! With the sawdust, you could try a pet store? I had pet mice as a child, and I used to get smallish bags of sawdust for their cage from the pet store.
ReplyDeleteHey Ali! Thank you, I'm so glad you liked it.
DeleteI found the sawdust for my original in a pet shop in Sydney and so thought it wouldn't be hard to find here either. Turns out I was wrong! They don't seem to sell it in small packs here in NZ. They have wood shavings (which we have for our chooks anyway), but I'm not convinced they'd pack down tight enough :(
I'm sure I'll come up with something :)
This is timely, I have making new tailors hams and a seam roll on my Christmas holiday to-do list! I was looking at another tutorial a while back and they suggested using wood shavings from a pet shop - they're sold in small-ish quantities for use as small animal bedding (guinea pigs, rabbits etc). I was going to give it a try myself :)
ReplyDeleteWoohoo!! Great timing indeed :)
DeleteWe do actually have wood shavings (for our chooks), but I wonder how tightly they'd pack down? I will give it a go though and report back. No harm in trying huh?
Thank you for kindly sharing your pattern and tutorial, have you considered using crushed walnut shell for stuffing?
ReplyDeleteWow, I've never heard of crushed walnut shell... I'll have to see if I can find some, thanks for the lead!!
DeleteI've thought about polyester stuffing, but I wonder if it would be dense enough? It's definitely on the plan if all else fails :)
Hi Jennifer - have you considered using chaff for the filling of the Tailor's Ham? Should be easy to obtain a modest quantity from an animal-feeds stockist, and it was used years ago for an easily-replaced mattress-filling; is clean, bright and non-dusty if good quality as it should be for horses :)
ReplyDeleteCompliments of the season to you, and thank you for your charming blog which I've been following for some years.
[Valerie]