Image Slider

An Afternoon Tutorial - Inserting Back Gathers

Friday, March 18, 2016

Hey, hey!

Thank you all for your thoughtful comments and emails on my last post! I've not managed to reply (or approve) all of them yet, but I'm getting there. I didn't realise it would hit such a note with all of you! 

Today I'm sharing the second Afternoon Tutorial - inserting the back gathering for View 4 of the Afternoon Shift dress

You'll need - 
Steps:

1. To cut the correct length of bias binding, use your back paper pattern piece and measure the waistline all the way across using the waistline notch and the tailor's tack marks on the pattern to get a straight line. Double this measurement then cut that length in bias tape.


2. To cut the correct length of elastic, use your back paper pattern piece and measure the waistline from the waistline notch to the tailor's tack marking to get an accurate measurement. Double this measurement then cut that length in elastic.


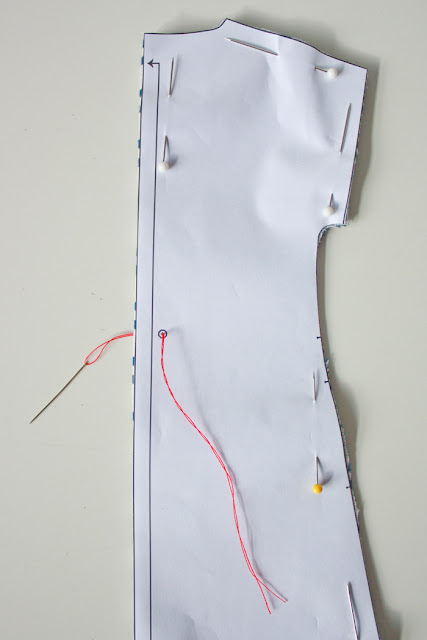
3. Take your cut out back pattern piece with the pattern still attached and using your needle and contrasting thread, place a small tailors tack into your pattern. 


4. Open out your back piece, snip your tack in half and wrong side facing down, place your bias binding on top. Line up the ends of the binding with the waist line notches on either side and the centre with the tailor's tack notches to ensure a straight line.


5. Stitch the top and bottom of the bias binding down, as close to the edge as possible, leaving the ends on each side open. Back tack at each end and remove your tailor's tack.


6. Place a small safety pin at one end of your elastic and pull it carefully through the bias casing, lining up each end of elastic exactly to the side of your shift dress.

I've also pinned the end of my elastic to the side in the photos below so it doesn't pull all the way through.


7. Place a few small stitches, within the seam allowance, at each end of the elastic to secure it until the side seams are stitched up. These can be hand stitches or machine stitches.


And that's how you insert the back gathering! It's pretty easy and leaves you with a really nice finish on the outside of the dress.

Have you made an Afternoon Shift or Blouse? Leave me a link in the comments, I'd love to see them :)

xx
J
Shop Patterns     .     Instagram     .     Newsletter      .     Facebook    .     Pinterest   .   Podcast

Feeling Chatty...

Friday, March 11, 2016


I was going to post the second of my Afternoon Tutorials, but today, I just felt like writing to you all instead and saying hello.

Hello!

Autumn is apparently officially here in my neck o' the woods. We've literally just had the power turned back on. It's been down since yesterday evening - we've had gale force winds here which have knocked down powerlines, um, hello autumn or winter!? Thank goodness for our little wood burner and stove top kettle, oh how we take power for granted...

Autumn is technically my favourite season, but, I just want a bit more summer warmth. We've not had a great summer this year, so I'm feeling a little cheated and not quite ready to give up my long light days in exchange for dark mornings and cold nights.

No, not yet. I think we can wring a few more warm, flowery days out before the cold settles in and the garden goes to sleep though... I live in hope.

Anyway, what I actually wanted to talk about today... you know how sometimes you're in the mood to share, and other times you'd rather use that sharing time to just get more sewing done? Yeah, I've definitely been in that mood lately. I'd rather make stuff than share it at the moment, so, that back log of stuff-to-share most certainly isn't getting smaller. BUT we did take some time on Wednesday to take photos of a few of the things I've been making.

Photo sessions have to happen quickly and in bulk these days, between naps and on a sunny day, in the afternoon when the sun is streaming into my sewing room, when David is home. It definitely needs planning...

Which brings me to the topic of blogging regularly as a seamstress. It quite rightly pops up fairly often, because the reality is that if we want to blog our makes regularly, we have to actually make regularly. But most of the time, that need-to-make leads to less-than-wearable/usable makes, wasted time and an aversion to actually getting any sewing done, doesn't it?

I know that when I feel like I should be blogging but have nothing to share, I end up not doing any sewing because I start to feel resentful at the need to sew just because I feel like I should be blogging, and not sewing because I actually want to. It's a cycle. And not a terribly productive one at that.

So my advice? Ignore all those helpful 'blog 10 times a week for a super dazzlingly successful blog'. They might be trying to be helpful, but they really aren't actually all that helpful for your productivity. Blog when you have something you're really excited to share, I'm sure your readers won't mind. I doubt they realise that you've made a rule to post every Monday, Wednesday and Friday at 10am exactly.

Do you sew to blog? Or do you blog when you've got some sewing to share?

xx
J

Shop Patterns     .     Instagram     .     Newsletter      .     Facebook    .     Pinterest   .   Podcast

An Afternoon Tutorial - Inserting a Back Box Pleat

Friday, March 4, 2016

Hello Everyone!

Lots of you have already purchased or upgraded to the new Afternoon Blouse & Shift Dress pattern, thank you so much! I can't wait to start seeing your lovely creations popping up soon.

Today I thought I'd share a quick tutorial on how to insert the back inverted box pleat for View 3. The pleat is a lovely little addition to the shift dress, giving you some added shape while also providing an unusual wee detail - right up my alley.

You'll need -

  • Your Afternoon Shift back pattern piece 
  • a needle with contrasting thread 
  • your sewing machine

Oh, and this tutorial has been photographed using a mini version of the shift pattern - so much easier to photograph and so cute!!

Steps:

1. Take your cut out back pattern piece with the pattern still attached and using your needle and contrast thread, place a small but sturdy temporary tack into the notch markings in the centre back of your shift dress, securing them together.


Don't be afraid to stitch this tack in several times, because the last thing you want is for it to move before you've stitched in your final pleat.

2. Using a low heat on your iron, press the centre fold line down gently next to your tack. This will provide a temporary guide, allowing you to line up your box pleat more accurately for the next step.


3. With the wrong side facing you, open out the pleat and press it flat down, lining up your centre 'line' with your temporary tack. This will ensure you have an even amount of 'pleat' on either side of your imaginary centre back line. Pin in place.


4. Stitch your box pleat down with one row of stitching (you may choose to do two for extra security if you like). Don't back tack at either end, instead, leave long tails and pull these through to the underside once you have finished securing your pleat. Knot securely and clip threads short. Remove your temporary tailor's tack.


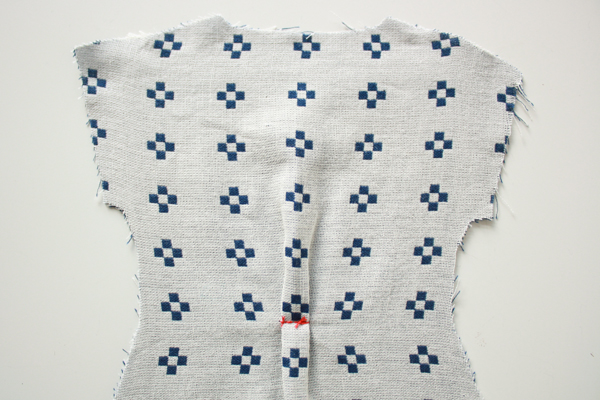
This is what your pleat should look like from the right side!


And that's it! Easier than baking a cookie*

Next week I'll be showing you how to put the gathering into the back for Version 4 of the Afternoon Shift Dress.

Talk soon,

xx
J

* Possibly not as easy as eating the cookie though - but you'll be mighty comfortable doing that in your sparkly new Afternoon Shift :)

Shop Patterns     .     Instagram     .     Newsletter      .     Facebook    .     Pinterest   .   Podcast

Introducing The Afternoon Shift Dress Pattern - an Afternoon Blouse Expansion Pack...

Friday, February 26, 2016
Here it is you guys, the newly updated Afternoon Blouse & Shift Dress
an expansion pack of the popular Afternoon Blouse pattern.


This new version includes additional sizes in the upper range as well as a comfortable and stylish Shift Dress variation with your choice of back box pleat or light gathering for additional shaping, as well as some all-important side seam pockets.

With pretty kimono sleeves and two different neckline options, The Afternoon Blouse & Shift Dress is a great pattern for beginners and advanced seamstresses. You can make both the dress and blouse in most fabrics. Why not make use of all those quilting cottons in your stash for a crisp garment, or use light cottons like voile, lawn and linen for a softer, lighter finish - perfect for wearing in spring and summer. If you want a little more luxury or a bit more of a challenge, try stitching them up in silks and rayons. 

And for those of us heading into winter, why not stitch up your very own shift dress in a snuggly flannel or drapey wool-blend? Then layer it up with tights, boots and a scarf, and you're set for an autumn afternoon walk.


As the name suggests, you should be able to whip up either the blouse or dress in an afternoon, so if you're after a quick and satisfying make, then this should be right up your alley.

What if you already bought the blouse when it was first released...?

This is a free pattern update! Yay! All you need to do is forward me a copy of your Etsy or Paypal receipt and I'll email you a new copy. Please note, due to demand, I will be emailing new patterns once a week, so you may not get your new pattern straight away, but it's coming - jenniferlauren.is@gmail.com

So, what do you think? Will you be swanning around in an Afternoon Shift or Blouse soon? I'd love to see them if so, make sure to tag me on Facebook, Pinterest and Instagram!

xx
J
Shop Patterns     .     Instagram     .     Newsletter      .     Facebook    .     Pinterest   .   Podcast

A New Pattern, it's nearly here...

Tuesday, February 23, 2016

Hello, hello :) 

Sign up to my newsletter before 8am GMT+13 Thursday 24th February if you'd like to be among the first to catch a glimpse of the newly updated Afternoon Blouse & Shift Dress pattern, along with a little discount code for newsletter subscribers only.

Otherwise, I'll see you Friday!

xx
J
Shop Patterns     .     Instagram     .     Newsletter      .     Facebook    .     Pinterest   .   Podcast

Blink and you miss it...

Friday, February 5, 2016


And in the blink of an eye, January is over and February has well and truely taken over.

It's the last official month of summer now, though we're finally getting some consecutive sunny, warm days, so it better continue into March at the very least.

I accidentally took a mini blogging break during January, oops. It wasn't intentional, but boy have I been productive during it. Having a word for the year has been really kind of amazing. Focus indeed.

I always have lots of things on the go at once, both personal projects and work related things, but in the past, I'd always feel guilty for doing one thing when I had 10 other things to do. So, I'd stop doing the thing that I had just started and would start the next thing, only to feel guilty about not doing something else, so I'd stop and the cycle of not-really-getting-anything-much-done would continue.

During January, with my word firmly in my mind, I would slip into my sewing room as often as possible, pick a project and focus on getting it done. Sometimes I would still feel guilty for not doing other things, but instead of stopping, I'd tell myself to focus and voila, things are finally crossed off my list that have been lingering for an embarrassingly long amount of time.

In terms of personal sewing, I made David a cardigan, I sewed some floral pillow cases and I made some wood basket liners which I had been meaning to do ever since we moved into our wee house nearly two years ago. We put a new wood stove into our living room late last year - the old one is in the kitchen, and we found we were spending more time in there than our cosy living room - but the living room has carpet, and all the little sticks and bits of wood that were falling through the basket cracks were driving me nuts. So, one morning, I sat down and made three of them. It was a great feeling putting those liners on those baskets, and they look so pretty.

In sewing patterny-things, my updated Afternoon Blouse with new shift dress pattern went out to testers two weeks ago, I drafted and have finalised a new pattern piece for The Felicity Dress for a wee expansion pack coming really soon, one new summery blouse pattern has been drafted and is ready for grading and another little autumn-y knit dress & top is nearly finished and should be ready for grading next week sometime.

Add to that my mum being here for close to two weeks, Oscar gaining his first 3 teeth in rapid succession (with 3 more very visibly on their way) and deciding that solid foods aren't all that bad and getting the hang of crawling (although backwards, hehe), and I'd call that a focussed and action packed January. Phew! I'm feeling very pleased with myself don't ya know :)

Now I just have to make some time for some picture taking of all of the above, and we'll be back on this ol' blogging wagon soon enough.

How was your January?

xx
J
Shop Patterns     .     Instagram     .     Newsletter      .     Facebook    .     Pinterest   .   Podcast

Auto Post Signature

Auto Post  Signature