

It's hard to believe that this was me a year ago!! A whole year has slipped on by and Rowan is now one and her own little person. Did you know these were actually taken the day before she was born? Seems like a lifetime ago.
Well, I'm here to tell you that if you can sew and have a basic knit top pattern in your stash, you can easily and successfully sew your own nursing clothes and it won't cost you very much at all.

I've used the Ostara Top here (a fitted knit top made with stretch knits) but you can use any fitted knit top pattern you like - may I suggest Gable? (You could even make a Gable nursing dress!) Bronte or Vielle?
After making several of these tops just before Rowan was born last year, and seeing the wear and tear on them (the constant pulling up and down to feed and the little hands always tugging at the neckline) my best advice here is to choose a good quality knit that has really good recovery. Drapey knits in a fitted top won't ever work well, but they will especially bad in a nursing top.
However, if you have a drapey/loose knit top pattern, the principles of this tutorial are essentially the same, you'll just want to adjust the amount of elastic you put into your 'opening' hems (this will make more sense once you see the process below).
You'll need:
- A fitted knit t-shirt pattern (I've used Ostara for this tutorial)
- 2 traced out front bodice patterns
- A length of 1cm width elastic (I like lingerie elastic) - more on the specifics of this below
- Pen/paper/ruler/tape measure/pins
A bit about elastic length:
Measure your under bust and over bust at the front from one side to the other. Add on another 5cm or so and you should have a good amount of elastic (without too much wastage) to make one top.
You can also use any width elastic you like - you'll just need to adjust your seam allowance widths to accomodate this.
A bit about elastic type:
I like to use flat lingerie elastic for this tutorial, because you're sewing directly into the length of the elastic for this top. Lingerie elastic is flat and the 'elastic' within it is thinner and more spread out VS standard elastic where the 'lines' of elastic are encased in thread.
Sewing over standard elastic leaves more room for your needle to pierce the encased elastic, therefore weakening it and causing it to break and fray over time - which is not ideal when a top for this purpose will be constantly being tugged on!
Steps:
Seam allowances should be removed before making paper pattern adjustments
1. If you've made a top with the pattern you've chosen, put it on and mark where your under bust is. If you've never made your pattern before, put on a top that is similar in fit and mark that instead.
Measure the length from the underarm down to your marking and transfer the mark to your first traced pattern piece. Mine was 14cm.

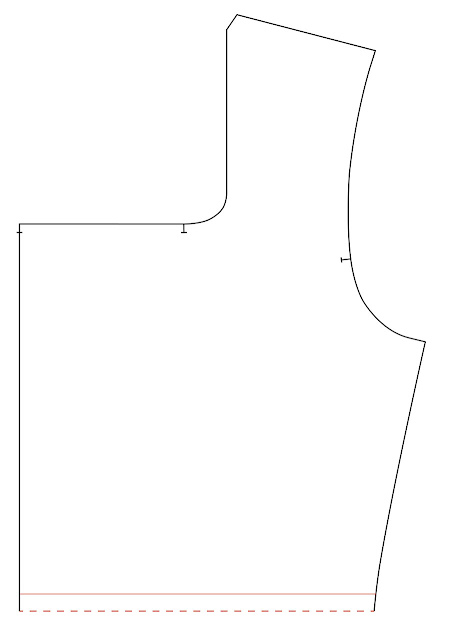
2. Draw a line straight across from your under bust marking.

3. Add on a seam allowance the width of your elastic (mine was 1cm) and cut along this line (the dotted line below). Discard the bottom pattern piece keeping the top half only.
You now have the upper bodice for your nursing top.

4. Take your second front bodice tracing and draw a straight line from the under arm to the centre (blue line below). To get a nice curve that sits across your over bust, draw a marking 4.5cm (or more or less depending on your cup size) higher at the centre, then curve it back down to nothing at the under arm (red line below).

5. Add all seam allowances that were removed back on and add on an additional 1cm seam allowance (or the width of your elastic) above the curved line you drew in step 4 (dotted line below).

6. Cut along the dotted line and discard the top portion of the traced pattern. You now have the lower bodice for your nursing top.

7. Place the upper bodice on top of the lower bodice and mark a notch on the side of the lower bodice, where the finished upper bodice will end (circled below in blue).

8. Now is the time to lengthen the front and back bodice pieces in the bodice if you wish to do this.
Now for the sewing part!!
Note: you'll see that I didn't finish the raw edges (I've called them 'Hems' below) of my upper and lower bodice openings. Because they are knits, you don't have too - and to be honest, I wasn't sure how well breastfeeding Rowan was going to go after my previous experience. So I didn't want to put too much extra effort into making tops that may not get worn. As it turns out, we're still breastfeeding, and while I wish I had made more of these tops (I made one short sleeve and two long sleeves) the 'raw' edges still look like they did the first time I cut them after a year of being in very high rotation. So, it's not a 'must do' if you don't want too.
1. Finish off raw edges of bodice opening hems if you'd like, removing as little fabric as possible.
2. Cut a length of elastic approximately 2.5cm to 5cm (1-2") shorter than the raw edge of the upper bodice hem. You can do more or less depending on your elastic and fabric stretch percentage.
3. With the wrong side facing, place the elastic along the hem edge of your top. Pin it in place at the sides and the centre.

4. Using a large zigzag stitch, gently ease your elastic into place, stretching the bodice hem rather than the elastic.

5. Press your hem up by your elastic width (1cm for me), press gently, then zigzag in place again.


6. Repeat the above steps for the lower bodice opening hem.
7. Right sides facing up, place the upper bodice on top of the lower bodice, matching up the finished hem of the upper bodice to the side notches you marked in step 8 above.


8. Pin in place along the side seam then baste in place within the seam allowance. Finish your top as per the instructions included with your pattern.

And that's it! Once you've done the paper pattern adjustments, you can bulk cut these and have as many nursing tops (or dresses) as your heart desires.


As I mentioned above, my 3 have been in very heavy rotation for a year now and are still going strong (although they are looking a little tired), so if you give this a go, I'd love to see them and hear how they're working out for you.
And if you're interested in making a maternity knit top, I have a tutorial for that here.
xx
J


Post Comment
Post a Comment
Thank you so much for stopping by to leave me a comment, like most people, I really do appreciate them all!
Due to the large amount of spam I receive here, unfortunately I have had to turn comments off. If you'd like to get in touch with me, please send me an email :)
Note: Only a member of this blog may post a comment.