Image Slider

Showing posts with label Little Inspirations. Show all posts

1930's Fashion Predictions...

Saturday, June 29, 2013
David sent me a link to this video a long long time ago - 1930's futuristic fashion predictions AKA what they thought we'd be wearing in 2000.

It's a hair-raisingly brilliant video. Some real eye candy for you lovely cuties...


Oooh, swish!!

xx
Jen

The Crazy Granny Square Lady...

Friday, June 14, 2013


Okay, I can explain...

About a week and a half ago I taught myself how to crochet a granny square (and by taught myself, I watched a youtube video). I've now officially gone a bit crazy and have crocheted a grand total of 72 (and counting...) granny squares, including one accidental triangle when I wasn't paying attention (which I actually really quite like, so I am seeing some granny-triangles in my future as well...).

The pattern I'm using isn't the one from the youtube video though. Once I had got the hang of the granny square, I ended up playing around with the stitch count and placement of stitches, presented the 5 different designs I had come up with to David and we both agreed on our favourite. I'm fairly sure the pattern is not new to anyone who crochets, but I am happy to give it to you if you want it (and once I figure out how exactly to write a crochet pattern...).

So, what am I making with all these granny squares? Well, some cushion covers are first on my list and then a blanket. After that, probably some more cushion covers and then perhaps another blanket. I don't foresee my granny square craze stopping anytime soon. They are too cute and quick to make!

And oh the colour combinations you could have! I've changed my mind about the colour combinations for my pillows so many times already, I just can't decide!


I'll get back to you with my finished cushions just as soon as they are done (probably in the next week or so).

xx
Jen

Tutorial - Make Bunting (with free pattern!)

Friday, May 24, 2013


Whether it's for a birthday, baby shower, wedding or to brighten up a room, bunting is pretty awesome stuff and it's super easy to make at home. Also, I've made you an awesome free downloadable pattern for both circular and triangular bunting!

A special thanks goes to David and his computer skillz for taking my hand drawn patterns and making them look like real patterns.


The pattern is designed to print onto 1 A4 sheet of paper - no random printer resizing should be required.

While I have used the circular pattern in my tutorial, if you choose to use the triangle, the steps are exactly the same.

Supplies:

Steps:

1. Gather your scraps of fabric and iron. Lay your bunting pattern on your fabric scraps.

Note: Get creative when laying out your bunting pattern and use as much of the fabric as you can, you don't need to really worry about grain when making bunting. You'll be surprised at where you can squeeze your pattern onto.


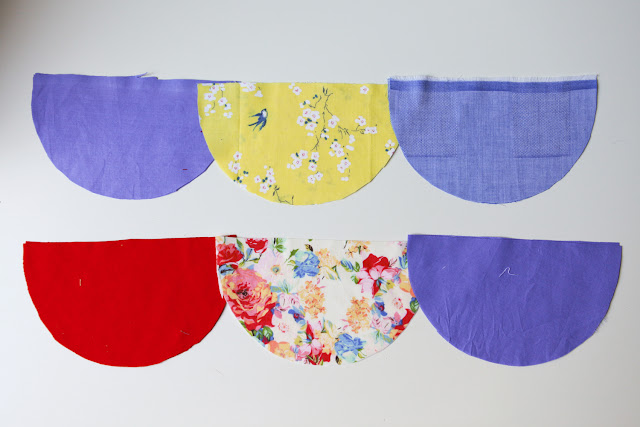
2. Cut your bunting out. As this is reversible bunting, you'll need 2 pieces of fabric for each bunting piece.

Note: Feel free to mix it up and use different fabrics on each side. This works particularly well if you don't have enough of one type of fabric.

3. Right sides together, sew your bunting together leaving the top open.

4. Trim seam allowances and clip corners.

5. Turn bunting inside out and iron. Now you can decide the order of your bunting.

6. Once you've decided on the order, take your bias binding and fold the end in about 1 inch (so you can pin your bunting to the wall, table etc). Place your first piece of bunting on the binding so that the raw top edge sits in the middle of the binding line.

7. Fold the binding over the top raw edge of your bunting and pin in place. Then place the next piece of bunting onto the bias binding - you can either place the bunting right next to each other (as I have done) or leave spaces between each piece.

Keep adding your bunting pieces to your binding until you run out. Then leave another 1inch of folded binding at the end.


8. Starting about 1/4inch in, sew a straight line down your binding. Make sure you catch all of the bunting edges in your binding.


Iron and Ta Da! You have your very own reversible bunting.

I used 10 pieces of circular bunting placed right next to each other ended up with a length of bunting measuring just over 64inches long.

A quick note about the size of your binding - as you can see, I used a really small width of binding for my bunting, and while it looks really cute, I wouldn't recommend it. It was difficult making sure the top bunting edge was securely sewn in. This was some vintage binding that I had had my heart set on using for this purpose ever since I got it though, so if you're like me, you've been warned :)

Let me know if you make any! I'd love to see it :)

xx
Jen
Shop Patterns     .     Instagram     .     Twitter     .     Pinterest

It's Giveaway Time!

Wednesday, May 22, 2013


Competition now closed :) Please check out my Etsy shop for these lovelies.

It's my birthday next Tuesday and to celebrate, I'm giving you a present :)

I've been working hard on my Etsy shop these past few weeks and have gotten it to a point that I'm finally happy with the stock and the photography.

I've turned my embroidery designs into screen printable stencils and have been happily screen printing away in my kitchen ever since. It's so much faster than the embroidery I was originally doing, though I am still offering custom embroidery in my shop.

I have a range of pillow/cushion slips, tote bags and tea towels available. There are three screen printed designs currently in the shop, but I have just put the finishing touches onto a cat design that will be available hopefully next week sometime.

As I had spare fabric remaining from previous projects, I ended up changing the backing out on the screen printed versions of my cushions - can anyone guess which projects they are left over from?


My screen printing method was mostly trial and error in the beginning. I have done it before, but it was years ago, so I was going off what I could remember and thankfully, they turned out quite amazingly well!

Are any of you interested in hearing a little more about screen printing? It's a great way to customise fabric for your garments and you don't really need much to start with. If you are interested in hearing a little more about how I did my screen printing, let me know in the comments and I can do a small 'beginners screen printing' series.

WIN!!

In honor of my birthday next week, I am giving away one tote bag to a lucky winner and one tea towel to another winner - the winners get to choose the design they prefer.

All you need to do is:

Visit my shop and then leave me a comment on this post telling me what you would like the most - a tea towel or a tote bag, and your preferred design (rabbit, mouse or bird).

Please leave me your email address as well so I can get in touch with you easily (feel free to email it to me once you've left your comment so it's not out on the inter webz for all to see - jenniferlauren.is@gmail.com)

I will ship any where in the world!

I will announce the winners a week from today (Wednesday 29th May). Please feel free to share the give away anywhere you feel appropriate as well :)

Good luck!!

xx
Jen

Auto Post Signature

Auto Post  Signature