Image Slider

Showing posts with label Tutorials. Show all posts

Delicate Rolled Hems, Without a specialty Foot

Saturday, July 16, 2016

Just like any hobby, sewing can become an expensive pass-time with all of the different bits and bobs available - whether you're a newbie (what do I actually need?) to an experienced sewer (must have all-the-new gadgets!!).

I might be in the minority here, but I think that the fewer fancy gadgets you have, the better. Yes, you might save a few minutes on a specialty technique with that fancy foot, but you still have to learn how to use the foot AND it's only worth it if you use that particular technique a lot. Almost everything can be done with the basic equipment that came with your sewing machine and yet, almost every technique has it's own specialty thing to 'make it easier and faster'.

So, if you're on a budget or are still exploring whether sewing is for you, here is a little technique that will give you perfect rolled hems every time, without the need for a rolled hem foot. There are a few more steps involved, but you only need your straight stitch foot and an extra 5 minutes for a lovely little rolled hem - it's easier than you think it is.

You'll Need - 


Steps - 

1. Place a line of stitching 6mm (or 1/4") in from the raw edge, all the way around the hem of your Hunter Tank (or other sewing project), starting from one tie end and finishing at the other tie end.


2. Press your hem up to the wrong side along your stitched line, making sure your stitches are just visible on the wrong side. For the Hunter Tank, you'll need to gently ease up the side seams.


3. Secure your pressed fold by placing a line of stitching as closely to the pressed edge as you can. You'll probably be stitching on or very near to your initial set of stitches.


This is what it'll look like on the right side...

4. Trim out your excess fabric, as close to your stitched line as possible.


5. Press your hem up again one more time so that your rows of stitching are to the underside, easing around your side seam one more time.


6. Stitch in place with your machine or using hand stitches and you'll now have a neat little rolled hem. No specialty feet needed.
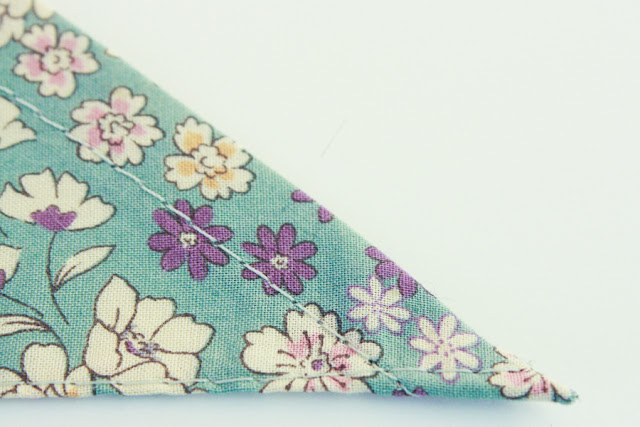

Of course, you are more than welcome to use a rolled hem foot if you have one, but you'll still get a lovely result either way.

Do you have specialty feet that you hardly ever use? Have you tried this technique to get a rolled hem? I'd love to know how it worked out for you, let me know in the comments!

xx
J

This tutorial is part of The Hunter Tank Sewing Series

Shop Patterns     .     Instagram     .     Newsletter      .     Facebook    .     Pinterest   .   Podcast

Perfect French Seams - The Hunter Tank Sewing Series

Friday, July 8, 2016

I love French Seams and though I did a tutorial a few years ago, I thought since releasing The Hunter Tank, that it was the perfect time for a bit of a re-fresh.

The Hunter Tank can be almost completely made up with French Seams (except for the centre front) and it's the perfect little pattern to try the technique on if you're new to it.

French Seams are the best kind of seam to use on delicate, light and sheer fabrics, just what The Hunter Tank calls for.  They enclose the raw edge of a seam and produce a beautiful finish on the inside and out, and they aren't hard at all! Let me show you...

You'll need - 


Steps - 

1. Wrong sides together, place a line of stitching 5mm (or 1/4") away from the seam allowance.


2. Press your seam allowances open (use a Tailor's Ham to keep the light angles on the centre back seam of your Hunter Tank in place).


3. Fold your seam in half, right sides together, along your stitched edge and press.


4. Place a line of stitching along the seam allowance again, this time 10mm (3/8") away from the edge. Press and marvel at your beautiful finished French Seam.


Ahhhh, look at how pretty that is, and so easy to boot! You can do a French Seam with any amount of seam allowance really, just make sure both seams equal the seam allowance that your pattern calls for (15mm for Hunter). And make sure your first seam is smaller than the second seam, or trim your first seam down before stitching in your second seam.

French seams can be used on The Hunter Tank for the back centre seam, side seams and shoulder seams.

Have you tried French Seams? Will you give them a go now that you know how easy they are?

xx
J
Shop Patterns     .     Instagram     .     Newsletter      .     Facebook    .     Pinterest   .   Podcast

The Hunter Tank - A Sewing Tutorial Series...

Saturday, June 25, 2016

Hey everyone,

Let's get onto some Hunter Tank tutorials shall we? 

Below is a little list of some of the tutorials I've already photographed and will be posting about in regards to The Hunter Tank. If you have any other techniques you're interested in knowing a bit more about, let me know in the comments and I'll add them to my list.
Hope you're keeping warm (or staying cool!),

xx
J
Shop Patterns     .     Instagram     .     Newsletter      .     Facebook    .     Pinterest   .   Podcast

* Fabric used for The Hunter Tank above is Frou Frou Floral in Blue.

Sewing Indie Month - Guest Tutorial by Kat from Muse Patterns

Saturday, September 19, 2015
Hey Everyone!

With Sewing Indie Month in full swing, I'm honoured to have Kat from Muse Patterns (a fellow Kiwi) here today with a great wee tutorial using the Cressida Skirt and Dalloway bodice. Combined, they make such a sweet little dress and with summer just around the corner here in little old NZ, I'm definitely going to be giving this a go.

So, over to you Kat...!

Hi everyone! My name’s Kat, from indie label Muse Patterns. I’m really excited to be here today, showing you a pattern “hack” I’ve done with two of Jennifer’s patterns - the Dalloway dress and the Cressida skirt.


Jennifer and I have a few things in common - we both design patterns with vintage inspiration, we both have very young children, and she lives in the town I grew up in! So it seemed rather perfect to be paired up with her for Sewing Indie Month. :-)


Since Jennifer’s Cressida skirt was part of the first of the pattern bundles for Sewing Indie Month, I wanted to do a tutorial using that pattern, and hopefully giving you all inspiration for how else you can make it up. So, I’ve turned it into a dress, by pairing it with the bodice of the Dalloway dress!


Combining these two patterns is super easy, and results in a pretty dress in a classic fit-and-flare style. Here’s how to go about it....


Cutting your fabric


To make the Cressida-Dalloway dress, you’ll need the following pattern pieces:
  • From the Dalloway dress: front and back bodice pieces.
  • From the Cressida skirt: front and back skirt pieces, and the pocket.


Cut the Dalloway bodice pieces out of your main fabric and your lining fabric, as per the Dalloway instructions.


Before you cut out the Cressida skirt, we’ll need to make some simple adjustments to both the front and back skirt pattern pieces. The Cressida skirt is designed to button up the front. However, we need to switch this around to be a back lapped-zip opening, so that it fits well with the fastening for the Dalloway bodice. This means that we need to remove the overlap from the centre front of the skirt, and convert it to be cut on the fold. We’re also going to add a centre back seam to the skirt for attaching the zipper.


First up, the skirt front. Near the centre front, on the waist curve of the skirt you’ll see a notch marked ‘Centre Front Notch’. Draw a line from this notch all the way to the skirt hem, running parallel with the centre front seam. This line is your new centre front seam, and we’ll be placing it on the fold of the fabric to cut out the skirt. You can see it marked in red in the image below.


FrontNewCF.jpg


And here’s where we cut out the skirt front - that new red line is now placed on the fold of the fabric, so the skirt front is cut in one piece.


frontCutFabric.jpg


The alteration to the back skirt is just as easy - to convert it to have a centre back seam, all we need to do is add 1.5cm / 5/8” to the centre back as seam allowance. We can easily do this while cutting out the fabric - place your skirt back piece on your fabric, and draw a line in tailors chalk 1.5cm / 5/8” away from the centre back seam, running parallel to that seam. This is our new cut line - you can see it marked in blue chalk below. (Important: because we’re adding a centre back seam, do not cut the skirt back on the fold.)


backNewCB.jpg


And here’s what the skirt back looks like when it’s cut out, with the extra width added for seam allowance.


backCutFabric.jpg

Sewing up your dress


First, sew up the skirt by following the Cressida skirt instructions for stitching together the pockets and skirt front and back and finishing the seams. Leave the centre back seam open.


Now switch to the instructions for the Dalloway dress - you’ll be following these from now on.


Follow the Dalloway instructions until you reach the section on attaching the skirt to the bodice. To do this, pin the skirt to the bodice, right sides together, and lining up the skirt side seams with the bodice side seams. Stitch together, and press seam allowance up towards the bodice.


Now go back to following the Dalloway instructions, until your dress is finished.

Yay! You now have a pretty and classic fit-and-flare dress! (With pockets. ;-)

Thanks so much Kat!

Do you guys think you'll give this a go? We'd both love to see it if you do :)

xx
J

The Dalloway Tutorial Series

Thursday, September 11, 2014

Howdy Folks!

First off, thank you so much for all o' your kind comments on the release of The Dalloway Dress & Skirt Pattern. I'm so happy you like it AND it made me even more happy that you like that it's different to what's out there at the moment and that it's aimed at intermediate to advanced seamstresses. I have more beginner patterns coming, but it's always nice to sink your teeth into a little something pretty that's a bit more complicated.

As I mentioned when I released the pattern, I'm not going to be running a sew a long (unless there's a big push for it!) but I am going to be running a series of tutorials for the pattern. The dates for the tutorials are below - starting tomorrow with the Hip Grading tute. I kind of figured that those of you who already have the pattern probably know about tailors tacks and are itching to get sewing, but might need to fiddle with the hips a little first and aren't quite so sure how to tackle them (it's not as complicated as it might seem - promise!). And just in case you don't have your Dalloway pattern yet, you can purchase it here and download it instantly to your computer.

Dates for your diary...

Friday 12th September 
Dalloway - Grading the Hips

Tuesday 16th September
Easy Tailor's Tacks for Dalloway

Tuesday 23rd September
Dalloway - Pressing in your Horizontal Skirt Pleats

Friday 26th September 
Dalloway - Stitching in your Horizontal Skirt Pleats

If there is something specific you'd like to see that isn't listed, please let me know, it is by no means a comprehensive list of things you might struggle with, it's mostly the things I think you might want to know about, so I'm more than happy to add more to the list.

And just because I could, I made a wee button for you should you wish to display it proudly somewhere :)


Grab button for The Dalloway Pattern Tutorial Series by Jennifer Lauren
<div class="Jennifer-lauren-vintage-dalloway-button" style="width: 200px; margin: 0 auto;"> <a href="http://www.jenniferlaurenvintage.com/2014/09/the-dalloway-tutorial-series.html" rel="nofollow"> <img src="http://i1289.photobucket.com/albums/b516/Jenniferlaurenv/Dalloway-button_smallweb_zpsfddf3989.jpg" alt="Jennifer Lauren Vintage" width="200" height="200" /> </a> </div>

So, onwards to some hip easing action Ladies (and Gents, if you're out there) - see you tomorrow,

xx
J

The Bronte Top Sew-A-Long...

Monday, June 16, 2014

Wow you guys, what an amazing reception to Bronte there has been, I'm so glad you like her!

As promised, I am running a sew-a-long for The Bronte Top, so if you're planning on sewing your own Bronte with us, here are some dates you might like jot down in your diary (if there is something in particular that you'd like to know about that I haven't mentioned below, let me know and I'll do my best to add it in) - you can buy the pattern for instant download here.

Thursday 19th June
All about suitable knits for your Bronte top and some of my favourite types

Monday 23rd June
Appropriate sewing machine settings for sewing with knits (if you don't have an overlocker)

Thursday 26th June
Flat Pattern Adjustments Part 1 - Lengthening & Shortening the bodice and long sleeves

Monday 30th June
Flat Pattern Adjustment Part 2 - Doing an FBA (full bust adjustment) for knits

Monday 7th July
Let's Start Sewing! Adding bindings to the front and back necklines

Thursday 10th July
Basting shoulders together and inserting sleeves

Monday 14th July
Finishing side seams and hemming

Thursday 17th July
Finishing the neckline

If you want to let everyone know that you're taking part in the fun, I've created a little 200px button for you to display on your blog as well -

Grab button for The Bronte Top Sew a long by Jennifer Lauren
<div class="Jennifer-lauren-vintage-bronte-button" style="width: 200px; margin: 0 auto;"> <a href="http://www.jenniferlaurenvintage.com/2014/06/the-bronte-top-sew-long.html" rel="nofollow"> <img src="http://i1289.photobucket.com/albums/b516/Jenniferlaurenv/BronteButtonFinalWeb_zps08fdc541.jpg" alt="Jennifer Lauren Vintage" width="200" height="200" /> </a> </div>

I've also started a Flickr Group for my patterns, so feel free to upload your makes onto the group board so I can see them (I'm nosey and I wanna see them!).

And finally, I had actually planned to get this post up on Friday, but alas, some major renovations have just started on our house and so I've been without a bathroom the entire week and for most of it, without lights, some power and the internet. Oh the joys of renovations, I can't wait for them to be finished! For those of you who are interested, I have actually started a little blog following our renovations over here if you'd like to have a nosey. There are only 2 posts up at the moment, but I'm planning rather a few more, especially after this week, the change has been rather dramatic (albeit dusty and messy!).

xx
J

Afternoon Blouse Pattern Hack - Adding Waist Ties

Wednesday, June 4, 2014
So, you want to make an Afternoon Blouse, but you have one problem - you're never going to wear it tucked in so you'd like it to be a little more fitted.

While you could easily grade it in a size (or two) at the waist, have you ever thought about adding in waist ties?


Adding waist ties to your Afternoon Blouse (or any top for that matter!) is easy, cute, and has the added bonus of you being able to let them out a little after lunch time, while still looking chic!

Supplies:

Steps:
1. First up you'll need to decide how long and how wide you want your waist ties to be. Once sewn up, mine are 70cm (27.5") long and 4cm (1.5") wide. Once you've decided on these measurements, you'll need to add on your seam allowance (I used 1cm (3/8")). So my rectangle pattern measures 71cm long and 10cm wide total (the width is doubled since it's folded over).

2. Draft up your rectangle pattern onto paper, then using that pattern, cut out 2 waist ties from your chosen fabric.

Optional Step - if you want your waist ties to have some extra body, add interfacing to the wrong side of each one before continuing.

3. Fold in half length-wise, right-sides together and press.

4. Feel free to leave the ends of your waist ties square, but I decided to make my waist ties with an angled tip. To do this, cut off a triangle at the end, angling out from the raw edge of your waist tie towards the tip. How sharp you want your tip is entirely up to you!


5. Starting at one end, leaving the shorter edge open, stitch raw edges together.


6. Trim seam allowance and corners


7. Turn waist tie right-side out and press.


8. Repeat with other waist tie.

9. Sew up your Afternoon Blouse as per the instructions until you get to the step where you sew up the sides. Locate where your waist sits on the side of the blouse and pin waist tie to the right-side of the front bodice, matching up raw edges.

Note - if you've angled your tips, make sure the longer end is on top, as per the photo below.


10. Baste in place into the seam allowance. Repeat for other side making sure waist ties are matching up.

11. Sandwich your waist ties in between your front and back bodice, being careful not to catch the loose ends of your waist ties in your side seam, sew up your side seams and finish the blouse as per the instructions.


Ta da! One cute Afternoon Blouse with waist ties coming up!

xx
J

Stabilising Seams - Tips & Tricks

Thursday, April 17, 2014
 photo Stabilising-Seams-Banner_zps87eaa748.jpg

If you're planning on making an Afternoon Blouse from a lightweight or slippery fabric like silk or rayon, you're probably going to want to stabilise your neckline seams to stop them from drooping out of shape.

Stabilising seams is a simple technique used to give a bit of extra oomph to a seam, whether it's to the shoulders on knit tops to stop them stretching out, or the neckline on your Afternoon Blouse to help it keep it's shape. It only takes a few extra steps and is totally worth the effort.

You can use almost anything with a bit of strength to stabilise your seams. Twill tape or ribbon work just fine, but if you're using a really light weight fabric you'll want to minimise seam bulk, so try using an interfaced bias strip of the same fabric or if you're feeling fancy, a bias strip of silk organza.

Note - Using a bias strip is best if you are trying to stabilise a curved seam as it will bend and curve with your seam.

There are two ways you can sew your stabilising strip onto your garment. You can either sew it directly onto the seam line (Picture 1 & 2) or you can sew it as close as you can get it to the seam line but within the seam allowance (Picture 3 & 4). They both have their place, but for the Afternoon Blouse, you'll want to sew it onto your seam allowance and not into your seam. This will ensure you have a lovely delicate but stabilised neckline, without the bulk.


Picture 1 & 2 - Place your stabilising strip right on top of your seam line, and sew in place.


Picture 3 & 4 - Place your stabilising strip as close to the seam line as you can get, within the seam allowance, and sew in place.

Note - I've used a small width twill tape in the pictures above to illustrate where you should place your stabilising strip but it's totally up to you how wide your strip is. For the Afternoon Blouse, since you'll be sewing it into your seam allowance, I would go with a strip that is just under the seam allowance width or smaller.

Another way you could think about stabilising your neckline is to add piping to it as Melissa did - the piping essentially works as a decorative form of seam stabilisation. However, do be careful with the type of piping fabric you use here, as it can add a lot of extra bulk. If you think you might want to give piping a go, I have a tutorial on making and inserting inseam piping here.

I personally don't think there is any need to stabilise the neckline on your Afternoon Blouse if you're using a sturdier fabric like cotton voile or lawn as they should hold their shape just fine, but feel free to do this if you feel your fabric is especially lightweight, or if you just want to see what all the fuss is about.

xx
J

Auto Post Signature

Auto Post  Signature