Image Slider

Interfacing all the things (or not!!) - The Willa Wrap Coat Sew Along

Tuesday, February 2, 2021


Before we even get to interfacing anything on our Willa Wrap Coats, my main piece of advice right now is to work with your fabric!  Case in point - it turns out, my fabric is incredibly thick.  Much, much thicker than I thought it was going to be.


It was purchased from the same place as Kyla's cream coat, is almost the same composition and had the exact same description, so, I just assumed I was getting the same fabric, but in a different colour. WRONG!


As I was pressing my fabric prior to cutting, I could tell straight away that it was heavier and thicker than the fabric I used for Kyla's coat. And when it came to cutting out the pattern pieces, that was a job all in itself. I got a callous and a bruise on my thumb and fingers where the scissor handles dug into my hand as I was cutting and my hand was solidly achy for several days. That's how thick my fabric was. 


I initially wondered whether I should get a different, lighter fabric, to work with, but instead, it actually turned out to be a blessing for this Sew Along. It's given me the opportunity to show you how to 'follow the instructions' for sewing, while also making allowances for the fabric you are using. So I hope, if you've also chosen a fabric that is challenging for you, that you can see you have permission to work with it however you need too, without always following the rules (just bending them a bit to fit your fabric's will).


So, the first thing to say is, I only interfaced the hems of the outer coat and sleeves on my Sew Along coat. I opted to leave off the interfacing for the Front and Back Facings as well as the belt, as it was just going to add too much unnecessary thickness in these areas, and my fabric was doing just fine without any of this additional hold.  


However, if you have a really light fabric, like a mammoth flannel, you may choose to not only interface all of the pieces suggested in the instructions, but also the Front Outer Coat piece itself. This will give you extra hold around the collar, helping it to stay in place and look neat during wear. Use The Front Facing piece as a pattern for your interfacing here. It's not exact, but it will give you a good approximation as you can see below:


And, make sure you do a quick test of your interfacing on a scrap of fabric before you begin! Just to make sure the interfacing doesn't somehow mess up your nice fabric.


Right, grab your press cloth, turn on your iron and lets go!


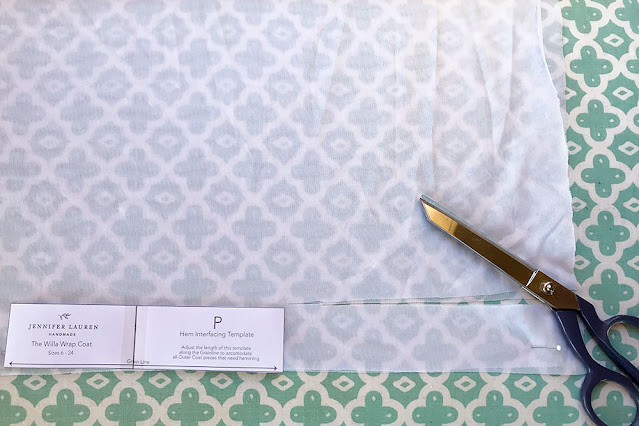
Cutting out your Hem Interfacing (Pattern piece P)


Why interface the hems? The interfacing template is the width of the hem allowance on the outer coat, and the reason why it's a good idea to interface your hems on a coat like Willa is because there isn't a line of stitching holding your hem in place. Interfacing gives the hem a stronger hold when pressed up, so that it's not as tempted to sag down when worn. For Willa, we still give our hems a little help with sagging by sewing seam allowances together (more on that later!) but interfacing just adds a little extra oomph.


The hem pattern piece included is a template to get the right thickness for your hems, not individual hem pieces for each section of coat that needs them (because wow, that would be A LOT of unnecessary pattern pieces...).  


I fold my length of interfacing in half, and then cut long strips that is the template's width, and then cut each strip to size as I'm pressing my interfacing in place...


Attaching Interfacing


Below shows how I interfaced the sleeve on Kyla's cream coat. 


Lay your strip of interfacing down on your fabric along the hem - the fabric should be wrong side up and the interfacing should be glue side down. Trim the length of your interfacing strip to suit the hem you're interfacing.


Pop your press cloth gently on top, being careful not to move your interfacing. Then using your iron, press down firmly. Don't move your iron around too much at the start, as that can move your interfacing around underneath your press cloth before the glue has had a chance to melt and bond to your fabric.


Pull your press cloth gently off after a few minutes and voila! Interfaced hems.


To get the right shape interfacing for the front corner of the Front Outer Coat, simply cut your interfacing strip to the correct length, then trim out the little up-step on the front corner.


You can now press up your hem - this is good for your fabric's memory (especially if you have a thick fabric!). Even though your hem is gently folded back down for construction, giving it a good press now means you'll have an easier time with hemming when we get to it.


Interface the hems of all the Outer Coat pattern pieces as well as the sleeves.


And that's us all interfaced! Yay! Tomorrow we start assemble our coat belt and hang/belt loops if you're choosing to use them.


You can purchase your Willa Wrap Coat Sewing Pattern here.


xx

J

Broad or Narrow Shoulder Adjustment - The Willa Wrap Coat Sew Along

Saturday, January 30, 2021


Today's post is the final pattern adjustment for the Willa Wrap Coat that we'll be doing before we finally start sewing next week!


How much to adjust by...


Where your arm and shoulder are connected (to find this, lift your arm up and down, you'll feel where the movement is happening) is where you want the top of the sleeve cap/end of the shoulder line to be sitting. If the shoulder is sitting too far down into the sleeve, you'll want to perform a Narrow Shoulder Adjustment to bring that back up. If the sleeve is pulling up, into your shoulder, you'll want to perform a Broad Shoulder Adjustment, to bring the sleeve back down.


Making a toile and measuring where the end shoulder line sits on you will give you a good idea whether you need to adjust this at all, OR by how much.  Before you do anything though, make sure you check out the Additional Finished Garment Measurements included with your Willa Wrap Coat. Compare Measurement G - across the back shoulders - to a coat you have that you already like the fit of (or that you know you want to adjust) and go from there. This will give you a good idea whether you'll want to make any adjustments here before you even make your toile. 


You'll Need:


  • Your front and back Willa Wrap Coat pieces (both the outer and lining pieces)
  • Ruler
  • Tape, scissors and spare paper


Steps: 


1. Draw in seam allowances along the shoulder line and the upper portion of your armscye, noted as the red dotted line below. 

Mark approximately the centre of the seam allowance along the shoulder line (make sure it's the seam allowance, not the outer edge of the shoulder you're marking!), noted by the solid red line below.


2. Draw in 2 lines. Line A runs from approximately the centre of the armscye to the solid red line marked above, and Line B runs from the top corner down to Line A.


3. Cut along Line A from the top shoulder down, leaving a pivot point at the seam allowance circled below (trim into the seam allowance toward the pivot point to open this up).


4. Cut along Line B, from Line A, leaving a pivot point at the corner, circled below (trim into the seam allowance toward the pivot point to open this up).


Narrow Shoulder Adjustment


1. To perform a Narrow Shoulder Adjustment, move Line A in toward the centre of the coat, overlapping with the main pattern piece. You want to shorten the shoulder line by the amount you deemed necessary at the start of this tutorial - this is indicated by the red line below.


2. Open up Line B and swing the top of the pattern piece up, in line with the remaining shoulder line on your main pattern piece. Tape in place. True up any outer edges and tape some spare paper underneath to fill in any gaps.


3. Repeat this adjustment for the back shoulder as well as all lining pieces.


Broad Shoulder Adjustment


1. To perform a Broad Shoulder Adjustment, move Line A out toward the side of the coat. You want to lengthen the shoulder line by the amount you deemed necessary at the start of this tutorial - this is indicated by the red line below. ,You will need to pop some spare paper underneath to fill in the gap.


2. Bring the top of the shoulder line down and overlap Line B to match up with the shoulder line on your main pattern piece. Tape in place.


3. True up any edges and repeat this adjustment for the back shoulder as well as all lining pieces.


See you for some sewing next week! You can purchase your Willa Wrap Coat Sewing Pattern here.


xx

J

Forward or Backward Shoulder Adjustment - The Willa Wrap Coat Sew Along

Friday, January 29, 2021


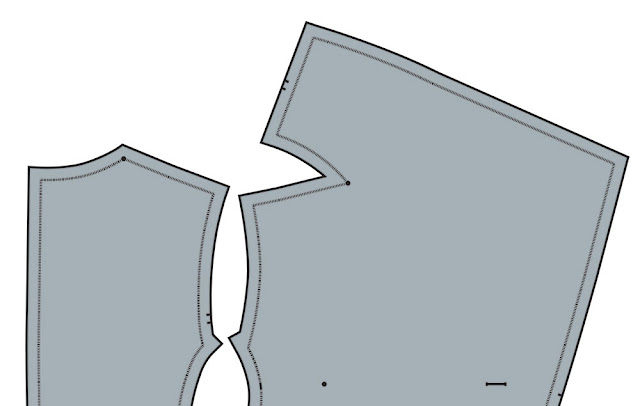
Performing a forward or backward shoulder adjustment on Willa may seem like it's going to be hard because of the grown-on collar, but it's actually as just straightforward as for any pattern in my opinion. The key is making sure you keep track of the neckline dots on the pattern - but first, let's figure out how much of an adjustment you need...


How much to adjust by...


Hello toile! Have I hammered in how important making a toile is? This is your key piece of kit when trying to figure out if you need this (or any!) adjustments. Pop it on and standing straight, have a look at the shoulder seam. It should be sitting straight out from your neck, along your shoulder line, to the top of the sleeve head. If it is sitting to either side of the top of your shoulder line (either towards the back or towards the front), you will want to perform a forward or backward shoulder adjustment. 


Along the end of the shoulder seam (around the top of the armscye) measure how much your seam is sitting off the top and use that measurement to see how much of an adjustment you'll need.


A Forward shoulder adjustment will be a more common adjustment to make as our 21st century lifestyle's have us hunched over computers/car steering wheels/phones etc more often than not, making our shoulders sit forward rather than straight. 


Note: this tutorial shows a Forward Shoulder Adjustment, for a Backward Shoulder Adjustment, do the opposite. 


You'll need:


  • Your front and back Willa Wrap Coat pieces (both the outer and lining pieces)
  • Ruler
  • Tape, scissors and spare paper


Steps:


1. The first thing I recommend you do before doing any shoulder adjustments is to draw in your seam allowances. You don't need to do them around the whole pattern piece as they are here, just around the shoulder/back neckline is fine.


2. Depending on the adjustment you're doing, you'll either be moving your shoulder seam forward (for a Forward Adjustment) or backward (for a Backward Adjustment). 

Below, I'm showing you the newly drawn seams for a forward shoulder adjustment - starting at the inner marked shoulder notch and wedging out. You are removing the wedge from the front shoulder and adding it to the back. Do the opposite for a Backward Shoulder Adjustment.


3. Before you cut into your pattern to make your adjustments, I suggest removing the seam allowances along both the front and back shoulder seams and the back neckline on the front coat pattern piece as the shapes of these will change depending on how dramatic your adjustment is.


4. Remove the wedge from the front coat shoulder, and add it to the back shoulder.


5. Your back shoulder will now need to be trued up. Once this is done, you can add your seam allowances back in on both the front and back shoulders (and the front 'back' neckline).


6. Don't forget to do the same adjustment on your lining pieces! The back lining/facing is in pink below and the front lining/facing is in gold.


7. Tape your lining pattern pieces together, matching up shoulder seams and repeat the steps above.


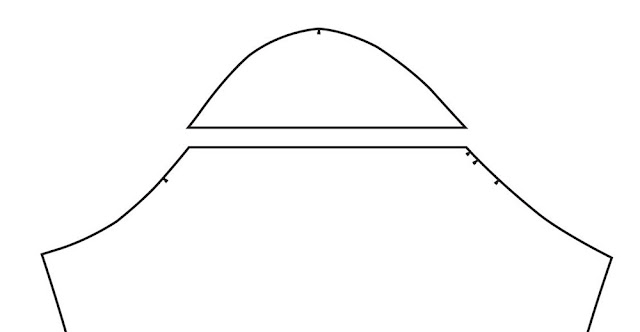
7. The last thing to consider is whether you need to adjust your sleeve cap. If you've only made a small adjustment (approx 1cm at the shoulder line max) then you can probably leave the sleeve as is. If you've made a larger adjustment, I'd recommend moving the sleeve cap over so that it sits as comfortably into the armscye as possible, giving you maximum movement.


Cut a straight line along your sleeve cap (I do this above the notches).


8. Move the cap over by the same amount you adjusted your shoulder line by - move the cap to the left (as below) for a forward shoulder adjustment, or to the right for a backward shoulder adjustment.
 
9. True up your sleeve cap seams.


You can purchase your Willa Wrap Coat Pattern here.


xx

J

Small & Full Bust Adjustment on a Dior Dart - The Willa Wrap Coat Sew Along

Thursday, January 28, 2021


It's bust adjustment day here at the Willa Coat Sew Along


But before we talk about how we do a small and full bust adjustment on the Willa Wrap Coat, let's talk about what a Dior Dart is...


What is a Dior Dart? AKA a Darted Princess Seam


Willa doesn't have a true princess seam - true princess seams run down over the top of the apex of the bust, or at least, very close to it. Willa's 'princess seam' runs more toward the side of the bust, with a dart sharing the shaping at the side of the centre front panel. This dart is called a Dior Dart.


This type of shaping is great for thick fabrics, as it shares the shaping load across the dart and the side panel seam, meaning any potential bulk is shared out over a few places, rather than just one.


I chose to call the way Willa was shaped as a 'darted princess seam' because everyone knows what a dart is, and everyone knows what a princess seam is. Where as 'Dior Dart' isn't a very common place name. Apparently this type of dart shaping originated with Christian Dior and it sounds like a great story to me, so, let's stick with it.


Performing a bust adjustment on a Dior Dart is pretty much the same as performing a normal one. And while you could rotate the dart to the shoulder, stick the whole pattern back together, do the bust adjustment, and then put the Dior dart and princess seam back again - and this would be the most accurate way to do it - that is not only time-consuming, but very fiddly. And any changes this makes to the side panel is extremely minimal.


Also, because you'll be doing a bust adjustment on a pattern that already has bust cups included, the adjustments you'll be doing are hopefully going to be small enough, that any changes to the side front panel will be essentially non-existant, especially in a style like Willa. So, I opt to just perform the bust adjustment on the centre front coat, and add/remove the necessary bust fabric at the Dior dart, ignoring any adjustment of the side front panel. 


Which brings me too...


Do You Need a Bust Adjustment?


Remember, Willa does come with multiple bust cups, A to F! So, before you dive in, take a few minutes to see if you really need one.


Keep in mind that I have integrated 2 cups per front bodice though, as Willa is a relaxed wrap style around the front, meaning it's much easier to fit than a regular tailored coat. 


There are 2 cup fronts per pattern set - A+B and C+D in the Original sizings and C+D and E+F in the Curve sizings. This does mean that if you fall into the smaller cup, there may be a touch more fullness at the bust, but again, this is really not noticeable due to the way the coat fits.


Measuring for a Bust Adjustment


If you sit to either side of my size guides in the available cups, you may decide that you need to perform a bust adjustment. Because I already provide you with several cup size options, start with the pattern pieces that sit the closest to your current measurements. This way, you won't need to do a massive adjustment like you may have needed too if the current cups weren't provided.


To work out what cup size you are, take the difference between your Full Bust circumference Measurement and your High Bust circumference measurement. Compare this difference to the cup measurement tables here.


  • Measuring for a Small Bust Adjustment AKA SBA


If you need to perform an SBA, I'm assuming here that your bust is smaller than an A cup in the Original sizes - the difference in the High Bust and Full Bust for an A cup is 1cm(3/8")  in my patterns OR you're smaller than a C cup in the Curve sizes - the difference in the High Bust and Full Bust for a C cup is 5cm (2").


Original Sizes example: If both your full and high bust measure 84cm (33 1/8"), you have a difference of 0cm/". If you start with the size 10 A+B cup pattern pieces, you can opt to perform a 1cm (3/8") to 3cm (1 1/4") SBA.


Curve Sizes example: If your full bust measures 102cm (40 1/8") and your High bust measures 99cm (39") you have a difference of 3cm (1 1/4") which puts you at a B cup. Using the size 16 C+D cup bodice, you can perform a 2cm (3/4") SBA, since the C cup has a difference of 5cm (2"), you only need to remove 2cm (3/4") to get to the 3cm (1 1/4") B cup difference.


  • Measuring for a Full Bust Adjustment AKA FBA


If you need to perform an FBA, I'm assuming here that your bust is larger than an D cup in the Original sizes - the difference in the High Bust and Full Bust for an D cup is 7.5cm (3")  in my patterns OR you're larger than a F cup in the Curve sizes - the difference in the High Bust and Full Bust for a F cup is 12.5cm (4 7/8").


Original Sizes example: If your full bust measures 104cm (41") and high bust measures 94cm (37"), you have a difference of 10cm (4") - which is an E cup in my patterns. If you start with the size 14 C+D cup pattern pieces, you can  perform a 2.5cm (1") FBA.


Curve Sizes example: If your full bust measures 139cm (54 3/4") and your High bust measures 124cm (48 7/8") you have a difference of 15cm (5 7/8") which would put you at approximately a G cup in my patterns. Using the size 26 E+F cup bodice, you can perform a 2.5cm (1") FBA.


You'll Need:

  • Your Willa Coat Front Coat Piece (A) and lining pieces for the initial adjustment (you will need to adjust the length on the rest of the coat bodice pieces though) 

  • Measuring tape & scissors

  • Ruler/pen/sticky tape


Steps:


1. Take your Front Coat pattern piece (A) and draw in the seam allowance for the armscye (you can draw in the full seam allowance OR just a little piece approximately at the centre). Do the same for the Front Lining piece (G). 


2. Draw in 3 lines. Line A runs straight up from the bottom hem of the coat to the tip of the dart. Line B runs from the tip of the dart to approximately the centre of the armscye and Line C runs from the centre of the dart to the tip. 

Note: From here on out, I will only show the adjustment being done on the Front Coat piece (A), BUT you will need to perform the exact same adjustment on the Front Lining piece (G).


3. Cut up line A pivoting into Line B, and stopping at the seam allowance line marked in step 1. From the outside, snip into the seam allowance up to line B, leaving a pivot point.


4. From the outside in, cut along Line C, leaving a pivot point at the tip of the dart. You are now ready to perform either a Small Bust Adjustment (SBA) or a Full Bust Adjustment (FBA).


Small Bust Adjustment (SBA)


1. Using the SBA measurement you got earlier (lets use 1cm for this example), draw a line 1cm to the right of what was Line A on the centre front side of your pattern piece - dashed line in red below. The arrow is indicating the 1cm gap.


2. Swing the left portions of the pattern into the centre of the pattern piece, lining up the tip of the dart with the red dashed line.


3. Swing the bottom left portion of the pattern back up, so that it lines up straight with the dashed line. Tape in place.


4. Depending on how big your SBA was, you may find that your dart either now no longer exists OR is very tiny. This is common if you have a cup size smaller than an A cup, and is just part of adapting clothes to fit your body.

If your dart is very tiny, it may be better to ease that small amount of fullness into the side front panel when it's attached. And if your dart no longer exists, there is still a small amount of shaping in the princess seam. If you really want to Dior Dart, you can play around with adding in a faux seam to get the same finished look.


5. True up the length of the centre front panel by drawing a line at the bottom hem. Cut along this line and bring up the bottom so it is in-line with the side. Tape in place.


You will need to adjust the bottom hem length of all the remaining 'bodice' coat pieces, including the linings/facings.


You also need to will then need to taper out at the waist/hip by the same amount you performed your bust adjustment, to correct the original waist/hip measurements. Depending on how big your bust adjustment was, you can disperse this across the 'princess' seam and the side seam if you want too. 


Adjust pocket placements back to their original markings (unless you're moving them for personal preference).


Full Bust Adjustment (FBA)


1. Place some scrap paper underneath your pattern piece. Then, using the FBA measurement you got earlier (lets use 2.5cm for this example), draw a line on your scrap paper, 2.5cm away from the left of what was Line A on the centre front side of your pattern piece - dashed line below. The arrow is indicating the 2.5cm gap.

Swing the left portions of the pattern out to the left of the pattern piece, lining up the tip of the dart with the dashed line.


2. Swing the bottom left portion of the pattern down, so that it lines up straight with the dashed line. Tape in place.


3. True up the length of the centre front panel by drawing a line at the bottom hem. Cut along this line and bring the bottom down so it is in-line with the side. Tape in place.


4. Re-draw in outer dart end and bottom hem/front corner.

You will need to adjust the bottom hem length of all the remaining 'bodice' coat pieces, including the linings/facings.


You also need to will then need to taper in at the waist/hip by the same amount you performed your bust adjustment, to correct the original waist/hip measurements. Depending on how big your bust adjustment was, you can disperse this across the 'princess' seam and the side seam if you want too. 


Adjust pocket placements back to their original markings (unless you're moving them for personal preference).


Remember to perform the bust adjustment on your Front Lining piece (G) as well!! 


You can purchase your Willa Wrap Coat pattern here.


xx

J

Auto Post Signature

Auto Post  Signature