Image Slider

New Pattern Release - The Laneway Dress (with B, C & D cups included!).

Wednesday, June 7, 2017


The Laneway Dress blends comfort, whimsy and the unexpected into one perfectly tailored dress.


The Details

With a sleek yet easy to wear 1940s A-line silhouette, Laneway will be your go-to dress for everyday adventures and beyond.

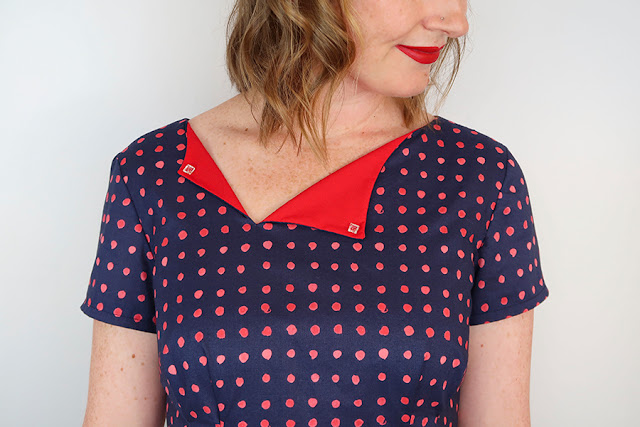
Double open-ended darts shape the waist and bust for a flattering fit and the distinctive asymmetrical or centred collar is built into the facing of the bodice, meaning no extra pattern pieces or tricky construction techniques are required.

With B, C & D cups included as well as clever inset pockets and a graceful V back neckline, Laneway is a perfect project for intermediate seamstresses. 


Laneway comes with your choice of an asymmetrical or centred collar. Secure with buttons, invisible hand stitches or your favourite brooch. 

Multiple cup sizes you say?

Yes! Laneway includes front bodice pieces for B, C & D cups as well as fitting advice and instructions on how to choose the correct size for a personalised fit. No more bust adjustments, yay!

Skill Level

Laneway is aimed at intermediate seamstresses, though if you have a few woven garments under your belt and want to dive right in, then this might just be the dress for you.

Set-in sleeves, zip insertion, integrated collar facings and inset pockets are all techniques you will learn with the Laneway Dress.


The Bonus Classic Neckline Pattern

Laneway is the perfect everyday dress, but sometimes having a distinctive collar might not be what you're after.

Included with your original Laneway Dress pattern is the bonus Classic Neckline pattern.

The classic Laneway Dress is constructed in exactly the same way as the original except there is no collar in sight, just a perfectly shaped neckline dipping just below your collar bone. 


 Included with your Laneway Dress pattern is the BONUS Classic Neckline Version. 

Your Laneway Pattern

You can purchase your Laneway Dress right here and have it delivered instantly to your inbox. You will receive an email with links to download either the easy-to-assemble A4/Letter version or the A0/Print Shop version (or both! Why not?).


I love seeing your makes and would love it if you tagged me on Instagram or used the hashtag #Lanewaydress .

Will you be making a Laneway any time soon?

xx
J

PS) The Laneway Dress can be made in many of your favourite woven fabrics. The samples above were made in a range of fabrics - 

Navy & Spots (from Miss Maude) - Cotton Lawn
Flamingos (sold out - from Miss Maude) - Cotton Chambray
Maroon - Robert Kaufman Cotton Mammoth Flannel


Shop Patterns     .     Instagram     .     Newsletter      .     Facebook    .     Pinterest    .    Podcast

The Juniper Cardigan Sew Along - Attaching the Sleeves

Friday, June 2, 2017

Attaching the sleeves and forming the saddle shoulder line is the main feature of the Juniper Cardigan. I promise it's not difficult to get a nice curve along the shoulder line, but being able to sit back, relax and take your time with it will make all the difference. Once the sleeves are in, it's pretty much smooth sewing from here on out.

I should mention that this whole sew along is being done on my sewing machine, that's right, you do not need an overlocker to sew with knits (contrary to what you might think!). If you want to know how to sew with knits on your sewing machine, check out my post here for everything you need to know!

You'll need:
  • Either your long or 3/4 Juniper sleeve pieces
  • Bodice pieces - both front and back
  • Sewing machine & thread 
Note: it really doesn't matter which order you attach your sleeves. In the instructions that come with Juniper, the fronts are attached first, but today, I'm showing you the back first.

Steps:
1. Right sides together, match your back bodice armscye/shoulder line to the back section of your sleeve armscye/shoulder line.

There are multiple notches along this section of the bodice and sleeve to help you line up this seam accurately. Pin in place.


Note: the angle of the notch on the back neckline of the bodice matches to the angle of the corner of the sleeve shoulder - it's just another extra check for you to make sure you have your sleeve matched up correctly.


2. Stitch in place, easing the sleeve in where necessary around the armscye.


When you get to the end of the shoulder line, continue following what would be the shoulder line (the blue line on the photo below), as opposed to pivoting your cardigan down into the neckline. This will ensure you stitch right into the corner of the sleeve. 


3. Finish edges (if you want to), notch curves and press the seam allowance using a tailor's ham or sleeve roll to the sleeve side.


Note: when you press your seam allowances up, this is where it will become apparent why you needed to stitch into the corner of the sleeve by following the 'imaginary' shoulder line. Below, you can see that the seam allowance, once pressed up, will match perfectly to your back neckline, giving you a smooth line to attach your neckband to later on.


4. Repeat the above steps on the front bodice and sleeve armscye - matching notches, easing the sleeve armscye into the bodice armscye and attaching the shoulder with a smooth line.

Note: There is no tricky sleeve corner to stitch into this time!


Repeat the above steps for the second sleeve and you're done. What a pretty shoulder line you have there...

See you next time for some shoulder stabilisation and side seam stitching action.

xx
J
Shop Patterns     .     Instagram     .     Newsletter      .     Facebook    .     Pinterest    .    Podcast

The Laneway Dress - New Pattern Coming Soon...

Tuesday, May 30, 2017

If you like pretty necklines, pockets, sleeves and 40s skirts, then you might be happy to hear that my soon-to-be released pattern, The Laneway Dress, includes all of these things and more...

I'm really excited to announce that for the first time, I'm offering multiple bust cup sizes within one pattern. Yes! Laneway comes with pattern pieces for B, C & D cup busts and a bonus neckline option to make the dress even more versatile.

Summer, here we come.

If you'd like to have access to the subscriber-only discount, as well as being one of the first to have access to The Laneway Dress, you might want to sign up to the newsletter here.

Talk soon,

xx
J
Shop Patterns     .     Instagram     .     Newsletter      .     Facebook    .     Pinterest    .    Podcast

The Juniper Cardigan Sew Along - Assembling the Neckband

Sunday, May 28, 2017

Yay, today we are sewing!! Let's assemble some Juniper Cardigan neckbands, shall we? If you need to brush up on your 'sewing with knits' skills, check out my blog post all about how to sew with knits here.

You'll need:
  • Your Juniper Cardigan neckband pieces (either the long line or cropped version, which ever you're making).
  • Interfacing pieces
  • Sewing machine with needle & thread
  • Iron

Steps:
1. Interface the wrong side of both neckband pieces, starting at the bottom of each neckline piece and matching notches.

Note: Always test your interfacing on a scrap of fabric first! If you're not sure about knit interfacing, check out this post.

2. Right sides together, matching double centre back notches, stitch neckline pieces together. Press seam open and trim down seam allowances.


3. At each end of your neckband piece (the interfaced ends), right sides together, fold in half and stitch down. Trim down seam allowances and notch corners.


4. Turn neckband out to the right side, gently poking out the bottom corners. Press.

5. Press the entire neckband piece in half, wrong sides together, matching notches.


Next up, attaching those sleeves!

xx
J
Shop Patterns     .     Instagram     .     Newsletter      .     Facebook    .     Pinterest    .    Podcast

Me Made May - Win with SewBox!!

Wednesday, May 24, 2017

The second official competition for Me Made May is now live over on Zoe's blog, and it's amazing!

Sewbox.co.uk is offering entrants a £50 voucher that you can spend on anything you'd like in her shop! Zoe has already picked out a beautiful Liberty fabric that she's been eyeing up, and I'm definitely following suit...


If you'd like to enter, head on over to Zoe's blog and let us know what you would choose if you won! The competition is open world-wide and closes at midnight 28th May GMT.

xx
J
Shop Patterns     .     Instagram     .     Newsletter      .     Facebook    .     Pinterest    .    Podcast

The Juniper Cardigan Sew Along - How to Make a Hip-Length Variation

Monday, May 22, 2017

Another simple adjustment to make to the Juniper Cardigan is to turn it into a hip length cardigan if that's more your style.

You'll need your long line bodice pattern pieces (we'll be adjusting the length of those for this tutorial) and it's helpful to have a long line cardigan already made up to get a better idea of where you want your final hip version to sit, but it's not necessary.

Please remember, all adjustments are made without the seam allowance!

You'll need:
  • Your Juniper Cardigan long line bodice pattern pieces (both front and back) & the hip band pattern piece
  • A ruler/tape measure/french curve
  • Pens and paper
  • Cellotape
  • Optional - an already made long line Juniper Cardigan
Steps:

1. First you'll need to decide where you want your finished cardigan to sit. If you already have a long line Juniper made up, you can pop it on and play around with the length then place a pin or make a mark at the side seam when you're happy. If you don't have a cardigan to try on, you can try the pattern paper up against you or measure the side seam of another cardigan you like the length of to get an approximate finished length.

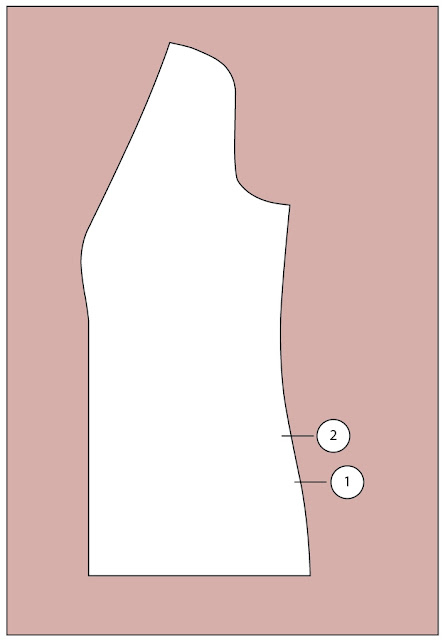
2. Once you know your finished length, transfer this mark to the side seam of your front bodice pattern piece - (1) on the diagram below.

You'll then need to account for the band that runs around the bottom of the cardigan. This band has a finished width of 5cm, so you'll need to measure up 5cm from mark (1) and place another pin there - (2) on the diagram below. This will be your cutting line.


3. Draw a line straight across and trim off the bottom. Repeat for the back bodice piece.


4. Depending on how far up you are ending your cardigan, you may need to slightly true-up the bottom of your side seam using a french curve for a smooth line (marked in red below).


5. The last thing you'll need to do is adjust the length of the bottom cardigan band.

You'll see on the band that there are notches along it, these match up to the side seams on your original cardigan. Measure the new hip seam line length for both the front and back of the cardigan, and remove the excess from each end of your Hip Band pattern piece.


6. Replace all seam allowances and you're ready to get sewing!

Note - if you want a more fitted hip (and to help prevent any drooping in this area over time) you may want to take a little extra length off the hip band. You can experiment with this, but 5mm-1cm on each side might be a good starting point. If you do this, you will need to ease your band evenly into your cardigan when attaching, but you will end up with a lovely fitted hip area.

Let me know if you have any questions about this adjustment, otherwise, see you at the end of the week when we'll finally get some sewing done!

xx
J
Shop Patterns     .     Instagram     .     Newsletter      .     Facebook    .     Pinterest    .    Podcast

Me Made May Week 1 PLUS Win with Miss Maude

Sunday, May 7, 2017
Hello,

Wow, week one of Me Made May is done - I've been checking out the hashtag on instagram regularly and gosh, there are some inspiring hand mades out there.

The competition is now closed. Thank you!!

Today, as a little motivation to inspire you even more throughout the month, I have the absolute honour of hosting the first Me Made May prize pack which is... I just... you guys, this prize is amazing!!

Emma at Miss Maude is sponsoring an amazing prize of two metres of fabric and one pattern of the winners choice from her store PLUS she's going to be throwing in a surprise haberdashery piece, and goodness, there are so many wonderful things you might be lucky enough to receive.

To enter, head on over to Miss Maude and let us know in the comments on this post which pattern and/or fabric you'd choose if you won! 

I've recently purchased two fabrics from Miss Maude (Sun Spots and Flamingos), and they are stunning - Emma has such an eye for curating fabrics, patterns and haberdashery. If you haven't yet looked at her wares, make sure you set aside a bit of time, you'll be there for quite a while...

The competition is open world wide and closes 8pm Sunday 14th May NZDT.


 Images above are courtesy of Miss Maude.

My recent Miss Maude order, Sun Spots & Flamingos - Laneway Dresses, here I come!

In regards to my personal challenge, as expected, I haven't quite been keeping up with the daily photos. Honestly, I think it's something that I just don't enjoy all that much any more. I love looking back at them, but taking them? Nope.

So, I'm not going to stress this part of my challenge. I still wear hand mades on a daily basis anyway, but I think I'll probably only take the odd photo when I feel like it. My knitting on the other hand, that's going great guns :)

If you'd like to see some of my me-mades, you check them out on instagram.

How have you been finding sticking to your challenge so far?

xx
J
Shop Patterns     .     Instagram     .     Newsletter      .     Facebook    .     Pinterest    .    Podcast

Auto Post Signature

Auto Post  Signature